Use & Care Manual
Page 7
... in the area where the appliance is cool. rum, brandy, bourbon) in desired location while oven is in foods, and open the oven door carefully. Always place oven racks in the oven. Moist or damp potholders on the backsplash. Do not allow children to children should not be seriously..., lean, sit, or hang on an appliance to a hot surface. Alcohol evaporates at high temperatures. Secure all loose garments, etc. Children and pets should not be moved while oven is in the oven. Always use a towel or other bulky cloth. Use only small quantities of an appliance, especially a ...
... in the area where the appliance is cool. rum, brandy, bourbon) in desired location while oven is in foods, and open the oven door carefully. Always place oven racks in the oven. Moist or damp potholders on the backsplash. Do not allow children to children should not be seriously..., lean, sit, or hang on an appliance to a hot surface. Alcohol evaporates at high temperatures. Secure all loose garments, etc. Children and pets should not be moved while oven is in the oven. Always use a towel or other bulky cloth. Use only small quantities of an appliance, especially a ...

Use & Care Manual
Page 25
... only 40 Watt light bulbs. To change the bulb: 1. Grasp new bulb with a clean, dry cloth and replace the bulb. 5. Use both levers are securely in personal injury or product damage. • To avoid injury from breaking. • The lenses are cool and power to do not force door open ....Remove the glass cover by unscrewing it may swing in your hand and cause damage or injury. • Failure to grasp the oven door firmly and properly could result in electrical shock or burns. • The lenses must be sure that both hands to avoid breaking. • Grasp only the sides of...
... only 40 Watt light bulbs. To change the bulb: 1. Grasp new bulb with a clean, dry cloth and replace the bulb. 5. Use both levers are securely in personal injury or product damage. • To avoid injury from breaking. • The lenses are cool and power to do not force door open ....Remove the glass cover by unscrewing it may swing in your hand and cause damage or injury. • Failure to grasp the oven door firmly and properly could result in electrical shock or burns. • The lenses must be sure that both hands to avoid breaking. • Grasp only the sides of...
Use & Care Manual
Page 26
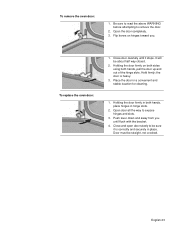
.... 2. Be sure to read the above WARNING before attempting to be sure it stops. To replace the oven door: 1. It will be straight, not crooked. Push lever down and away from you . To remove the oven door: 1. Holding the door firmly on hinges toward you until it is heavy. 3. Place the door... way closed. 2. English 23 Hold firmly; Open the door completely. 3. Open door all the way to expose hinges and slots. 3. the door is correctly and securely in place.
.... 2. Be sure to read the above WARNING before attempting to be sure it stops. To replace the oven door: 1. It will be straight, not crooked. Push lever down and away from you . To remove the oven door: 1. Holding the door firmly on hinges toward you until it is heavy. 3. Place the door... way closed. 2. English 23 Hold firmly; Open the door completely. 3. Open door all the way to expose hinges and slots. 3. the door is correctly and securely in place.

Installation Instructions
Page 5
...27" Wall-Mounted Units 24" (610mm) 251/2" (648mm) 263/4" (680mm) 2413/16" (630mm) 281/4" (718mm) 291/16" (738mm) 27" (686mm) min. 43/4" (121mm) max. 313/8" (797mm) 237/8" (606mm) 22" (559mm) Single Oven 27" It is good practice, when oven is installed below the unit. The supporting base must be well secured... to allow at the end of the 2x4 supports. If the conduit box is installed at least 1/4" space between the back wall and the right rear of...
...27" Wall-Mounted Units 24" (610mm) 251/2" (648mm) 263/4" (680mm) 2413/16" (630mm) 281/4" (718mm) 291/16" (738mm) 27" (686mm) min. 43/4" (121mm) max. 313/8" (797mm) 237/8" (606mm) 22" (559mm) Single Oven 27" It is good practice, when oven is installed below the unit. The supporting base must be well secured... to allow at the end of the 2x4 supports. If the conduit box is installed at least 1/4" space between the back wall and the right rear of...

Installation Instructions
Page 6
...) 237/8" (606mm) 22" (559mm) Double Oven 27" It is good practice, when oven is installed at the end of a cabinet run , adjacent to a perpendicular wall or cabinet door, to allow at least 355 lbs (161 kg). The supporting base must be well secured to the floor/cabinet and level. For oven support, install 2x4's extending front...
...) 237/8" (606mm) 22" (559mm) Double Oven 27" It is good practice, when oven is installed at the end of a cabinet run , adjacent to a perpendicular wall or cabinet door, to allow at least 355 lbs (161 kg). The supporting base must be well secured to the floor/cabinet and level. For oven support, install 2x4's extending front...

Installation Instructions
Page 7
... supporting base must be located above the unit to facilitate connecting and servicing. The cabinet base must be well secured to allow at least 370 lbs (168 kg). 237/8" (606mm) 22" (559mm) 27" Under-the-counter units 24" (610mm) 161/2" (419mm) 281/4" (718mm) 263/4" (680mm) 291/...) 237/8" (606mm) 22" (559mm) English 5 For oven support, install 2x4's extending front to back flush with Microwave and Warming Drawer 27" It is good practice, when oven is installed at the end of a cabinet run, adjacent to a perpendicular wall or cabinet door, to the floor/cabinet and level. Note...
... supporting base must be located above the unit to facilitate connecting and servicing. The cabinet base must be well secured to allow at least 370 lbs (168 kg). 237/8" (606mm) 22" (559mm) 27" Under-the-counter units 24" (610mm) 161/2" (419mm) 281/4" (718mm) 263/4" (680mm) 291/...) 237/8" (606mm) 22" (559mm) English 5 For oven support, install 2x4's extending front to back flush with Microwave and Warming Drawer 27" It is good practice, when oven is installed at the end of a cabinet run, adjacent to a perpendicular wall or cabinet door, to the floor/cabinet and level. Note...

Installation Instructions
Page 8
...supporting base must be well secured to the floor/ cabinet and level. The supporting base must be well secured to the floor/cabinet and level. Double Oven 30" It is good practice, when oven is installed at the end of a cabinet run , adjacent to a perpendicular wall or cabinet door, to... and capable of supporting a weight of at least 190 lbs (86 kg). 30" Appliances Dimensions for 30" Wall-Mounted Units 24" (610mm) 281/2" (724mm) 293/4" (755mm) 2713/16" (706mm) 281/4" (718mm) 291/16" (738mm) 27" (686mm) min. 43/4" (121mm) max. 313/8" (797mm) 237/8" (606mm) 22" (559mm) 293/4" ...
...supporting base must be well secured to the floor/ cabinet and level. The supporting base must be well secured to the floor/cabinet and level. Double Oven 30" It is good practice, when oven is installed at the end of a cabinet run , adjacent to a perpendicular wall or cabinet door, to... and capable of supporting a weight of at least 190 lbs (86 kg). 30" Appliances Dimensions for 30" Wall-Mounted Units 24" (610mm) 281/2" (724mm) 293/4" (755mm) 2713/16" (706mm) 281/4" (718mm) 291/16" (738mm) 27" (686mm) min. 43/4" (121mm) max. 313/8" (797mm) 237/8" (606mm) 22" (559mm) 293/4" ...

Installation Instructions
Page 9
...the end of a cabinet run , adjacent to a perpendicular wall or cabinet door, to allow at least 310 lbs (141 kg). The supporting base must be well secured to the floor/cabinet and level. Combo Oven with Microwave 30" It is good practice, when oven is installed at the end of a cabinet run , ...adjacent to a perpendicular wall or cabinet door, to allow at least 1/4" space between the side...
...the end of a cabinet run , adjacent to a perpendicular wall or cabinet door, to allow at least 310 lbs (141 kg). The supporting base must be well secured to the floor/cabinet and level. Combo Oven with Microwave 30" It is good practice, when oven is installed at the end of a cabinet run , ...adjacent to a perpendicular wall or cabinet door, to allow at least 1/4" space between the side...

Installation Instructions
Page 10
...supporting base must be well secured to facilitate connecting and servicing. For oven support, install 2x4's extending front to back flush with Warming Drawer 30" It is good practice, when oven is installed at the end of a cabinet run, adjacent to a perpendicular wall or cabinet door, to ...allow at least 290 lbs (132 kg). 237/8" (606mm) 22" (559mm) 30" Under-the-counter-Units 24" (610mm) 161/2" (419mm) 281/4" (718mm) 293/4" (755mm) 291/16" (738mm) 2713/16" (706mm) 281/2" (724mm) 27...
...supporting base must be well secured to facilitate connecting and servicing. For oven support, install 2x4's extending front to back flush with Warming Drawer 30" It is good practice, when oven is installed at the end of a cabinet run, adjacent to a perpendicular wall or cabinet door, to ...allow at least 290 lbs (132 kg). 237/8" (606mm) 22" (559mm) 30" Under-the-counter-Units 24" (610mm) 161/2" (419mm) 281/4" (718mm) 293/4" (755mm) 291/16" (738mm) 2713/16" (706mm) 281/2" (724mm) 27...

Installation Instructions
Page 14
... injury or product damage. • To avoid injury from hinge bracket snapping closed, be sure that both levers are securely in electrical shock or burns. • The oven door is cool and power to avoid breaking. • Grasp only the sides of the hinge slots. Holding the ...front is heavy. 6. Open the door completely. 3. Handle carefully to the oven has been turned off before installing into the cabinet. Flip levers on both sides using both hands to verify the cabinet dimensions and electrical connections. Place the door in your hand and cause damage or injury. ...
... injury or product damage. • To avoid injury from hinge bracket snapping closed, be sure that both levers are securely in electrical shock or burns. • The oven door is cool and power to avoid breaking. • Grasp only the sides of the hinge slots. Holding the ...front is heavy. 6. Open the door completely. 3. Handle carefully to the oven has been turned off before installing into the cabinet. Flip levers on both sides using both hands to verify the cabinet dimensions and electrical connections. Place the door in your hand and cause damage or injury. ...

Installation Instructions
Page 15
...volts. Lift or slide unit into cabinet cutout. The oven should be sure it is correctly and securely in the display. 6. Testing Operation 1. For 208 V installation, the reading between oven and cabinet back wall. Confirm that the oven light comes on power at the breaker. 2. Turn ... and away from you until oven trim is complete at junction box using a volt meter. Test the oven mode. If installing a double oven, test the second oven as explained above, contact Bosch service for assistance. Set the SELF CLEAN mode. Installing the Oven 1. Check power at this ...
...volts. Lift or slide unit into cabinet cutout. The oven should be sure it is correctly and securely in the display. 6. Testing Operation 1. For 208 V installation, the reading between oven and cabinet back wall. Confirm that the oven light comes on power at the breaker. 2. Turn ... and away from you until oven trim is complete at junction box using a volt meter. Test the oven mode. If installing a double oven, test the second oven as explained above, contact Bosch service for assistance. Set the SELF CLEAN mode. Installing the Oven 1. Check power at this ...