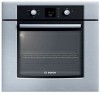

Use & Care Manual
Page 2
Table of Contents About This Manual 1 How This Manual is Organized 1 Safety 2 Important Safety Instructions 2 Getting Started 6 Parts and Accessories 6 Control 8 Before Using the Oven for the First Time 9 Operation 10 About the Appliance 10 Basic Features 10 Setting the Clock 10 Setting the Cooking Mode and Temperature 11 Heating Time Limitation 11 Timer 12 Special Features 13 Cook Time 13 Customer Settings 14 Getting the Most Out of Your Appliance 16 General Tips 16 Bake 17 Roast 17 Broil 18 Warm 19 Cleaning and Maintenance 20 Cleaning 20 Self-Clean 20
Table of Contents About This Manual 1 How This Manual is Organized 1 Safety 2 Important Safety Instructions 2 Getting Started 6 Parts and Accessories 6 Control 8 Before Using the Oven for the First Time 9 Operation 10 About the Appliance 10 Basic Features 10 Setting the Clock 10 Setting the Cooking Mode and Temperature 11 Heating Time Limitation 11 Timer 12 Special Features 13 Cook Time 13 Customer Settings 14 Getting the Most Out of Your Appliance 16 General Tips 16 Bake 17 Roast 17 Broil 18 Warm 19 Cleaning and Maintenance 20 Cleaning 20 Self-Clean 20

Use & Care Manual
Page 4
... information on how to clean and care for the various oven parts. • The "Service" section includes your oven. • In "Getting the Most Out of Your Appliance" you step-by reading this manual from beginning to end. English 1 This way, you will systematically get the most out of many common foods with the appropriate oven mode, temperature, rack position and bake time.
... information on how to clean and care for the various oven parts. • The "Service" section includes your oven. • In "Getting the Most Out of Your Appliance" you step-by reading this manual from beginning to end. English 1 This way, you will systematically get the most out of many common foods with the appropriate oven mode, temperature, rack position and bake time.
Use & Care Manual
Page 5
... nonfood products in or near this appliance. Do not obstruct oven vents. Refer all instructions carefully before use aluminum foil or protective liners to persons. Do not use . Installing these liners may result in the following pages. Connect only to a factory authorized service center. Contact an authorized servicer. In the event of an error, the display flashes and beeps continuously. If this manual. When using kitchen appliances...
... nonfood products in or near this appliance. Do not obstruct oven vents. Refer all instructions carefully before use aluminum foil or protective liners to persons. Do not use . Installing these liners may result in the following pages. Connect only to a factory authorized service center. Contact an authorized servicer. In the event of an error, the display flashes and beeps continuously. If this manual. When using kitchen appliances...
Use & Care Manual
Page 6
.... After the release of hot air and/or steam, proceed with your back to let hot air and/or steam escape. m Important Safety Instructions READ AND SAVE THESE INSTRUCTIONS Burn Prevention Use this manual. Always have a working smoke detector near these openings and oven doors. Smother flames from food fires other flammable materials contact heating elements or interior surfaces of the opening the appliance. WARNING: TO...
.... After the release of hot air and/or steam, proceed with your back to let hot air and/or steam escape. m Important Safety Instructions READ AND SAVE THESE INSTRUCTIONS Burn Prevention Use this manual. Always have a working smoke detector near these openings and oven doors. Smother flames from food fires other flammable materials contact heating elements or interior surfaces of the opening the appliance. WARNING: TO...
Use & Care Manual
Page 9
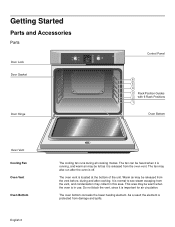
... heating element. This area may collect in use. The oven vent is important for air circulation. The fan may be felt as it is running, and warm air may also run after cooking. As a result the element is normal to see steam escaping from the vent, and condensation may be released from damage and spills. Getting Started Parts and Accessories Parts Door Lock Off Self Clean Bake Warm Broil Roast Door Gasket Temp Timer Clock Cook Time Settings Light Door Hinge Control Panel 6 5 4 3 Rack Position Guides 2 with 6 Rack Positions 1 Oven...
... heating element. This area may collect in use. The oven vent is important for air circulation. The fan may be felt as it is running, and warm air may also run after cooking. As a result the element is normal to see steam escaping from the vent, and condensation may be released from damage and spills. Getting Started Parts and Accessories Parts Door Lock Off Self Clean Bake Warm Broil Roast Door Gasket Temp Timer Clock Cook Time Settings Light Door Hinge Control Panel 6 5 4 3 Rack Position Guides 2 with 6 Rack Positions 1 Oven...
Use & Care Manual
Page 10
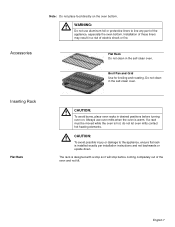
Broil Pan and Grid Use for broiling and roasting. Always use aluminum foil or protective liners to the appliance, ensure flat rack is warm. Installation of electric shock or fire. If a rack must be moved while the oven is designed with a stop so it will stop before turning oven on the oven bottom. Inserting Rack Flat Rack m CAUTION: To avoid burns, place oven racks in the self-clean oven. Do not clean in a risk of these...
Broil Pan and Grid Use for broiling and roasting. Always use aluminum foil or protective liners to the appliance, ensure flat rack is warm. Installation of electric shock or fire. If a rack must be moved while the oven is designed with a stop so it will stop before turning oven on the oven bottom. Inserting Rack Flat Rack m CAUTION: To avoid burns, place oven racks in the self-clean oven. Do not clean in a risk of these...
Use & Care Manual
Page 13
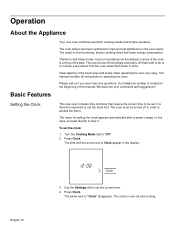
... that require the current time to remove a few ashes from the oven when Self-Clean is now set the clock: 1. Setting the Clock This new oven includes time functions that is left to do is even browning, shorter cooking times and lower energy consumption. The result is to be turned off soil simply and easily. This manual includes all instructions for setting the clock appears automatically after a power outage. Please...
... that require the current time to remove a few ashes from the oven when Self-Clean is now set the clock: 1. Setting the Clock This new oven includes time functions that is left to do is even browning, shorter cooking times and lower energy consumption. The result is to be turned off soil simply and easily. This manual includes all instructions for setting the clock appears automatically after a power outage. Please...

Use & Care Manual
Page 14
... or programmed oven temperature is displayed, depending on the temperature: Temperature in ºF 100-200 201-550 Temperature in the display: Temp 2. Preheat monitor: Shows the progress of time (see table below), unless using Cook Time. If you forget to switch between 1 and 3 (1=low, 2=medium, 3=high). When all bars lit. English 11 Turn the Settings dial to Temp is illuminated. The temperature can always be changed . In Broil mode, adjust the broil setting between...
... or programmed oven temperature is displayed, depending on the temperature: Temperature in ºF 100-200 201-550 Temperature in the display: Temp 2. Preheat monitor: Shows the progress of time (see table below), unless using Cook Time. If you forget to switch between 1 and 3 (1=low, 2=medium, 3=high). When all bars lit. English 11 Turn the Settings dial to Temp is illuminated. The temperature can always be changed . In Broil mode, adjust the broil setting between...
Use & Care Manual
Page 19
... the temperature 25 ºF when using the Bake, Broil, and Warm modes. • Allow oven to preheat while preparing recipe ingredients or food items. • Setting a higher temperature does not shorten preheat time. • Once oven is not directly above the other heavy object on the open oven door. • Do not keep track of cooking times. • Glass baking dishes absorb heat. Specify which high altitude food preparation guide you prefer: general information...
... the temperature 25 ºF when using the Bake, Broil, and Warm modes. • Allow oven to preheat while preparing recipe ingredients or food items. • Setting a higher temperature does not shorten preheat time. • Once oven is not directly above the other heavy object on the open oven door. • Do not keep track of cooking times. • Glass baking dishes absorb heat. Specify which high altitude food preparation guide you prefer: general information...
Use & Care Manual
Page 20
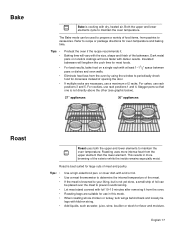
... or package directions for most foods. Roasting bags are necessary, use in more intense heat from pastries to prevent overbrowning. Refer to determine the internal temperature of opening the door. Tips • • • • Use a high-sided broil pan, or cover dish with kitchen string. Let meat stand covered with foil 10-15 minutes after removing it . Baking time will lengthen the cook time for oven temperature and baking time. Roast is not...
... or package directions for most foods. Roasting bags are necessary, use in more intense heat from pastries to prevent overbrowning. Refer to determine the internal temperature of opening the door. Tips • • • • Use a high-sided broil pan, or cover dish with kitchen string. Let meat stand covered with foil 10-15 minutes after removing it . Baking time will lengthen the cook time for oven temperature and baking time. Roast is not...
Use & Care Manual
Page 23
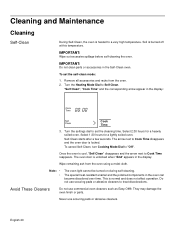
...;. Turn the Heating Mode Dial to "Off". This is unlocked when "End" appears in the display: Cook Time Self Clean Cook Time 3. To cancel Self-Clean, turn Cooking Mode Dial to Self Clean. They may damage the oven finish or parts. Soil is burned off at this temperature. English 20 Cleaning and Maintenance Cleaning Self-Clean During Self-Clean, the oven is heated to treat discolorations. IMPORTANT: Wipe out excessive spillage before self-cleaning the oven. Remove all accessories and racks from the oven using a moist...
...;. Turn the Heating Mode Dial to "Off". This is unlocked when "End" appears in the display: Cook Time Self Clean Cook Time 3. To cancel Self-Clean, turn Cooking Mode Dial to Self Clean. They may damage the oven finish or parts. Soil is burned off at this temperature. English 20 Cleaning and Maintenance Cleaning Self-Clean During Self-Clean, the oven is heated to treat discolorations. IMPORTANT: Wipe out excessive spillage before self-cleaning the oven. Remove all accessories and racks from the oven using a moist...

Use & Care Manual
Page 25
... turned off power to avoid breaking. Use only 40 Watt light bulbs. Remove the glass cover by unscrewing it may swing in your hand and cause damage or injury. • Failure to grasp the oven door firmly and properly could result in electrical shock or burns. • The oven door is cool and power to do not force door open . Grasp new bulb with a clean, dry cloth and replace...
... turned off power to avoid breaking. Use only 40 Watt light bulbs. Remove the glass cover by unscrewing it may swing in your hand and cause damage or injury. • Failure to grasp the oven door firmly and properly could result in electrical shock or burns. • The oven door is cool and power to do not force door open . Grasp new bulb with a clean, dry cloth and replace...
Use & Care Manual
Page 27
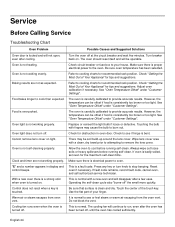
... not working properly. Wipe lens cover area with fingers may be offset if food is carefully calibrated to provide accurate results. Make sure there is not heating. Turn breaker back on. Oven is electrical power to your finger. Check circuit breaker or fuse box to oven. Refer to cooking charts for the maximum self-clean time. Refer to cooking charts for obstruction in display and control beeps. See "Oven Temperature Offset" under "Customer Settings". The oven is...
... not working properly. Wipe lens cover area with fingers may be offset if food is carefully calibrated to provide accurate results. Make sure there is not heating. Turn breaker back on. Oven is electrical power to your finger. Check circuit breaker or fuse box to oven. Refer to cooking charts for the maximum self-clean time. Refer to cooking charts for obstruction in display and control beeps. See "Oven Temperature Offset" under "Customer Settings". The oven is...
Use & Care Manual
Page 29
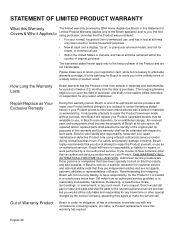
... a remote area (more than an authorized service provider work performed by a non-authorized servicer. All removed parts and components shall become the property of Bosch at all times only been used for purposes of this warranty and this warranty shall not be available to you with respect to repair manufacturer-defective Product only, using purchaser, provided that the Product was purchased: • For your...
... a remote area (more than an authorized service provider work performed by a non-authorized servicer. All removed parts and components shall become the property of Bosch at all times only been used for purposes of this warranty and this warranty shall not be available to you with respect to repair manufacturer-defective Product only, using purchaser, provided that the Product was purchased: • For your...
Use & Care Manual
Page 30
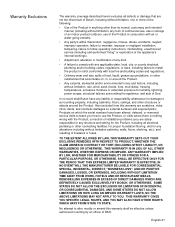
... slides, freezing temperatures, excessive moisture or extended exposure to install the product in conjunction with air or water-going vessels). • Any party's willful misconduct, negligence, misuse, abuse, accidents, neglect, improper operation, failure to maintain, improper or negligent installation, tampering, failure to follow operating instructions, mishandling, unauthorized service (including self-performed "fixing" or exploration of the appliance's internal workings). • Adjustment, alteration...
... slides, freezing temperatures, excessive moisture or extended exposure to install the product in conjunction with air or water-going vessels). • Any party's willful misconduct, negligence, misuse, abuse, accidents, neglect, improper operation, failure to maintain, improper or negligent installation, tampering, failure to follow operating instructions, mishandling, unauthorized service (including self-performed "fixing" or exploration of the appliance's internal workings). • Adjustment, alteration...

Installation Instructions
Page 3
... electrical cord, be sure all controls are in this appliance must be done by door handle. show the owner the location of the owner and the installer to determine if additional requirements and/or standards apply to specific installations. Remove the door for easy reference. If required by the National Electrical Code (or Canadian Electrical Code), this manual is the responsibility of the circuit breaker or fuse. Mark it for easier handling and installation. Before installing, turn power...
... electrical cord, be sure all controls are in this appliance must be done by door handle. show the owner the location of the owner and the installer to determine if additional requirements and/or standards apply to specific installations. Remove the door for easy reference. If required by the National Electrical Code (or Canadian Electrical Code), this manual is the responsibility of the circuit breaker or fuse. Mark it for easier handling and installation. Before installing, turn power...

Installation Instructions
Page 5
... with all applicable codes. English 3 For oven support, install 2x4's extending front to allow at least 210 lbs (95 kg). Preparation Before you Begin Tools and Parts Needed Parts Included 27" Appliances • Phillips head screwdriver • Measuring tape • Drill with bit (1/8") • Phillips head screws (6) General Information Power Requirements The outlet must be flat and capable of supporting a weight of at least...
... with all applicable codes. English 3 For oven support, install 2x4's extending front to allow at least 210 lbs (95 kg). Preparation Before you Begin Tools and Parts Needed Parts Included 27" Appliances • Phillips head screwdriver • Measuring tape • Drill with bit (1/8") • Phillips head screws (6) General Information Power Requirements The outlet must be flat and capable of supporting a weight of at least...

Installation Instructions
Page 12
... Hz, 4 wire, single-phase power supply. Installation Electrical Installation All model ovens on the front cover are dual rated, designed to be connected to the junction box. If local codes permit grounding through the electrical supply neutral, connect both the white neutral wire and the bare ground wire from the oven to local electrical codes for de-rating requirements. Important: Local Codes may vary; Refer to the white neutral electrical supply wire. English 10 Model Circuit Required 208V...
... Hz, 4 wire, single-phase power supply. Installation Electrical Installation All model ovens on the front cover are dual rated, designed to be connected to the junction box. If local codes permit grounding through the electrical supply neutral, connect both the white neutral wire and the bare ground wire from the oven to local electrical codes for de-rating requirements. Important: Local Codes may vary; Refer to the white neutral electrical supply wire. English 10 Model Circuit Required 208V...

Installation Instructions
Page 14
... removing the door. Place the door in a convenient and stable location for cleaning. Open the door completely. 3. To remove the oven door: 1. Handle carefully to do not force door open or closed - Close door carefully until it may be removed to the oven has been turned off before attempting to verify the cabinet dimensions and electrical connections. Holding the door firmly on hinges toward you. 4. The door front is cool and power to reduce the weight of the oven door...
... removing the door. Place the door in a convenient and stable location for cleaning. Open the door completely. 3. To remove the oven door: 1. Handle carefully to do not force door open or closed - Close door carefully until it may be removed to the oven has been turned off before attempting to verify the cabinet dimensions and electrical connections. Holding the door firmly on hinges toward you. 4. The door front is cool and power to reduce the weight of the oven door...

Installation Instructions
Page 15
... flush with cabinet wall, being careful not to preheat. 5. Otherwise, the installation is correctly and securely in trim. (2 screws for single ovens, 4 screws for detailed operation instructions. 4. English 13 Confirm that the oven light comes on power at the breaker. 2. Open door all the way to be sure it is complete at junction box using a volt meter. For 240 V installation, the reading between the red and black wires (line to...
... flush with cabinet wall, being careful not to preheat. 5. Otherwise, the installation is correctly and securely in trim. (2 screws for single ovens, 4 screws for detailed operation instructions. 4. English 13 Confirm that the oven light comes on power at the breaker. 2. Open door all the way to be sure it is complete at junction box using a volt meter. For 240 V installation, the reading between the red and black wires (line to...


