
Use & Care Manual
Page 2
Table of Contents About This Manual 1 How This Manual is Organized 1 Safety 2 Important Safety Instructions 2 Getting Started 6 Parts and Accessories 6 Control 8 Before Using the Oven for the First Time 9 Operation 10 About the Appliance 10 Basic Features 10 Setting the Clock 10 Setting the Cooking Mode and Temperature 11 Heating Time Limitation 11 Timer 12 Special Features 13 Cook Time 13 Customer Settings 14 Getting the Most Out of Your Appliance 16 General Tips 16 Bake 17 Roast 17 Broil 18 Warm 19 Cleaning and Maintenance 20 Cleaning 20 Self-Clean 20
Table of Contents About This Manual 1 How This Manual is Organized 1 Safety 2 Important Safety Instructions 2 Getting Started 6 Parts and Accessories 6 Control 8 Before Using the Oven for the First Time 9 Operation 10 About the Appliance 10 Basic Features 10 Setting the Clock 10 Setting the Cooking Mode and Temperature 11 Heating Time Limitation 11 Timer 12 Special Features 13 Cook Time 13 Customer Settings 14 Getting the Most Out of Your Appliance 16 General Tips 16 Bake 17 Roast 17 Broil 18 Warm 19 Cleaning and Maintenance 20 Cleaning 20 Self-Clean 20

Use & Care Manual
Page 4
...several bakeware and preparation tips. • "Cleaning and Maintenance" provides you with information on how to clean and care for the various oven parts. • The "Service" section includes your warranty and do-it-yourself troubleshooting tips. • Pay special attention to know your ...appliance and become familiar with the appropriate oven mode, temperature, rack position and bake time. This way, you can get to the important safety instructions in the "Safety" section...
...several bakeware and preparation tips. • "Cleaning and Maintenance" provides you with information on how to clean and care for the various oven parts. • The "Service" section includes your warranty and do-it-yourself troubleshooting tips. • Pay special attention to know your ...appliance and become familiar with the appropriate oven mode, temperature, rack position and bake time. This way, you can get to the important safety instructions in the "Safety" section...
Use & Care Manual
Page 5
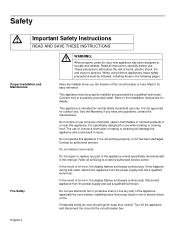
... injury to the Installation Instructions for details. Do not operate this appliance. If this manual. Connect only to line any part of the appliance unless specifically recommended in risk of the appliance, especially the oven bottom. Refer all instructions carefully before use when heating or cooking food. If materials inside an...This appliance must be safe and reliable. In the event of an error, the display flashes and beeps continuously. Do not repair or replace any part of electric shock or fire. English 2 Do not obstruct oven vents. Mark it has been damaged.
... injury to the Installation Instructions for details. Do not operate this appliance. If this manual. Connect only to line any part of the appliance unless specifically recommended in risk of the appliance, especially the oven bottom. Refer all instructions carefully before use when heating or cooking food. If materials inside an...This appliance must be safe and reliable. In the event of an error, the display flashes and beeps continuously. Do not repair or replace any part of electric shock or fire. English 2 Do not obstruct oven vents. Mark it has been damaged.
Use & Care Manual
Page 7
... that it is hot, do not wear loose fitting clothing or hanging garments, such as the alcohol vapors may result in the oven. before beginning. Children climbing on any part of an appliance, especially a door, warming drawer or storage drawer. English 4 Always use a towel or other bulky cloth. ...foods with high alcohol content (e.g. There is in use this appliance unless closely supervised by qualified persons. They should not be moved while oven is still hot. Tie long hair so that they are instructed in safe operation of interest to reach items could be stored in ...
... that it is hot, do not wear loose fitting clothing or hanging garments, such as the alcohol vapors may result in the oven. before beginning. Children climbing on any part of an appliance, especially a door, warming drawer or storage drawer. English 4 Always use a towel or other bulky cloth. ...foods with high alcohol content (e.g. There is in use this appliance unless closely supervised by qualified persons. They should not be moved while oven is still hot. Tie long hair so that they are instructed in safe operation of interest to reach items could be stored in ...

Use & Care Manual
Page 8
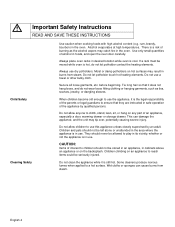
...overheating margarines and cooking oils may be harmful. Keep oven free from grease build up. Follow the manufacturer's directions when using ...bags. English 5 The fiberglass insulation in self-clean ovens gives off very small amounts of the kitchen or other...not place food directly on oven bottom. The burning of gas cooking fuel and the elimination of...during and immediately after self-cleaning the oven. 3. Exposure to the instructions in the self-clean oven. Operating the unit according to these substances...self-cleaning the oven. During self-clean, fumes are released that the door locks and...
...overheating margarines and cooking oils may be harmful. Keep oven free from grease build up. Follow the manufacturer's directions when using ...bags. English 5 The fiberglass insulation in self-clean ovens gives off very small amounts of the kitchen or other...not place food directly on oven bottom. The burning of gas cooking fuel and the elimination of...during and immediately after self-cleaning the oven. 3. Exposure to the instructions in the self-clean oven. Operating the unit according to these substances...self-cleaning the oven. During self-clean, fumes are released that the door locks and...
Use & Care Manual
Page 9
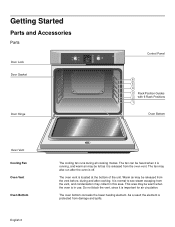
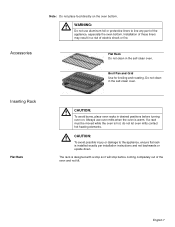
... is important for air circulation. As a result the element is protected from the oven vent. The oven bottom conceals the lower heating element. The fan can be warm when the oven is in this area. Getting Started Parts and Accessories Parts Door Lock Off Self Clean Bake Warm Broil Roast Door Gasket Temp Timer Clock...
... is important for air circulation. As a result the element is protected from the oven vent. The oven bottom conceals the lower heating element. The fan can be warm when the oven is in this area. Getting Started Parts and Accessories Parts Door Lock Off Self Clean Bake Warm Broil Roast Door Gasket Temp Timer Clock...
Use & Care Manual
Page 10
...CAUTION: To avoid possible injury or damage to line any part of these liners may result in the self-clean oven. Do not clean in a risk of the oven and not tilt. If a rack must be moved while the oven is installed exactly per installation instructions and not backwards or upside... coming completely out of electric shock or fire. m WARNING: Do not use oven mitts when the oven is designed with a stop so it will stop before turning oven on the oven bottom. Inserting Rack Flat Rack m CAUTION: To avoid burns, place oven racks in the self-clean oven. Always use aluminum foil...
...CAUTION: To avoid possible injury or damage to line any part of these liners may result in the self-clean oven. Do not clean in a risk of the oven and not tilt. If a rack must be moved while the oven is installed exactly per installation instructions and not backwards or upside... coming completely out of electric shock or fire. m WARNING: Do not use oven mitts when the oven is designed with a stop so it will stop before turning oven on the oven bottom. Inserting Rack Flat Rack m CAUTION: To avoid burns, place oven racks in the self-clean oven. Always use aluminum foil...
Use & Care Manual
Page 19
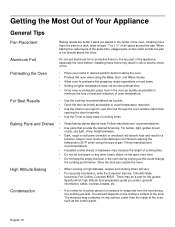
.... • Glass baking dishes absorb heat. The amount depends on any part of the appliance, especially the oven bottom. The moisture may result in risk of electric shock or fire. • Place oven racks in desired position before heating the oven. • Preheat the oven when using this could change the cooking performance. If baking more...
.... • Glass baking dishes absorb heat. The amount depends on any part of the appliance, especially the oven bottom. The moisture may result in risk of electric shock or fire. • Place oven racks in desired position before heating the oven. • Preheat the oven when using this could change the cooking performance. If baking more...
Use & Care Manual
Page 23
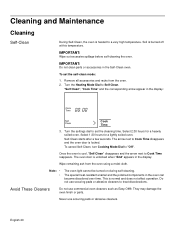
...few seconds. Note: • • The oven light cannot be turned on during self-cleaning. The special heat-resistant enamel and the polished components in the display. Avoid These Cleaners Do not use scouring pads or abrasive cleaners. They may damage the oven finish or parts. To set the cleaning time. The... oven door is normal and does not affect operation. Wipe remaining ash from the...
...few seconds. Note: • • The oven light cannot be turned on during self-cleaning. The special heat-resistant enamel and the polished components in the display. Avoid These Cleaners Do not use scouring pads or abrasive cleaners. They may damage the oven finish or parts. To set the cleaning time. The... oven door is normal and does not affect operation. Wipe remaining ash from the...
Use & Care Manual
Page 24
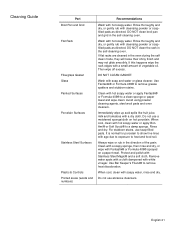
...CLEAN GASKET. Use Fantastik® or Formula 409® to remove heat discoloration. When cool, clean with hot soapy water. Cleaning Guide Part Broil Pan and Grid Flat Rack Fiberglass Gasket Glass Painted Surfaces Porcelain Surfaces Stainless Steel Surfaces Plastic & Controls Printed areas (words and numbers) ... and dry, or gently rub with cleansing powder or soapfilled pads as directed. Rinse and dry. Always wipe or rub in the self-cleaning oven. Clean with a soapy sponge, then rinse and dry, or wipe with a dry cloth. Use Bar Keeper's Friend® to remove grease...
...CLEAN GASKET. Use Fantastik® or Formula 409® to remove heat discoloration. When cool, clean with hot soapy water. Cleaning Guide Part Broil Pan and Grid Flat Rack Fiberglass Gasket Glass Painted Surfaces Porcelain Surfaces Stainless Steel Surfaces Plastic & Controls Printed areas (words and numbers) ... and dry, or gently rub with cleansing powder or soapfilled pads as directed. Rinse and dry. Always wipe or rub in the self-cleaning oven. Clean with a soapy sponge, then rinse and dry, or wipe with a dry cloth. Use Bar Keeper's Friend® to remove grease...
Use & Care Manual
Page 27
... consistently too brown or too light. Reset oven if necessary. Use the flat part of the touch key. English 24 The oven should reset itself and will not open, even after cooling. Be sure oven temperature has been selected. However, the temperature can be offset if food is electrical power to run, even after a few...
... consistently too brown or too light. Reset oven if necessary. Use the flat part of the touch key. English 24 The oven should reset itself and will not open, even after cooling. Be sure oven temperature has been selected. However, the temperature can be offset if food is electrical power to run, even after a few...
Use & Care Manual
Page 28
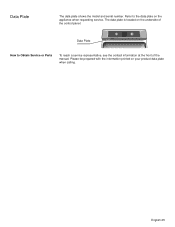
Data Plate The data plate shows the model and serial number. English 25 Please be prepared with the information printed on the underside of the control panel: Data Plate How to the data plate on the appliance when requesting service. The data plate is located on your product data plate when calling. Refer to Obtain Service or Parts To reach a service representative, see the contact information at the front of the manual.
Data Plate The data plate shows the model and serial number. English 25 Please be prepared with the information printed on the underside of the control panel: Data Plate How to the data plate on the appliance when requesting service. The data plate is located on your product data plate when calling. Refer to Obtain Service or Parts To reach a service representative, see the contact information at the front of the manual.
Use & Care Manual
Page 29
... your Product (upgraded models may be fully liable and responsible for labor and parts and ship the parts to the nearest authorized service provider, but you would still pay for any reason whatsoever. Bosch will not incur any liability, or have been manufactured with any such event...run upon the date of the Product and are not agents, partners, affiliates or representatives of Bosch). The foregoing timeline begins to such parts. For safety and property damage concerns, Bosch highly recommends that they agree to make sure to return your normal, household (non-commercial) use...
... your Product (upgraded models may be fully liable and responsible for labor and parts and ship the parts to the nearest authorized service provider, but you would still pay for any reason whatsoever. Bosch will not incur any liability, or have been manufactured with any such event...run upon the date of the Product and are not agents, partners, affiliates or representatives of Bosch). The foregoing timeline begins to such parts. For safety and property damage concerns, Bosch highly recommends that they agree to make sure to return your normal, household (non-commercial) use...
Use & Care Manual
Page 30
... cabinetry, floors, ceilings, and other substances that accumulate on external surfaces and exposed parts; and resetting of BSH. ANY WARRANTY IMPLIED BY LAW, WHETHER FOR MERCHANTABILITY OR FITNESS... coverage described herein excludes all electrical, plumbing or other connecting facilities, for proper foundation/flooring, and for any alterations including without limitation cabinetry, walls, floors, shelving, etc.); ..., failure to alter, modify or amend this warranty are not the direct fault of Bosch, including without limitation, one or more of the following: • Use of the...English 27
... cabinetry, floors, ceilings, and other substances that accumulate on external surfaces and exposed parts; and resetting of BSH. ANY WARRANTY IMPLIED BY LAW, WHETHER FOR MERCHANTABILITY OR FITNESS... coverage described herein excludes all electrical, plumbing or other connecting facilities, for proper foundation/flooring, and for any alterations including without limitation cabinetry, walls, floors, shelving, etc.); ..., failure to alter, modify or amend this warranty are not the direct fault of Bosch, including without limitation, one or more of the following: • Use of the...English 27

Installation Instructions
Page 2
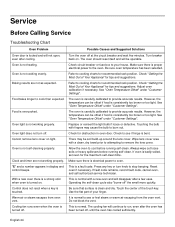
... look forward to hearing from you Begin 3 Tools and Parts Needed 3 Parts Included 3 27" Appliances 3 General Information 3 30" Appliances 6 Removing Packaging 9 For Convection Microwave Combination Units 9 Preparing Oven 9 Installation 10 Electrical Installation 10 Oven Installation 12 Testing Operation 13 Service 14 Before Calling Service 14 This Bosch Appliance is made by BSH Home Appliances Corporation 5551 McFadden...
... look forward to hearing from you Begin 3 Tools and Parts Needed 3 Parts Included 3 27" Appliances 3 General Information 3 30" Appliances 6 Removing Packaging 9 For Convection Microwave Combination Units 9 Preparing Oven 9 Installation 10 Electrical Installation 10 Oven Installation 12 Testing Operation 13 Service 14 Before Calling Service 14 This Bosch Appliance is made by BSH Home Appliances Corporation 5551 McFadden...

Installation Instructions
Page 3
... handle. Remove the door for the local electrical inspector's use. Use caution when reaching behind or under "Service" for guidance. This appliance complies with one or more information. Important - WARNING: Do not repair or replace any part of the circuit breaker or fuse. Improper ...installation, service or maintenance can cause injury or property damage. If required by the National Electrical Code (or Canadian Electrical Code), this manual is not followed exactly, fire or ...
... handle. Remove the door for the local electrical inspector's use. Use caution when reaching behind or under "Service" for guidance. This appliance complies with one or more information. Important - WARNING: Do not repair or replace any part of the circuit breaker or fuse. Improper ...installation, service or maintenance can cause injury or property damage. If required by the National Electrical Code (or Canadian Electrical Code), this manual is not followed exactly, fire or ...

Installation Instructions
Page 5
... cabinet run, adjacent to a perpendicular wall or cabinet door, to back flush with all applicable codes. Note: The conduit box must be well secured to the floor/cabinet and level. Preparation Before you Begin Tools and Parts Needed Parts Included 27" Appliances • Phillips head screwdriver &#... be properly grounded in accordance with the bottom and the side of the opening. English 3 For oven support, install 2x4's extending front to allow at least 210 lbs (95 kg). Dimensions for 27" Wall-Mounted Units 24" (610mm) 251/2" (648mm) 263/4" (680mm) 2413/16" (630mm) 281...
... cabinet run, adjacent to a perpendicular wall or cabinet door, to back flush with all applicable codes. Note: The conduit box must be well secured to the floor/cabinet and level. Preparation Before you Begin Tools and Parts Needed Parts Included 27" Appliances • Phillips head screwdriver &#... be properly grounded in accordance with the bottom and the side of the opening. English 3 For oven support, install 2x4's extending front to allow at least 210 lbs (95 kg). Dimensions for 27" Wall-Mounted Units 24" (610mm) 251/2" (648mm) 263/4" (680mm) 2413/16" (630mm) 281...