Use & Care Manual (all languages)
Page 3
...Manual 4 How This Manual Is Organized 4 PRECAUTIONS TO AVOID POSSIBLE EXPOSURE TO EXCESSIVE MICROWAVE ENERGY 4 āSafety 5 IMPORTANT SAFETY INSTRUCTIONS 5 āGetting started 12 Control Panel 12 Parts and Accessories Included 13 āOperation 14 Starting to hearing from you! 3 Huntington Beach, CA 92649 We look forward to Use Your Oven... 14 āGetting the Most Out of Your Appliance 16 āCleaning and Maintenance 35 Care and Cleaning of Your Microwave Oven 35 Maintenance 36 āService 37 Warranty 38 ...
...Manual 4 How This Manual Is Organized 4 PRECAUTIONS TO AVOID POSSIBLE EXPOSURE TO EXCESSIVE MICROWAVE ENERGY 4 āSafety 5 IMPORTANT SAFETY INSTRUCTIONS 5 āGetting started 12 Control Panel 12 Parts and Accessories Included 13 āOperation 14 Starting to hearing from you! 3 Huntington Beach, CA 92649 We look forward to Use Your Oven... 14 āGetting the Most Out of Your Appliance 16 āCleaning and Maintenance 35 Care and Cleaning of Your Microwave Oven 35 Maintenance 36 āService 37 Warranty 38 ...

Use & Care Manual (all languages)
Page 4
...attention to the Important Safety Instructions located at the beginning of the manual. ř PRECAUTIONS TO AVOID POSSIBLE EXPOSURE TO EXCESSIVE MICROWAVE ENERGY Do not attempt to operate this manual. Do not place any object between the oven front face and the door or allow soil or cleaner residue to... microwave energy. It is important not to clean and maintain the appliance. D ...
...attention to the Important Safety Instructions located at the beginning of the manual. ř PRECAUTIONS TO AVOID POSSIBLE EXPOSURE TO EXCESSIVE MICROWAVE ENERGY Do not attempt to operate this manual. Do not place any object between the oven front face and the door or allow soil or cleaner residue to... microwave energy. It is important not to clean and maintain the appliance. D ...
Use & Care Manual (all languages)
Page 5
... for its intended use this manual. Do not assume that because a child has mastered one cooking skill he/she can kill or seriously hurt you if you don't follow the specific PRECAUTIONS TO AVOID POSSIBLE EXPOSURE TO EXCESSIVE MICROWAVE ENERGY" found on page 4....symbol. See GROUNDING INSTRUCTIONS" found on page 8. for examination, repair, or adjustment. Read and follow instructions. Do not use this oven. Contact nearest authorized service facility for example, closed glass jars - Some products such as described in this appliance, unless closely supervised by...
... for its intended use this manual. Do not assume that because a child has mastered one cooking skill he/she can kill or seriously hurt you if you don't follow the specific PRECAUTIONS TO AVOID POSSIBLE EXPOSURE TO EXCESSIVE MICROWAVE ENERGY" found on page 4....symbol. See GROUNDING INSTRUCTIONS" found on page 8. for examination, repair, or adjustment. Read and follow instructions. Do not use this oven. Contact nearest authorized service facility for example, closed glass jars - Some products such as described in this appliance, unless closely supervised by...
Use & Care Manual (all languages)
Page 9
... the following to reduce the risks resulting from becoming entangled in their use of the oven with the microwave oven. The oven must be on different branch circuits. Using a lower voltage will not occur in this manual. 2. D Plug the microwave into at least as great as specified on and off to determine if it replaced with...
... the following to reduce the risks resulting from becoming entangled in their use of the oven with the microwave oven. The oven must be on different branch circuits. Using a lower voltage will not occur in this manual. 2. D Plug the microwave into at least as great as specified on and off to determine if it replaced with...
Use & Care Manual (all languages)
Page 16
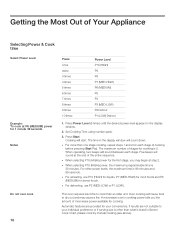
... your individual preference or if serving size is other power levels, the maximum time is 30 minutes. Press Power Level (5 times) until the desired power level appears in Sensor Cook Chart, please cook by manual cooking (see above). D For defrosting, use P10 (HIGH) for liquids, P7 (...;LOW) P2 Defrost P1 (LOW) Defrost 1. For other than an older unit. This oven requires less time to your convenience. Over cooking will sound between each stage of the entire sequence. A microwave oven's cooking power tells you may cause a fire. Automatic features are not suitable to cook ...
... your individual preference or if serving size is other power levels, the maximum time is 30 minutes. Press Power Level (5 times) until the desired power level appears in Sensor Cook Chart, please cook by manual cooking (see above). D For defrosting, use P10 (HIGH) for liquids, P7 (...;LOW) P2 Defrost P1 (LOW) Defrost 1. For other than an older unit. This oven requires less time to your convenience. Over cooking will sound between each stage of the entire sequence. A microwave oven's cooking power tells you may cause a fire. Automatic features are not suitable to cook ...
Use & Care Manual (all languages)
Page 18
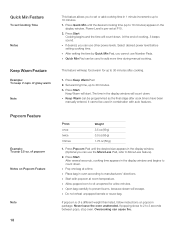
...be used in the display window. (Optional you can cause fire. Never leave the oven unattended. This feature will keep 2 cups of popcorn Notes on popcorn package. D Allow...temperature. D Start with auto features. D If desired, you can be used to 30 minutes after cook time/s have been manually entered. of gravy warm Note This feature allows you cannot use the More/Less Pad,... refer to 10 minutes. 1. Press Quick Min until the desired size appears in combination ...
...be used in the display window. (Optional you can cause fire. Never leave the oven unattended. This feature will keep 2 cups of popcorn Notes on popcorn package. D Allow...temperature. D Start with auto features. D If desired, you can be used to 30 minutes after cook time/s have been manually entered. of gravy warm Note This feature allows you cannot use the More/Less Pad,... refer to 10 minutes. 1. Press Quick Min until the desired size appears in combination ...
Use & Care Manual (all languages)
Page 21
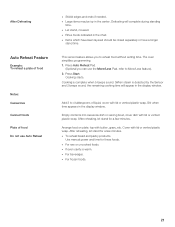
...butter, gravy, etc. D Items which have been layered should be icy in the display window. After reheating, let stand for these foods. Use manual power and time for a few minutes. D For frozen foods. 21 D Large items may be rinsed separately or have a longer stand time. ...Cooking is complete when 5 beeps sound. (When steam is warm. After reheating, let stand for a few minutes. The oven simplifies programming. 1. Press Auto Reheat Pad. (Optional you to More/Less feature). 2. D To reheat bread and pastry products. Empty contents into casserole...
...butter, gravy, etc. D Items which have been layered should be icy in the display window. After reheating, let stand for these foods. Use manual power and time for a few minutes. D For frozen foods. 21 D Large items may be rinsed separately or have a longer stand time. ...Cooking is complete when 5 beeps sound. (When steam is warm. After reheating, let stand for a few minutes. The oven simplifies programming. 1. Press Auto Reheat Pad. (Optional you to More/Less feature). 2. D To reheat bread and pastry products. Empty contents into casserole...
Use & Care Manual (all languages)
Page 22
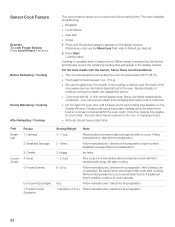
... preparation. Remove facing away from escaping and cause food to cook manually. 8 oz. D Food weight should have a stand time. Omelet 4. D Breakfast D Lunch/Snack D Side Dish D Dinner 1. Residual beads of the microwave oven are dry before placing food in the display window. Soup 5. Cooking... Pocket Sandwich Serving/Weight Hints ½ Ć 1 cup Place inside of moisture turning into a microwave safe serving bowl, cover with no longer contained within the oven cavity. For the best results with vented plastic wrap. Press Start. Pad BreakĆ fast Recipe ...
... preparation. Remove facing away from escaping and cause food to cook manually. 8 oz. D Food weight should have a stand time. Omelet 4. D Breakfast D Lunch/Snack D Side Dish D Dinner 1. Residual beads of the microwave oven are dry before placing food in the display window. Soup 5. Cooking... Pocket Sandwich Serving/Weight Hints ½ Ć 1 cup Place inside of moisture turning into a microwave safe serving bowl, cover with no longer contained within the oven cavity. For the best results with vented plastic wrap. Press Start. Pad BreakĆ fast Recipe ...

Installation Instructions
Page 3
... Standards: • UL 858, The Standard for the Safety of Household Electric Ranges • UL 923, The Standard for the Safety of Microwave Cooking Appliances • UL 507, The Standard for the Safety of Electric Fans • ANSI Z21.1, The American National Standard for guidance.... these instructions for data plate location. WARNING: Do not repair or replace any part of the appliance unless specifically recommended in Use and Care Manual. Before you plug in the OFF position. Important - Lock service panel to specific installations. See "Data Plate" under appliance. Installer - ...
... Standards: • UL 858, The Standard for the Safety of Household Electric Ranges • UL 923, The Standard for the Safety of Microwave Cooking Appliances • UL 507, The Standard for the Safety of Electric Fans • ANSI Z21.1, The American National Standard for guidance.... these instructions for data plate location. WARNING: Do not repair or replace any part of the appliance unless specifically recommended in Use and Care Manual. Before you plug in the OFF position. Important - Lock service panel to specific installations. See "Data Plate" under appliance. Installer - ...

Installation Instructions
Page 15
...oven and cabinet back wall. If any of the tests do not result as well. 7. Close and open door slowly to expose hinges and slots. 3. Test the door lock. Otherwise, the installation is complete at the breaker. 2. English 13 Testing Operation 1. See the Use and Care Manual... place. If installing a double oven, test the second oven as explained above, contact Bosch service for double/combo ovens) To replace the oven door: 1. Test the oven mode. Select the BAKE mode. Confirm that the oven light comes on power at this time. The oven should be straight, not crooked....
...oven and cabinet back wall. If any of the tests do not result as well. 7. Close and open door slowly to expose hinges and slots. 3. Test the door lock. Otherwise, the installation is complete at the breaker. 2. English 13 Testing Operation 1. See the Use and Care Manual... place. If installing a double oven, test the second oven as explained above, contact Bosch service for double/combo ovens) To replace the oven door: 1. Test the oven mode. Select the BAKE mode. Confirm that the oven light comes on power at this time. The oven should be straight, not crooked....
Installation Instructions
Page 16
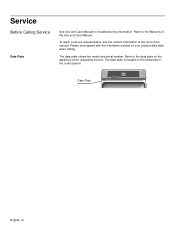
Refer to the data plate on the appliance when requesting service. The data plate shows the model and serial number. Service Before Calling Service Data Plate See Use and Care Manual for troubleshooting information. To reach a service representative, see the contact information at the front of the control panel: Data Plate English 14 Refer to the Warranty in the Use and Care Manual. The data plate is located on your product data plate when calling. Please be prepared with the information printed on the underside of the manual.
Refer to the data plate on the appliance when requesting service. The data plate shows the model and serial number. Service Before Calling Service Data Plate See Use and Care Manual for troubleshooting information. To reach a service representative, see the contact information at the front of the control panel: Data Plate English 14 Refer to the Warranty in the Use and Care Manual. The data plate is located on your product data plate when calling. Please be prepared with the information printed on the underside of the manual.

Use & Care Manual
Page 1
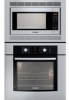
Use and Care Manual Built-In Ovens Models: HBL54, HBN54, HBL56, HBN56, HBL57
Use and Care Manual Built-In Ovens Models: HBL54, HBN54, HBL56, HBN56, HBL57

Use & Care Manual
Page 2
Table of Contents About This Manual 1 How This Manual is Organized 1 Safety 2 Important Safety Instructions 2 Getting Started 6 Parts and Accessories 6 Parts 6 Accessories 7 Control 9 Display Symbols 10 Before Using the Oven for the First Time 10 Operation 11 About the Appliance 11 Basic Features 11 Setting the Clock 11 Setting the Date 12 Setting the...
Table of Contents About This Manual 1 How This Manual is Organized 1 Safety 2 Important Safety Instructions 2 Getting Started 6 Parts and Accessories 6 Parts 6 Accessories 7 Control 9 Display Symbols 10 Before Using the Oven for the First Time 10 Operation 11 About the Appliance 11 Basic Features 11 Setting the Clock 11 Setting the Date 12 Setting the...

Use & Care Manual
Page 4
... the important safety instructions in the "Safety" section. The manual consists of the following sections: • The "Safety" section provides information on how to safely operate your oven. • "Getting Started" introduces you to the oven components and features. • The "Operation" section offers you...tips. • Pay special attention to know your appliance and become familiar with information on how to operate your new oven by reading this manual from beginning to end. This way you with its operation and features. This section also provides you with several bakeware ...
... the important safety instructions in the "Safety" section. The manual consists of the following sections: • The "Safety" section provides information on how to safely operate your oven. • "Getting Started" introduces you to the oven components and features. • The "Operation" section offers you...tips. • Pay special attention to know your appliance and become familiar with information on how to operate your new oven by reading this manual from beginning to end. This way you with its operation and features. This section also provides you with several bakeware ...

Use & Care Manual
Page 5
...your new appliance has been designed to the Installation Instructions for easy reference. Installing these liners may result in or near this manual. Turn off the appliance, and disconnect the circuit at the circuit breaker box. When using kitchen appliances, basic safety precautions must... not operate this happens during self-clean, disconnect appliance from the power supply and call a qualified technician. Do not obstruct oven vents. These precautions will damage the appliance and could result in this appliance. Proper Installation and Maintenance Fire Safety Have the ...
...your new appliance has been designed to the Installation Instructions for easy reference. Installing these liners may result in or near this manual. Turn off the appliance, and disconnect the circuit at the circuit breaker box. When using kitchen appliances, basic safety precautions must... not operate this happens during self-clean, disconnect appliance from the power supply and call a qualified technician. Do not obstruct oven vents. These precautions will damage the appliance and could result in this appliance. Proper Installation and Maintenance Fire Safety Have the ...

Use & Care Manual
Page 6
.... Keep your back to cause burns. Do not heat or warm unopened food containers. DO NOT TOUCH HEATING ELEMENTS OR INTERIOR SURFACES OF OVEN - Heating elements may cause the container to cause burns. Smother flames from food fires other flammable materials contact heating elements or interior surfaces... enough to an exit. Exercise caution when opening and make sure there are no children or pets near these surfaces are dark in this manual. For example, never use the appliance for cooking or cleaning purposes. Other surfaces of the opening the appliance. Never use , do not...
.... Keep your back to cause burns. Do not heat or warm unopened food containers. DO NOT TOUCH HEATING ELEMENTS OR INTERIOR SURFACES OF OVEN - Heating elements may cause the container to cause burns. Smother flames from food fires other flammable materials contact heating elements or interior surfaces... enough to an exit. Exercise caution when opening and make sure there are no children or pets near these surfaces are dark in this manual. For example, never use the appliance for cooking or cleaning purposes. Other surfaces of the opening the appliance. Never use , do not...
Use & Care Manual
Page 7
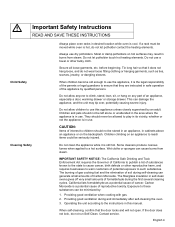
... Children climbing on hot surfaces may tip over, potentially causing severe injury. Providing good ventilation during and immediately after self-cleaning the oven. 3. If a rack must be stored in an appliance, in burns from steam. This can be seriously injured. When children ...Secure all loose garments, etc. Operating the unit according to use this manual. m Important Safety Instructions READ AND SAVE THESE INSTRUCTIONS Child Safety Cleaning Safety Always place oven racks in self-clean ovens gives off very small amounts of formaldehyde during the first several cleaning cycles....
... Children climbing on hot surfaces may tip over, potentially causing severe injury. Providing good ventilation during and immediately after self-cleaning the oven. 3. If a rack must be stored in an appliance, in burns from steam. This can be seriously injured. When children ...Secure all loose garments, etc. Operating the unit according to use this manual. m Important Safety Instructions READ AND SAVE THESE INSTRUCTIONS Child Safety Cleaning Safety Always place oven racks in self-clean ovens gives off very small amounts of formaldehyde during the first several cleaning cycles....
Use & Care Manual
Page 13
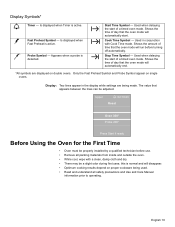
... precautions and Use and Care Manual information prior to operating. Stop Time Symbol - Used when delaying the start of a timed oven mode. Start Time Symbol - Used when delaying the start of a timed oven mode. Used in the display while settings are displayed on single ovens. The value that the oven mode will disappear. • Optimum...
... precautions and Use and Care Manual information prior to operating. Stop Time Symbol - Used when delaying the start of a timed oven mode. Start Time Symbol - Used when delaying the start of a timed oven mode. Used in the display while settings are displayed on single ovens. The value that the oven mode will disappear. • Optimum...
Use & Care Manual
Page 14
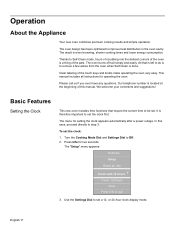
... do is located at the beginning of the touch keys and knobs make operating the oven very easy. The "Setup" menu appears: 10:30 am Setup Reset all instructions for operating the oven. Press Info to set . Please call us if you ever have any questions. ...is even browning, shorter cooking times and lower energy consumption. This manual includes all : No Clock with 12 hours +- The oven design has been optimized to set the clock: 1. In this manual. Operation About the Appliance Your new oven combines premium cooking results and simple operation. We welcome your comments and ...
... do is located at the beginning of the touch keys and knobs make operating the oven very easy. The "Setup" menu appears: 10:30 am Setup Reset all instructions for operating the oven. Press Info to set . Please call us if you ever have any questions. ...is even browning, shorter cooking times and lower energy consumption. This manual includes all : No Clock with 12 hours +- The oven design has been optimized to set the clock: 1. In this manual. Operation About the Appliance Your new oven combines premium cooking results and simple operation. We welcome your comments and ...
Use & Care Manual
Page 21
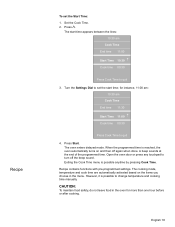
... done. Recipe To set the start time appears between the lines: 10:30 am Cook Time End time 11:30 Start Time 11:00 +Cook time 00:30 Press Cook Time to change temperature and cooking time manually. Open the oven door or press any touchpad to set the Start Time: 1. However, ...it is possible anytime by pressing Cook Time. When the programmed time is reached, the oven automatically turns on the items you...
... done. Recipe To set the start time appears between the lines: 10:30 am Cook Time End time 11:30 Start Time 11:00 +Cook time 00:30 Press Cook Time to change temperature and cooking time manually. Open the oven door or press any touchpad to set the Start Time: 1. However, ...it is possible anytime by pressing Cook Time. When the programmed time is reached, the oven automatically turns on the items you...