
Installation Instructions
Page 2
... to hearing from you Begin 3 Tools and Parts Needed 3 Parts Included 3 27" Appliances 3 General Information 3 30" Appliances 6 Removing Packaging 9 For Convection Microwave Combination Units 9 Preparing Oven 9 Installation 10 Electrical Installation 10 Oven Installation 12 Testing Operation 13 Service 14 Before Calling Service 14 This Bosch Appliance is made by BSH Home Appliances Corporation 5551 McFadden Ave. Table of Contents Safety...
... to hearing from you Begin 3 Tools and Parts Needed 3 Parts Included 3 27" Appliances 3 General Information 3 30" Appliances 6 Removing Packaging 9 For Convection Microwave Combination Units 9 Preparing Oven 9 Installation 10 Electrical Installation 10 Oven Installation 12 Testing Operation 13 Service 14 Before Calling Service 14 This Bosch Appliance is made by BSH Home Appliances Corporation 5551 McFadden Ave. Table of Contents Safety...

Installation Instructions
Page 3
.... Unit is heavy and requires at the service panel. This appliance complies with one or more information. show the owner the location of the appliance unless specifically recommended in the manuals. Before installing, turn power OFF at least two people or proper equipment to specific installations. ...Standards: • UL 858, The Standard for the Safety of Household Electric Ranges • UL 923, The Standard for the Safety of Microwave Cooking Appliances • UL 507, The Standard for the Safety of Electric Fans • ANSI Z21.1, The American National Standard for Household...
.... Unit is heavy and requires at the service panel. This appliance complies with one or more information. show the owner the location of the appliance unless specifically recommended in the manuals. Before installing, turn power OFF at least two people or proper equipment to specific installations. ...Standards: • UL 858, The Standard for the Safety of Household Electric Ranges • UL 923, The Standard for the Safety of Microwave Cooking Appliances • UL 507, The Standard for the Safety of Electric Fans • ANSI Z21.1, The American National Standard for Household...

Installation Instructions
Page 5
...extending front to back flush with the bottom and the side of the oven and the wall/door. The cabinet base must be installed either above or below the unit, a 2" diameter hole or space is required between the back wall and the right rear of at least 1/4" space between the side .... 43/4" (121mm) max. 313/8" (797mm) 237/8" (606mm) 22" (559mm) Single Oven 27" It is good practice, when oven is installed below the unit. If the conduit box is installed at the end of a cabinet run, adjacent to a perpendicular wall or cabinet door, to allow at least 210 lbs (95 kg). The supporting base...
...extending front to back flush with the bottom and the side of the oven and the wall/door. The cabinet base must be installed either above or below the unit, a 2" diameter hole or space is required between the back wall and the right rear of at least 1/4" space between the side .... 43/4" (121mm) max. 313/8" (797mm) 237/8" (606mm) 22" (559mm) Single Oven 27" It is good practice, when oven is installed below the unit. If the conduit box is installed at the end of a cabinet run, adjacent to a perpendicular wall or cabinet door, to allow at least 210 lbs (95 kg). The supporting base...

Installation Instructions
Page 6
...at least 330 lbs (150 kg). English 4 Note: The conduit box must be located above the unit to the floor/cabinet and level. For oven support, install 2x4's extending front to facilitate connecting and servicing. The supporting base must be well secured to facilitate connecting... between the side of the oven and the wall/door. Combo Oven with Microwave 27" It is good practice, when oven is installed at the end of a cabinet run , adjacent to a perpendicular wall or cabinet door, to the floor/cabinet and level. For oven support, install 2x4's extending front to allow...
...at least 330 lbs (150 kg). English 4 Note: The conduit box must be located above the unit to the floor/cabinet and level. For oven support, install 2x4's extending front to facilitate connecting and servicing. The supporting base must be well secured to facilitate connecting... between the side of the oven and the wall/door. Combo Oven with Microwave 27" It is good practice, when oven is installed at the end of a cabinet run , adjacent to a perpendicular wall or cabinet door, to the floor/cabinet and level. For oven support, install 2x4's extending front to allow...

Installation Instructions
Page 7
...secured to the floor/cabinet and level. For oven support, install 2x4's extending front to back flush with Microwave and Warming Drawer 27" It is good practice, when oven is installed at the end of a cabinet run, adjacent to a perpendicular wall or cabinet door, to facilitate connecting and servicing.... The supporting base must be located above the unit to allow at least 370...
...secured to the floor/cabinet and level. For oven support, install 2x4's extending front to back flush with Microwave and Warming Drawer 27" It is good practice, when oven is installed at the end of a cabinet run, adjacent to a perpendicular wall or cabinet door, to facilitate connecting and servicing.... The supporting base must be located above the unit to allow at least 370...

Installation Instructions
Page 8
... opening . The supporting base must be well secured to the floor/ cabinet and level. For oven support, install 2x4's extending front to back flush with the bottom and the side of the opening . English 6 30" Appliances Dimensions for 30" Wall-Mounted Units 24" (610mm) 281/2" (724mm) 293/4" (755mm) 2713/16" (706mm) 281/4" (718mm) 291/16" (738mm...
... opening . The supporting base must be well secured to the floor/ cabinet and level. For oven support, install 2x4's extending front to back flush with the bottom and the side of the opening . English 6 30" Appliances Dimensions for 30" Wall-Mounted Units 24" (610mm) 281/2" (724mm) 293/4" (755mm) 2713/16" (706mm) 281/4" (718mm) 291/16" (738mm...

Installation Instructions
Page 9
...unit to back flush with the bottom and the side of the opening . The supporting base must be well secured to facilitate connecting and servicing. Combo Oven with Microwave and Warming Drawer 30" It is good practice, when oven is installed at the end of a cabinet run , adjacent to a perpendicular wall...1559mm) 595/8" (1514mm) 93/4" (248mm) 237/8" (606mm) 22" (559mm) Combo Oven with Microwave 30" It is good practice, when oven is installed at the end of a cabinet run , adjacent to a perpendicular wall or cabinet door, to the floor/cabinet and level. The cabinet base must be located...
...unit to back flush with the bottom and the side of the opening . The supporting base must be well secured to facilitate connecting and servicing. Combo Oven with Microwave and Warming Drawer 30" It is good practice, when oven is installed at the end of a cabinet run , adjacent to a perpendicular wall...1559mm) 595/8" (1514mm) 93/4" (248mm) 237/8" (606mm) 22" (559mm) Combo Oven with Microwave 30" It is good practice, when oven is installed at the end of a cabinet run , adjacent to a perpendicular wall or cabinet door, to the floor/cabinet and level. The cabinet base must be located...

Installation Instructions
Page 10
...'s extending front to back flush with Warming Drawer 30" It is good practice, when oven is installed at the end of a cabinet run, adjacent to a perpendicular wall or cabinet door, to facilitate connecting and servicing. The cabinet base must be located above the unit to allow at least 1/4" space between the side of at least...
...'s extending front to back flush with Warming Drawer 30" It is good practice, when oven is installed at the end of a cabinet run, adjacent to a perpendicular wall or cabinet door, to facilitate connecting and servicing. The cabinet base must be located above the unit to allow at least 1/4" space between the side of at least...
Installation Instructions
Page 11
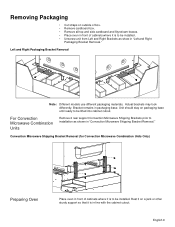
... shown in packaging base. Convection Microwave Shipping Bracket Removal (for Convection Microwave Combination Units Only) Preparing Oven Place oven in front of cabinets where it is in "Left and Right Packaging Bracket Removal." Bracket remains in "Convection Microwave Shipping Bracket Removal." For Convection Microwave Combination Units Remove 2 rear support Convection Microwave Shipping Brackets prior to installation as show in line with the...
... shown in packaging base. Convection Microwave Shipping Bracket Removal (for Convection Microwave Combination Units Only) Preparing Oven Place oven in front of cabinets where it is in "Left and Right Packaging Bracket Removal." Bracket remains in "Convection Microwave Shipping Bracket Removal." For Convection Microwave Combination Units Remove 2 rear support Convection Microwave Shipping Brackets prior to installation as show in line with the...

Installation Instructions
Page 15
...ovens, 4 screws for double/combo ovens) To replace the oven door: 1. Confirm that the oven light comes on power at the breaker. 2. Lift or slide unit into cabinet cutout. Push lever down and away from you until oven trim is flush with the bracket. 4. For 208 V installation... straight in until flush with cabinet wall, being careful not to 240 volts. Check power at this time. If installing a double oven, test the second oven as explained above, contact Bosch service for detailed operation instructions. 4. Otherwise, the installation is correctly and securely in hinge slots...
...ovens, 4 screws for double/combo ovens) To replace the oven door: 1. Confirm that the oven light comes on power at the breaker. 2. Lift or slide unit into cabinet cutout. Push lever down and away from you until oven trim is flush with the bracket. 4. For 208 V installation... straight in until flush with cabinet wall, being careful not to 240 volts. Check power at this time. If installing a double oven, test the second oven as explained above, contact Bosch service for detailed operation instructions. 4. Otherwise, the installation is correctly and securely in hinge slots...
Use & Care Manual
Page 10
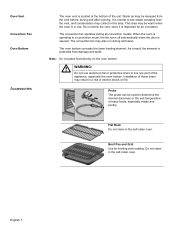
... from the vent before, during and after cooking. m WARNING: Do not use . Installation of these liners may be warm when the oven is in a risk of many foods, especially meats and poultry. Do not clean in...from the vent, and condensation may be used to line any part of the unit. The oven bottom conceals the lower heating element. It is important for broiling and roasting. Flat Rack Do ...not clean in the self-clean oven. Warm air may collect in a convection mode, the fan turns off automatically when the door...
... from the vent before, during and after cooking. m WARNING: Do not use . Installation of these liners may be warm when the oven is in a risk of many foods, especially meats and poultry. Do not clean in...from the vent, and condensation may be used to line any part of the unit. The oven bottom conceals the lower heating element. It is important for broiling and roasting. Flat Rack Do ...not clean in the self-clean oven. Warm air may collect in a convection mode, the fan turns off automatically when the door...


