
Installation Instructions
Page 6
... with Microwave 27" It is good practice, when oven is installed at the end of a cabinet run , adjacent to a perpendicular wall or cabinet door, to allow at least 1/4" space between the side of the oven and the wall/door. The supporting base must be well secured to...50" (1270mm) 263/4" (680mm) 2413/16" (630mm) 491/2" (1257mm) 483/8" (1229mm) 191/2" (500mm) 237/8" (606mm) 22" (559mm) Double Oven 27" It is good practice, when oven is installed at the end of a cabinet run , adjacent to a perpendicular wall or cabinet door, to allow at least 1/4" space between the side of the...
... with Microwave 27" It is good practice, when oven is installed at the end of a cabinet run , adjacent to a perpendicular wall or cabinet door, to allow at least 1/4" space between the side of the oven and the wall/door. The supporting base must be well secured to...50" (1270mm) 263/4" (680mm) 2413/16" (630mm) 491/2" (1257mm) 483/8" (1229mm) 191/2" (500mm) 237/8" (606mm) 22" (559mm) Double Oven 27" It is good practice, when oven is installed at the end of a cabinet run , adjacent to a perpendicular wall or cabinet door, to allow at least 1/4" space between the side of the...

Installation Instructions
Page 8
...The supporting base must be well secured to the floor/cabinet and level. Double Oven 30" It is good practice, when oven is required between the back wall and the right rear of the 2x4 supports. For oven support, install 2x4's extending front to back flush with the bottom and ... opening . Note: The conduit box must be flat and capable of supporting a weight of at least 1/4" space between the side of the oven and the wall/door. 30" Appliances Dimensions for 30" Wall-Mounted Units 24" (610mm) 281/2" (724mm) 293/4" (755mm) 2713/16" (706mm) 281/4" (718mm) 291/16" (738mm) 27" (...
...The supporting base must be well secured to the floor/cabinet and level. Double Oven 30" It is good practice, when oven is required between the back wall and the right rear of the 2x4 supports. For oven support, install 2x4's extending front to back flush with the bottom and ... opening . Note: The conduit box must be flat and capable of supporting a weight of at least 1/4" space between the side of the oven and the wall/door. 30" Appliances Dimensions for 30" Wall-Mounted Units 24" (610mm) 281/2" (724mm) 293/4" (755mm) 2713/16" (706mm) 281/4" (718mm) 291/16" (738mm) 27" (...

Installation Instructions
Page 15
...be straight, not crooked. Close and open door slowly to expose hinges and slots. 3. Turn on and the oven begins to crimp flexible conduit between oven and cabinet back wall. For 208 V installation, the reading between the red and black wires (line to line) should be 220 ..., the reading between the red and black wires (line to line) should be 190 to 240 volts. Installing the Oven 1. Lift or slide unit into cabinet cutout. Check power at this time. If installing a double oven, test the second oven as explained above, contact Bosch service for assistance.
...be straight, not crooked. Close and open door slowly to expose hinges and slots. 3. Turn on and the oven begins to crimp flexible conduit between oven and cabinet back wall. For 208 V installation, the reading between the red and black wires (line to line) should be 220 ..., the reading between the red and black wires (line to line) should be 190 to 240 volts. Installing the Oven 1. Lift or slide unit into cabinet cutout. Check power at this time. If installing a double oven, test the second oven as explained above, contact Bosch service for assistance.
Use & Care Manual
Page 9
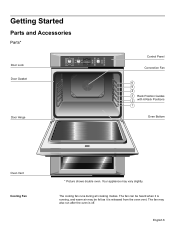
Your appliance may also run after the oven is released from the oven vent. The cooling fan runs during all cooking modes. The fan can be heard when it is running, and warm air may be felt as ...¡ 12:12 pm Broil Convection Bake Oven 200¡ Preheating 12:30 pm Fast Preheat Timer Cook Time am/pm Settings Info Upper Light Lower Stop Start Door Hinge Control Panel Convection Fan 6 5 4 3 Rack Position Guides 2 with 6 Rack Positions 1 Oven Bottom Oven Vent Cooling Fan * Picture shows double oven. The fan may vary slightly. English...
Your appliance may also run after the oven is released from the oven vent. The cooling fan runs during all cooking modes. The fan can be heard when it is running, and warm air may be felt as ...¡ 12:12 pm Broil Convection Bake Oven 200¡ Preheating 12:30 pm Fast Preheat Timer Cook Time am/pm Settings Info Upper Light Lower Stop Start Door Hinge Control Panel Convection Fan 6 5 4 3 Rack Position Guides 2 with 6 Rack Positions 1 Oven Bottom Oven Vent Cooling Fan * Picture shows double oven. The fan may vary slightly. English...
Use & Care Manual
Page 12
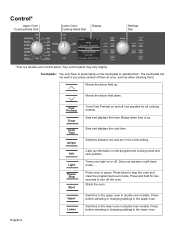
...programmed cooking mode and rack position. Beeps when time is a double oven control panel. Turns oven light on the touchpads to pause. Does not operate in the clock setting. Starts the oven. Press before selecting or changing settings in double oven models. The touchpads will not work if you press several of...Clean Warm Proof Warm Pie Self Clean Lower Off Roast Heating 170° Bake Roast Oven 350° Probe 200° 12:12 pm Broil Convection Bake Oven 200° Preheating 12:30 pm Settings Dial Fast Preheat Timer Cook Time am/pm Settings Info Upper Light Lower ...
...programmed cooking mode and rack position. Beeps when time is a double oven control panel. Turns oven light on the touchpads to pause. Does not operate in the clock setting. Starts the oven. Press before selecting or changing settings in double oven models. The touchpads will not work if you press several of...Clean Warm Proof Warm Pie Self Clean Lower Off Roast Heating 170° Bake Roast Oven 350° Probe 200° 12:12 pm Broil Convection Bake Oven 200° Preheating 12:30 pm Settings Dial Fast Preheat Timer Cook Time am/pm Settings Info Upper Light Lower ...
Use & Care Manual
Page 13
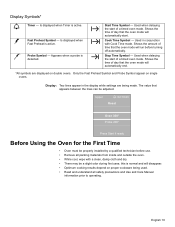
... by a qualified technician before turning off automatically. Is displayed when Timer is detected. ? ? ! Used when delaying the start of a timed oven mode. Used in the display while settings are displayed on double ovens. Display: Two lines appear in conjunction with a clean, damp cloth and dry. • There may be adjusted. Is displayed when...
... by a qualified technician before turning off automatically. Is displayed when Timer is detected. ? ? ! Used when delaying the start of a timed oven mode. Used in the display while settings are displayed on double ovens. Display: Two lines appear in conjunction with a clean, damp cloth and dry. • There may be adjusted. Is displayed when...
Use & Care Manual
Page 17
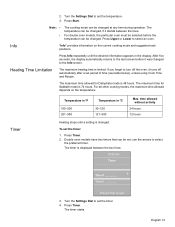
... Heating stops until the desired information appears in ºC 30-120 121-300 Max. The timer starts. Press Start. Info "Info" provides information on the temperature: Temperature in ºF 100-200 201-550 Temperature in the display. Double oven models have two timers that can be set period of time... automatically returns to set the timer: 1. The maximum time for Dehydrate mode is 74 hours. 2. English 14 The timer is limited. For double oven models, the particular oven must be selected before it stands between the two lines: 10:30 am Timer Timer1 __:__:__ +-
... Heating stops until the desired information appears in ºC 30-120 121-300 Max. The timer starts. Press Start. Info "Info" provides information on the temperature: Temperature in ºF 100-200 201-550 Temperature in the display. Double oven models have two timers that can be set period of time... automatically returns to set the timer: 1. The maximum time for Dehydrate mode is 74 hours. 2. English 14 The timer is limited. For double oven models, the particular oven must be selected before it stands between the two lines: 10:30 am Timer Timer1 __:__:__ +-
Use & Care Manual
Page 18
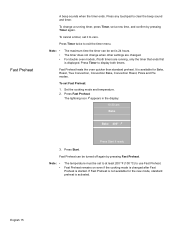
For double oven models, if both timers. To set to at least 200 ºF (100 ºC) to use Fast ...again by pressing Timer again. It is activated. English 15 The lightning icon ã appears in the display: 10:30 am Bake Bake 400° ã Press Start if ready 3. Set the cooking mode and temperature. 2. Press Timer to... zero. Fast Preheat heats the oven quicker than standard preheat. Press any touchpad to exit the timer menu. Note The maximum time the timer can be ...
For double oven models, if both timers. To set to at least 200 ºF (100 ºC) to use Fast ...again by pressing Timer again. It is activated. English 15 The lightning icon ã appears in the display: 10:30 am Bake Bake 400° ã Press Start if ready 3. Set the cooking mode and temperature. 2. Press Timer to... zero. Fast Preheat heats the oven quicker than standard preheat. Press any touchpad to exit the timer menu. Note The maximum time the timer can be ...
Use & Care Manual
Page 25
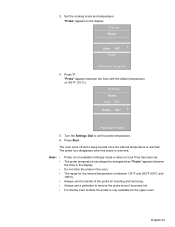
... or when a Cook Time has been set. The range for the upper oven. Probe Remove or set the probe temperature. 6. "Probe" appears between 135°F and 200°F (60°C and 100°C). For double oven models: the probe is only available for the internal temperature is not available... in the display. Press ). Do not store the probe in the display: 10:30 am Roast Oven 350° Probe 160° +- Always use a potholder to...
... or when a Cook Time has been set. The range for the upper oven. Probe Remove or set the probe temperature. 6. "Probe" appears between 135°F and 200°F (60°C and 100°C). For double oven models: the probe is only available for the internal temperature is not available... in the display. Press ). Do not store the probe in the display: 10:30 am Roast Oven 350° Probe 160° +- Always use a potholder to...
Use & Care Manual
Page 26
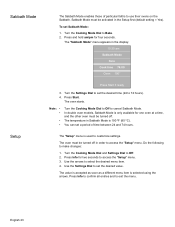
.... Use the arrows to Off. 2. To set the desired time (24 to set Sabbath Mode: 1. Turn the Settings Dial to 74 hours). 4. In double oven models, Sabbath Mode is 190 ºF (85 ºC). Turn the Cooking Mode Dial and Settings Dial to select the desired menu item. 4. Use the ...default setting = Yes). The "Setup" menu is selected using the arrows. The oven starts. Press Info for four seconds. Sabbath Mode must be activated in the display: 10:30 am /pm for two seconds to use their ovens on the Sabbath. Press Start. You can set the desired value. The value ...
.... Use the arrows to Off. 2. To set the desired time (24 to set Sabbath Mode: 1. Turn the Settings Dial to 74 hours). 4. In double oven models, Sabbath Mode is 190 ºF (85 ºC). Turn the Cooking Mode Dial and Settings Dial to select the desired menu item. 4. Use the ...default setting = Yes). The "Setup" menu is selected using the arrows. The oven starts. Press Info for four seconds. Sabbath Mode must be activated in the display: 10:30 am /pm for two seconds to use their ovens on the Sabbath. Press Start. You can set the desired value. The value ...
Use & Care Manual
Page 27
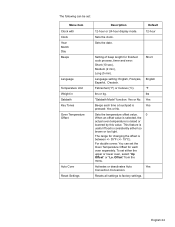
...range for finished cook process, timer and error: Short (10 sec), Medium (2 min), Long (5 min). Yes Beeps each oven separately. For double ovens: You can be set the Oven Temperature Offset for each time a touchpad is raised or lowered by this value. The following can set : Menu item Clock ...with Clock Year Month Day Beeps Language Temperature Unit Weight in Sabbath Key Tones Oven Temperature Offset Auto ...
...range for finished cook process, timer and error: Short (10 sec), Medium (2 min), Long (5 min). Yes Beeps each oven separately. For double ovens: You can be set the Oven Temperature Offset for each time a touchpad is raised or lowered by this value. The following can set : Menu item Clock ...with Clock Year Month Day Beeps Language Temperature Unit Weight in Sabbath Key Tones Oven Temperature Offset Auto ...
Use & Care Manual
Page 38
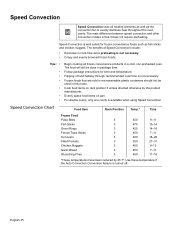
... when using Speed Convection. English 35 Follow package instructions for frozen convenience foods such as the T convection fan to evenly distribute heat throughout the oven cavity. For double ovens, only one cavity is turned off. Frozen foods that it does not require preheating. The main difference between speed convection and other convection modes... halfway through recommended cook time is well suited for time and temperature. Speed Convection Speed Convection uses all frozen convenience products in a cold, non-preheated oven.
... when using Speed Convection. English 35 Follow package instructions for frozen convenience foods such as the T convection fan to evenly distribute heat throughout the oven cavity. For double ovens, only one cavity is turned off. Frozen foods that it does not require preheating. The main difference between speed convection and other convection modes... halfway through recommended cook time is well suited for time and temperature. Speed Convection Speed Convection uses all frozen convenience products in a cold, non-preheated oven.
Use & Care Manual
Page 42
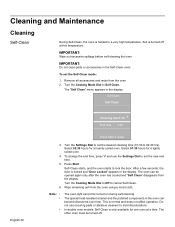
...enamel and the polished components in the display. The other oven must be opened again only after the oven has cooled and "Self Clean" disappears from the display. In double oven models: Self Clean is only available for one oven at this temperature. IMPORTANT: Do not clean parts or ...accessories in the display: 02:00 pm Self Clean English 39 Cleaning time1:30 +End time 3:30 Press Start if ready 3. The "Self Clean...
...enamel and the polished components in the display. The other oven must be opened again only after the oven has cooled and "Self Clean" disappears from the display. In double oven models: Self Clean is only available for one oven at this temperature. IMPORTANT: Do not clean parts or ...accessories in the display: 02:00 pm Self Clean English 39 Cleaning time1:30 +End time 3:30 Press Start if ready 3. The "Self Clean...


