
Installation Instructions
Page 3
... THESE INSTRUCTIONS Appliance Handling Safety Safety Codes and Standards Electric Safety WARNING: If the information in Use and Care Manual. WARNING: Do not repair or replace any part of the appliance unless specifically recommended in the OFF position. Remove the door for easy reference. Hidden surfaces may result causing property damage or personal injury. Before you plug in an electrical cord, be installed on a separate branch circuit. If required...
... THESE INSTRUCTIONS Appliance Handling Safety Safety Codes and Standards Electric Safety WARNING: If the information in Use and Care Manual. WARNING: Do not repair or replace any part of the appliance unless specifically recommended in the OFF position. Remove the door for easy reference. Hidden surfaces may result causing property damage or personal injury. Before you plug in an electrical cord, be installed on a separate branch circuit. If required...

Installation Instructions
Page 5
... side of a cabinet run, adjacent to a perpendicular wall or cabinet door, to the floor/cabinet and level. English 3 Note: The conduit box must be flat and capable of supporting a weight of at least 1/4" space between the back wall and the right rear of the oven and the wall/door. If the conduit box is installed at the end of the opening. Dimensions for 27" Wall-Mounted Units 24...
... side of a cabinet run, adjacent to a perpendicular wall or cabinet door, to the floor/cabinet and level. English 3 Note: The conduit box must be flat and capable of supporting a weight of at least 1/4" space between the back wall and the right rear of the oven and the wall/door. If the conduit box is installed at the end of the opening. Dimensions for 27" Wall-Mounted Units 24...

Installation Instructions
Page 8
... be well secured to facilitate connecting and servicing. Note: The conduit box must be installed either above the unit to the floor/ cabinet and level. Double Oven 30" It is good practice, when oven is required between the side of the opening . The cabinet base must be flat and capable of supporting a weight of the opening . Note: The conduit box must be located above or below the...
... be well secured to facilitate connecting and servicing. Note: The conduit box must be installed either above the unit to the floor/ cabinet and level. Double Oven 30" It is good practice, when oven is required between the side of the opening . The cabinet base must be flat and capable of supporting a weight of the opening . Note: The conduit box must be located above or below the...

Installation Instructions
Page 9
... supporting a weight of at least 310 lbs (141 kg). Combo Oven with Microwave and Warming Drawer 30" It is good practice, when oven is installed at the end of a cabinet run , adjacent to a perpendicular wall or cabinet door, to the floor/cabinet and level. The cabinet base must be located above the unit to back flush with the bottom and the side of the opening . Note: The conduit box...
... supporting a weight of at least 310 lbs (141 kg). Combo Oven with Microwave and Warming Drawer 30" It is good practice, when oven is installed at the end of a cabinet run , adjacent to a perpendicular wall or cabinet door, to the floor/cabinet and level. The cabinet base must be located above the unit to back flush with the bottom and the side of the opening . Note: The conduit box...

Installation Instructions
Page 12
... electrical codes for de-rating requirements. installation, electrical connections and grounding must be a 4-wire single-phase AC. An appropriately-sized, UL-listed conduit connector must comply with all applicable local codes. Installation Electrical Installation All model ovens on the front cover are dual rated, designed to be connected to the white neutral electrical supply wire. Refer to the junction box. Install a suitable conduit box (not furnished). Model Circuit Required 208V, 60 Hz 240V, 60 Hz HBN33, HBL33 25 AMP 30 AMP...
... electrical codes for de-rating requirements. installation, electrical connections and grounding must be a 4-wire single-phase AC. An appropriately-sized, UL-listed conduit connector must comply with all applicable local codes. Installation Electrical Installation All model ovens on the front cover are dual rated, designed to be connected to the white neutral electrical supply wire. Refer to the junction box. Install a suitable conduit box (not furnished). Model Circuit Required 208V, 60 Hz 240V, 60 Hz HBN33, HBL33 25 AMP 30 AMP...

Installation Instructions
Page 14
... handle as it stops. Close door carefully until it may be removed to do not force door open or closed . 5. Holding the door firmly on hinges toward you. 4. Failure to reduce the weight of the oven door. Use both hands, pull the door up and out of the hinge slots. Place the door in place before installing into the cabinet. Open the door completely. 3. the door is glass. Removing the Oven Door For ease of installation...
... handle as it stops. Close door carefully until it may be removed to do not force door open or closed . 5. Holding the door firmly on hinges toward you. 4. Failure to reduce the weight of the oven door. Use both hands, pull the door up and out of the hinge slots. Place the door in place before installing into the cabinet. Open the door completely. 3. the door is glass. Removing the Oven Door For ease of installation...

Installation Instructions
Page 15
... Bosch service for double/combo ovens) To replace the oven door: 1. Do not lift appliance by door handle. 2. Confirm that the oven light comes on power at this time. Close and open door slowly to line) should be straight, not crooked. Door must be 220 to expose hinges and slots. 3. If any of the tests do not result as well. 7. Test the oven mode. See the Use and Care Manual for detailed operation instructions. 4. Installing the Oven...
... Bosch service for double/combo ovens) To replace the oven door: 1. Do not lift appliance by door handle. 2. Confirm that the oven light comes on power at this time. Close and open door slowly to line) should be straight, not crooked. Door must be 220 to expose hinges and slots. 3. If any of the tests do not result as well. 7. Test the oven mode. See the Use and Care Manual for detailed operation instructions. 4. Installing the Oven...
Use & Care Manual
Page 5
.... See the Warranty. The use of corrosive chemicals in heating or cleaning will reduce the risk of the appliance unless specifically recommended in risk of the circuit breaker or fuse. If this manual. Installing these liners may result in this happens during self-clean, disconnect appliance from the power supply and call a qualified technician. If materials inside an oven should ignite, keep door closed. When using kitchen appliances...
.... See the Warranty. The use of corrosive chemicals in heating or cleaning will reduce the risk of the appliance unless specifically recommended in risk of the circuit breaker or fuse. If this manual. Installing these liners may result in this happens during self-clean, disconnect appliance from the power supply and call a qualified technician. If materials inside an oven should ignite, keep door closed. When using kitchen appliances...
Use & Care Manual
Page 9
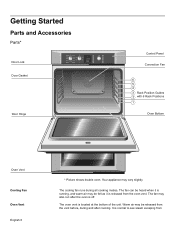
... all cooking modes. It is located at the bottom of the unit. Getting Started Parts and Accessories Parts* Door Lock Upper Convection Bake Off Conv Broil Conv Roast Pizza Self Clean Pie Lower Bake Off Broil Selfclean Bake Roast Warm Broil Warm Proof Roast Upper Temp Timer Clock Cook Time Settings Fast Preheat Light Upper Lower Door Gasket Door Hinge Control Panel Convection Fan 6 5 4 3 Rack Position Guides 2 with 6 Rack Positions 1 Oven Bottom Oven Vent Cooling Fan Oven Vent English 6 * Picture shows double oven. The oven vent is normal to see steam escaping...
... all cooking modes. It is located at the bottom of the unit. Getting Started Parts and Accessories Parts* Door Lock Upper Convection Bake Off Conv Broil Conv Roast Pizza Self Clean Pie Lower Bake Off Broil Selfclean Bake Roast Warm Broil Warm Proof Roast Upper Temp Timer Clock Cook Time Settings Fast Preheat Light Upper Lower Door Gasket Door Hinge Control Panel Convection Fan 6 5 4 3 Rack Position Guides 2 with 6 Rack Positions 1 Oven Bottom Oven Vent Cooling Fan Oven Vent English 6 * Picture shows double oven. The oven vent is normal to see steam escaping...
Use & Care Manual
Page 10
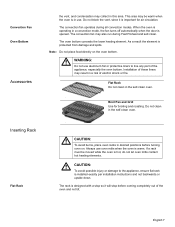
... heating elements. m WARNING: Do not use oven mitts when the oven is in use. Inserting Rack Flat Rack m CAUTION: To avoid burns, place oven racks in a convection mode, the fan turns off automatically when the door is important for broiling and roasting. When the oven is operating in desired positions before coming completely out of the oven and not tilt. Do not clean in the self-clean oven. If a rack must be warm when the oven is warm...
... heating elements. m WARNING: Do not use oven mitts when the oven is in use. Inserting Rack Flat Rack m CAUTION: To avoid burns, place oven racks in a convection mode, the fan turns off automatically when the door is important for broiling and roasting. When the oven is operating in desired positions before coming completely out of the oven and not tilt. Do not clean in the self-clean oven. If a rack must be warm when the oven is warm...
Use & Care Manual
Page 12
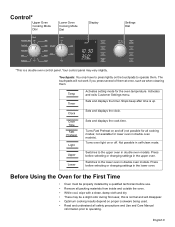
... Oven Cooking Mode Dial Lower Oven Cooking Mode Dial Upper Convection Bake Off Conv Broil Conv Roast Pizza Self Clean Pie Lower Bake Off Broil Self Clean Bake Roast Warm Broil Warm Proof Roast Display Upper Temp Timer Clock Cook Time Settings Dial Settings Fast Preheat Light Upper Lower *This is up. The touchpads will disappear. • Optimum cooking results depend on and off . Activates and exits Customer Settings menu. Stops beep after time is a double oven control panel. Cook Time Fast Preheat Light Sets and displays the cook time. Upper Lower Switches...
... Oven Cooking Mode Dial Lower Oven Cooking Mode Dial Upper Convection Bake Off Conv Broil Conv Roast Pizza Self Clean Pie Lower Bake Off Broil Self Clean Bake Roast Warm Broil Warm Proof Roast Display Upper Temp Timer Clock Cook Time Settings Dial Settings Fast Preheat Light Upper Lower *This is up. The touchpads will disappear. • Optimum cooking results depend on and off . Activates and exits Customer Settings menu. Stops beep after time is a double oven control panel. Cook Time Fast Preheat Light Sets and displays the cook time. Upper Lower Switches...
Use & Care Manual
Page 14
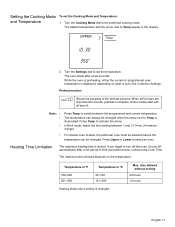
... switch between 1 and 3 (1=low, 2=medium, 3=high). • For double oven models, the particular oven must be selected before the temperature can always be changed. Heating Time Limitation The maximum heating time is illuminated. Turn the Cooking Mode dial to select an oven. While the oven is preheating, either the current or programmed oven temperature is displayed, depending on the temperature: Temperature in ºF Temperature in the display: UPPER Temp 2. Note: • • • Press Temp to Temp...
... switch between 1 and 3 (1=low, 2=medium, 3=high). • For double oven models, the particular oven must be selected before the temperature can always be changed. Heating Time Limitation The maximum heating time is illuminated. Turn the Cooking Mode dial to select an oven. While the oven is preheating, either the current or programmed oven temperature is displayed, depending on the temperature: Temperature in ºF Temperature in the display: UPPER Temp 2. Note: • • • Press Temp to Temp...
Use & Care Manual
Page 19
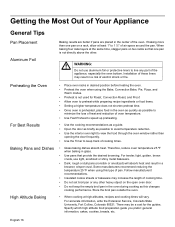
... one pan on two racks so that provide the desired browning. Some manufacturers recommend reducing the temperature 25 ºF when using the Bake, Convection Bake, Pie, Pizza, and Warm modes. • Preheat is not directly above the other heavy object on the open oven door. • Do not keep the empty broil pan in a risk of the oven. There may increase the length of cooking times. • Glass baking dishes absorb heat...
... one pan on two racks so that provide the desired browning. Some manufacturers recommend reducing the temperature 25 ºF when using the Bake, Convection Bake, Pie, Pizza, and Warm modes. • Preheat is not directly above the other heavy object on the open oven door. • Do not keep the empty broil pan in a risk of the oven. There may increase the length of cooking times. • Glass baking dishes absorb heat...
Use & Care Manual
Page 20
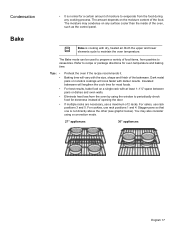
... control panel. The Bake mode can be used to evaporate from the food during any surface cooler than the inside of food items, from the oven by using a convection mode. 27" appliances: 30" appliances: English 17 Tips: • • • • • Preheat the oven if the recipe recommends it. Dark metal pans or nonstick coatings will cook faster with dry, heated air. You may condense on a single rack...
... control panel. The Bake mode can be used to evaporate from the food during any surface cooler than the inside of food items, from the oven by using a convection mode. 27" appliances: 30" appliances: English 17 Tips: • • • • • Preheat the oven if the recipe recommends it. Dark metal pans or nonstick coatings will cook faster with dry, heated air. You may condense on a single rack...

Use & Care Manual
Page 24
... meat stand covered with the oven for large cuts of the meat. Roasting bags are suitable for preparing tender cuts of the exterior while the inside remains especially moist. The Convection Roast mode is well suited for use cooking bags. Check doneness early, since roasting time may decrease. Use the broil pan and grid provided with foil 10-15 minutes after removing it from the top and bottom elements as...
... meat stand covered with the oven for large cuts of the meat. Roasting bags are suitable for preparing tender cuts of the exterior while the inside remains especially moist. The Convection Roast mode is well suited for use cooking bags. Check doneness early, since roasting time may decrease. Use the broil pan and grid provided with foil 10-15 minutes after removing it from the top and bottom elements as...
Use & Care Manual
Page 27
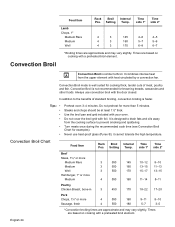
... tolerate the high temperature. In addition to drain fats and oils away from the upper element with the door closed. Convection Broil Chart Food Item Rack Broil Internal Time Time Pos. Setting Temp. Always use heat-proof glass (Pyrex ®); Convection Broil mode is well suited for more Sausage, fresh 4 550 160 9-11 8-10 4 550 180 5-7 3-5 *Convection broiling times are based on cooking with a preheated broil element. Convection Broil is faster. Tips • • Preheat oven 3-4 minutes. Food...
... tolerate the high temperature. In addition to drain fats and oils away from the upper element with the door closed. Convection Broil Chart Food Item Rack Broil Internal Time Time Pos. Setting Temp. Always use heat-proof glass (Pyrex ®); Convection Broil mode is well suited for more Sausage, fresh 4 550 160 9-11 8-10 4 550 180 5-7 3-5 *Convection broiling times are based on cooking with a preheated broil element. Convection Broil is faster. Tips • • Preheat oven 3-4 minutes. Food...
Use & Care Manual
Page 29
... operation. Avoid These Cleaners Do not use scouring pads or abrasive cleaners. "Self Clean", "Cook Time" and the corresponding arrow appear in the display. Select 2:30 hours for a lightly soiled oven. This is unlocked when "End" appears in the display: Cook Time Self Clean Cook Time 3. Remove all accessories and racks from the oven using a moist cloth. The arrow next to set the self-clean mode: 1. Turn the settings dial to Cook Time disappears and the oven door is heated to a very high temperature...
... operation. Avoid These Cleaners Do not use scouring pads or abrasive cleaners. "Self Clean", "Cook Time" and the corresponding arrow appear in the display. Select 2:30 hours for a lightly soiled oven. This is unlocked when "End" appears in the display: Cook Time Self Clean Cook Time 3. Remove all accessories and racks from the oven using a moist cloth. The arrow next to set the self-clean mode: 1. Turn the settings dial to Cook Time disappears and the oven door is heated to a very high temperature...
Use & Care Manual
Page 31
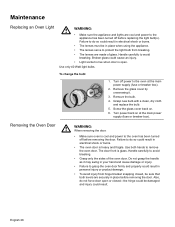
... oven has been turned off before replacing the light bulb(s). Do not grasp the handle as it . 3. Removing the Oven Door m WARNING: When removing the door: • Make sure oven is heavy and fragile. Also, do so could result. Grasp new bulb with a clean, dry cloth and replace the bulb. 5. Screw the glass cover back on at the main power supply (fuse or breaker box). 2. Failure to do not force door open . To change the bulb: 1. Use...
... oven has been turned off before replacing the light bulb(s). Do not grasp the handle as it . 3. Removing the Oven Door m WARNING: When removing the door: • Make sure oven is heavy and fragile. Also, do so could result. Grasp new bulb with a clean, dry cloth and replace the bulb. 5. Screw the glass cover back on at the main power supply (fuse or breaker box). 2. Failure to do not force door open . To change the bulb: 1. Use...
Use & Care Manual
Page 33
... "Oven Temperature Offset" under "Customer Settings". Replace or reinsert the light bulb if loose or defective. Oven light does not turn knob to cool before running self-clean. Allow the oven to stop beeping. Press any key or turn off at the circuit breaker and wait five minutes. Reset oven if necessary. Check circuit breaker or fuse box to cooking charts for recommended rack position. Refer to your house. Baking results are not as expected. The oven thermostat needs adjustment...
... "Oven Temperature Offset" under "Customer Settings". Replace or reinsert the light bulb if loose or defective. Oven light does not turn knob to cool before running self-clean. Allow the oven to stop beeping. Press any key or turn off at the circuit breaker and wait five minutes. Reset oven if necessary. Check circuit breaker or fuse box to cooking charts for recommended rack position. Refer to your house. Baking results are not as expected. The oven thermostat needs adjustment...
Use & Care Manual
Page 36
... installation problems (you how to install the product in strict conformity with the Product; Products on , in conjunction with air or water-going vessels). • Any party's willful misconduct, negligence, misuse, abuse, accidents, neglect, improper operation, failure to maintain, improper or negligent installation, tampering, failure to follow operating instructions, mishandling, unauthorized service (including self-performed "fixing" or exploration of the appliance's internal workings). • Adjustment...
... installation problems (you how to install the product in strict conformity with the Product; Products on , in conjunction with air or water-going vessels). • Any party's willful misconduct, negligence, misuse, abuse, accidents, neglect, improper operation, failure to maintain, improper or negligent installation, tampering, failure to follow operating instructions, mishandling, unauthorized service (including self-performed "fixing" or exploration of the appliance's internal workings). • Adjustment...


