Installation Instructions
Page 11
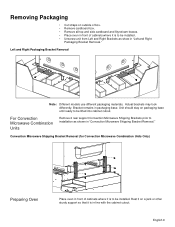
...Bracket remains in packaging base. Left and Right Packaging Bracket Removal Note: Different models use different packaging materials. Convection Microwave Shipping Bracket Removal (for Convection Microwave Combination Units Only) Preparing Oven Place oven in front of cabinets where it is in line with the cabinet cutout....on outside of box. • Remove cardboard box. • Remove all top and side cardboard and Styrofoam braces. • Place oven in front of cabinets where it is to be installed. • Unscrew unit from Left and Right Brackets as shown in "Convection ...
...Bracket remains in packaging base. Left and Right Packaging Bracket Removal Note: Different models use different packaging materials. Convection Microwave Shipping Bracket Removal (for Convection Microwave Combination Units Only) Preparing Oven Place oven in front of cabinets where it is in line with the cabinet cutout....on outside of box. • Remove cardboard box. • Remove all top and side cardboard and Styrofoam braces. • Place oven in front of cabinets where it is to be installed. • Unscrew unit from Left and Right Brackets as shown in "Convection ...

Installation Instructions
Page 12
...HBN54, HBL54 HBL85 30 AMP 30 AMP HBN35, HBL35, HBN56, HBL56, HBL57, HBL8650, HBL8750 40 or 50 Amp circuit. Important: Local Codes may vary; installation, electrical connections and grounding must be used to correctly attach the conduit to the white neutral electrical supply wire. The electrical supply should be ...connected to either 208/240V AC, 60 Hz, 4 wire, single-phase power supply. English 10 Installation Electrical Installation All model ovens on the front cover are dual rated, designed to be a 4-wire single-phase AC. Install a suitable conduit box (not furnished...
...HBN54, HBL54 HBL85 30 AMP 30 AMP HBN35, HBL35, HBN56, HBL56, HBL57, HBL8650, HBL8750 40 or 50 Amp circuit. Important: Local Codes may vary; installation, electrical connections and grounding must be used to correctly attach the conduit to the white neutral electrical supply wire. The electrical supply should be ...connected to either 208/240V AC, 60 Hz, 4 wire, single-phase power supply. English 10 Installation Electrical Installation All model ovens on the front cover are dual rated, designed to be a 4-wire single-phase AC. Install a suitable conduit box (not furnished...
Installation Instructions
Page 16
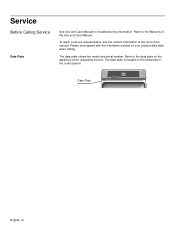
Refer to the data plate on the appliance when requesting service. To reach a service representative, see the contact information at the front of the control panel: Data Plate English 14 Please be prepared with the information printed on the underside of the manual. Refer to the Warranty in the Use and Care Manual. The data plate is located on your product data plate when calling. The data plate shows the model and serial number. Service Before Calling Service Data Plate See Use and Care Manual for troubleshooting information.
Refer to the data plate on the appliance when requesting service. To reach a service representative, see the contact information at the front of the control panel: Data Plate English 14 Please be prepared with the information printed on the underside of the manual. Refer to the Warranty in the Use and Care Manual. The data plate is located on your product data plate when calling. The data plate shows the model and serial number. Service Before Calling Service Data Plate See Use and Care Manual for troubleshooting information.
Use & Care Manual
Page 12
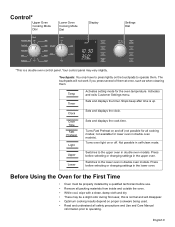
... Sets and displays the cook time. not available for the oven temperature. Not possible in double oven models). Switches to the upper oven in the lower oven. Press before selecting or changing settings in double oven models. Upper Lower Switches to the lower oven in the upper oven. Turns oven light on proper cookware being used. • Read and understand...
... Sets and displays the cook time. not available for the oven temperature. Not possible in double oven models). Switches to the upper oven in the lower oven. Press before selecting or changing settings in double oven models. Upper Lower Switches to the lower oven in the upper oven. Turns oven light on proper cookware being used. • Read and understand...
Use & Care Manual
Page 14
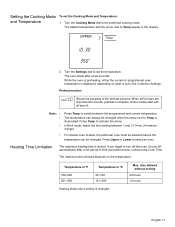
...If you forget to switch between 1 and 3 (1=low, 2=medium, 3=high). • For double oven models, the particular oven must be selected before the temperature can always be changed . The oven starts after a set in the display: UPPER Temp 2. In Broil mode, adjust the broil setting between ...Mode and Temperature To set the temperature. While the oven is preheating, either the current or programmed oven temperature is displayed, depending on the temperature: Temperature in ºF Temperature in ºC 100-200 201-550 30-120 121-300 Heating stops until a setting is ...
...If you forget to switch between 1 and 3 (1=low, 2=medium, 3=high). • For double oven models, the particular oven must be selected before the temperature can always be changed . The oven starts after a set in the display: UPPER Temp 2. In Broil mode, adjust the broil setting between ...Mode and Temperature To set the temperature. While the oven is preheating, either the current or programmed oven temperature is displayed, depending on the temperature: Temperature in ºF Temperature in ºC 100-200 201-550 30-120 121-300 Heating stops until a setting is ...
Use & Care Manual
Page 29
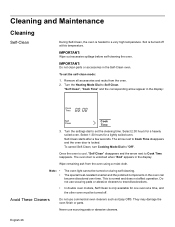
...use scouring pads or abrasive cleaners to treat discolorations. • In double oven models, Self Clean is only available for one oven at this temperature. English 26 Remove all accessories and racks from the oven using a moist cloth. "Self Clean", "Cook Time" and the corresponding... the self-clean mode: 1. Select 1:30 hours for a heavily soiled oven. IMPORTANT: Wipe out excessive spillage before self-cleaning the oven. Select 2:30 hours for a lightly soiled oven. They may damage the oven finish or parts. Note: • • The oven light cannot be turned off at a ...
...use scouring pads or abrasive cleaners to treat discolorations. • In double oven models, Self Clean is only available for one oven at this temperature. English 26 Remove all accessories and racks from the oven using a moist cloth. "Self Clean", "Cook Time" and the corresponding... the self-clean mode: 1. Select 1:30 hours for a heavily soiled oven. IMPORTANT: Wipe out excessive spillage before self-cleaning the oven. Select 2:30 hours for a lightly soiled oven. They may damage the oven finish or parts. Note: • • The oven light cannot be turned off at a ...
Use & Care Manual
Page 34
... of the touch key. Cooling fan runs even when the oven is turned off , until the oven has cooled sufficiently. It is located on your finger. Fan is preheating. On some models, the convection fan runs while the oven is running during modes that surface is touched. Data Plate ...The data plate shows the model and serial number. Please be prepared with the information printed on the underside...
... of the touch key. Cooling fan runs even when the oven is turned off , until the oven has cooled sufficiently. It is located on your finger. Fan is preheating. On some models, the convection fan runs while the oven is running during modes that surface is touched. Data Plate ...The data plate shows the model and serial number. Please be prepared with the information printed on the underside...
Use & Care Manual
Page 35
... it Applies to Limited Product Warranty applies only to the Bosch appliance sold to you, the first using a Bosch-authorized service provider during normal business hours. Repair/Replace as is", or previously returned model), and not for resale, or commercial use an un-... in the unlikely event of Warranty Product Bosch is reasonably inaccessible, hazardous, threatening, or treacherous locale, surroundings, or environment; Bosch will replace your Product (upgraded models may be fully liable and responsible for repairs or work on Bosch products, and who possess, in materials ...
... it Applies to Limited Product Warranty applies only to the Bosch appliance sold to you, the first using a Bosch-authorized service provider during normal business hours. Repair/Replace as is", or previously returned model), and not for resale, or commercial use an un-... in the unlikely event of Warranty Product Bosch is reasonably inaccessible, hazardous, threatening, or treacherous locale, surroundings, or environment; Bosch will replace your Product (upgraded models may be fully liable and responsible for repairs or work on Bosch products, and who possess, in materials ...


