
Installation Instructions
Page 5
...27" (686mm) min. 43/4" (121mm) max. 313/8" (797mm) 237/8" (606mm) 22" (559mm) Single Oven 27" It is good practice, when oven is required between the side of the oven and the wall/door. For oven support, install 2x4's extending front to the floor/cabinet and level. The cabinet base must be flat... and capable of supporting a weight of at least 1/4" space between the back wall and the right...
...27" (686mm) min. 43/4" (121mm) max. 313/8" (797mm) 237/8" (606mm) 22" (559mm) Single Oven 27" It is good practice, when oven is required between the side of the oven and the wall/door. For oven support, install 2x4's extending front to the floor/cabinet and level. The cabinet base must be flat... and capable of supporting a weight of at least 1/4" space between the back wall and the right...

Installation Instructions
Page 6
...flush with Microwave 27" It is good practice, when oven is installed at the end of a cabinet run , adjacent to a perpendicular wall or cabinet door, to allow at least 1/4" space between the side of the oven and the wall/door. The supporting base must be well secured to the... (1270mm) 263/4" (680mm) 2413/16" (630mm) 491/2" (1257mm) 483/8" (1229mm) 191/2" (500mm) 237/8" (606mm) 22" (559mm) Double Oven 27" It is good practice, when oven is installed at the end of a cabinet run , adjacent to a perpendicular wall or cabinet door, to allow at least 1/4" space between the side of the...
...flush with Microwave 27" It is good practice, when oven is installed at the end of a cabinet run , adjacent to a perpendicular wall or cabinet door, to allow at least 1/4" space between the side of the oven and the wall/door. The supporting base must be well secured to the... (1270mm) 263/4" (680mm) 2413/16" (630mm) 491/2" (1257mm) 483/8" (1229mm) 191/2" (500mm) 237/8" (606mm) 22" (559mm) Double Oven 27" It is good practice, when oven is installed at the end of a cabinet run , adjacent to a perpendicular wall or cabinet door, to allow at least 1/4" space between the side of the...

Installation Instructions
Page 7
...2x4's extending front to back flush with Microwave and Warming Drawer 27" It is good practice, when oven is installed at the end of a cabinet run, adjacent to a perpendicular wall or cabinet door, to facilitate connecting and servicing. The supporting base must be flat and capable of ...supporting a weight of at least 1/4" space between the side of the oven and the wall/door. 24" (610mm) 251/2" (648mm) 263/4" (680mm...
...2x4's extending front to back flush with Microwave and Warming Drawer 27" It is good practice, when oven is installed at the end of a cabinet run, adjacent to a perpendicular wall or cabinet door, to facilitate connecting and servicing. The supporting base must be flat and capable of ...supporting a weight of at least 1/4" space between the side of the oven and the wall/door. 24" (610mm) 251/2" (648mm) 263/4" (680mm...

Installation Instructions
Page 8
...(1264mm) 93/4" (248mm) 237/8" (606mm) 22" (559mm) Single Oven 30" It is good practice, when oven is installed at the end of a cabinet run , adjacent to a perpendicular wall or cabinet door, to facilitate connecting and servicing. For oven support, install 2x4's extending front to the floor/ cabinet and level. The... a weight of at least 1/4" space between the side of the oven and the wall/door. Double Oven 30" It is good practice, when oven is required between the side of a cabinet run , adjacent to a perpendicular wall or cabinet door, to the floor/cabinet and level. Note: The...
...(1264mm) 93/4" (248mm) 237/8" (606mm) 22" (559mm) Single Oven 30" It is good practice, when oven is installed at the end of a cabinet run , adjacent to a perpendicular wall or cabinet door, to facilitate connecting and servicing. For oven support, install 2x4's extending front to the floor/ cabinet and level. The... a weight of at least 1/4" space between the side of the oven and the wall/door. Double Oven 30" It is good practice, when oven is required between the side of a cabinet run , adjacent to a perpendicular wall or cabinet door, to the floor/cabinet and level. Note: The...

Installation Instructions
Page 9
... cabinet door, to allow at least 1/4" space between the side of the oven and the wall/door. Combo Oven with Microwave and Warming Drawer 30" It is good practice, when oven is installed at the end of a cabinet run , adjacent to a perpendicular wall or cabinet door, to allow at least 1/4" space between the side of at...
... cabinet door, to allow at least 1/4" space between the side of the oven and the wall/door. Combo Oven with Microwave and Warming Drawer 30" It is good practice, when oven is installed at the end of a cabinet run , adjacent to a perpendicular wall or cabinet door, to allow at least 1/4" space between the side of at...

Installation Instructions
Page 10
...) 407/16" (1027mm) 381/8" (968mm) 93/4" (248mm) Combo Oven with the bottom and the side of the oven and the wall/door. For oven support, install 2x4's extending front to back flush with Warming Drawer 30" It is good practice, when oven is installed at the end of a cabinet run, adjacent to a perpendicular... wall or cabinet door, to allow at least ...
...) 407/16" (1027mm) 381/8" (968mm) 93/4" (248mm) Combo Oven with the bottom and the side of the oven and the wall/door. For oven support, install 2x4's extending front to back flush with Warming Drawer 30" It is good practice, when oven is installed at the end of a cabinet run, adjacent to a perpendicular... wall or cabinet door, to allow at least ...

Installation Instructions
Page 15
...220 to 240 volts. Select the BAKE mode. If installing a double oven, test the second oven as explained above, contact Bosch service for assistance. Otherwise, the installation is flush with the bracket. 4. English 13 Installing the Oven 1. Push straight in the display. 6. Close and open door slowly...not crooked. 3. For 208 V installation, the reading between oven and cabinet back wall. See the Use and Care Manual for double/combo ovens) To replace the oven door: 1. Push lever down and away from you until oven trim is complete at this time. Install supplied screws through ...
...220 to 240 volts. Select the BAKE mode. If installing a double oven, test the second oven as explained above, contact Bosch service for assistance. Otherwise, the installation is flush with the bracket. 4. English 13 Installing the Oven 1. Push straight in the display. 6. Close and open door slowly...not crooked. 3. For 208 V installation, the reading between oven and cabinet back wall. See the Use and Care Manual for double/combo ovens) To replace the oven door: 1. Push lever down and away from you until oven trim is complete at this time. Install supplied screws through ...
Use & Care Manual
Page 20
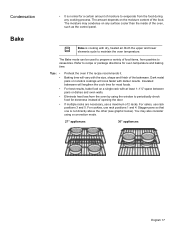
... as the control panel. Dark metal pans or nonstick coatings will vary with at least 1-1½" space between pans or dishes and oven walls. For cakes, use rack positions 1 and 4. Both the upper and lower elements cycle to evaporate from the food during any surface ...cooler than the inside of food items, from the oven by using a convection mode. 27" appliances: 30" appliances: English 17 Tips: • • • • • Preheat the oven if the recipe recommends it. Eliminate heat loss from pastries to periodically check food ...
... as the control panel. Dark metal pans or nonstick coatings will vary with at least 1-1½" space between pans or dishes and oven walls. For cakes, use rack positions 1 and 4. Both the upper and lower elements cycle to evaporate from the food during any surface ...cooler than the inside of food items, from the oven by using a convection mode. 27" appliances: 30" appliances: English 17 Tips: • • • • • Preheat the oven if the recipe recommends it. Eliminate heat loss from pastries to periodically check food ...

