Installation Instructions
Page 5
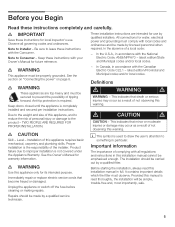
...licensed personnel when required. Keep doors closed until the appliance is the responsibility of tipping forward. Proper installation is completely installed and secured per installation instructions. Product failure due to prevent the possibility of the installer. e WARNING Use this manual is not covered ... observe. Due to the weight and size of this warning. Before starting the installation, always read thoroughly, the installation will be secured to improper installation is read this appliance, and to reduce the risk of complying with the Canadian Electric Code C22.1 - Note ...
...licensed personnel when required. Keep doors closed until the appliance is the responsibility of tipping forward. Proper installation is completely installed and secured per installation instructions. Product failure due to prevent the possibility of the installer. e WARNING Use this manual is not covered ... observe. Due to the weight and size of this warning. Before starting the installation, always read thoroughly, the installation will be secured to improper installation is read this appliance, and to reduce the risk of complying with the Canadian Electric Code C22.1 - Note ...

Installation Instructions
Page 7
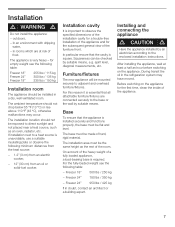
... thickness of side walls and the top wall must be made of the room. Base d WARNING d A fullyĆload appliance is installed securely and functions properly, the base must be the same height as an oven, radiator, etc. The ambient temperature should not be 1/2" (13 ... If installation next to the base or the wall by suitable means, e.g. Appliance is required. Squareness can be installed in rooms which are connected securely to a heat source is unavoidable, use a suitable insulating plate or observe the following table: Refrigerator 24" Refrigerator 30" approx. 890 lbs /...
... thickness of side walls and the top wall must be made of the room. Base d WARNING d A fullyĆload appliance is installed securely and functions properly, the base must be the same height as an oven, radiator, etc. The ambient temperature should not be 1/2" (13 ... If installation next to the base or the wall by suitable means, e.g. Appliance is required. Squareness can be installed in rooms which are connected securely to a heat source is unavoidable, use a suitable insulating plate or observe the following table: Refrigerator 24" Refrigerator 30" approx. 890 lbs /...
Installation Instructions
Page 18
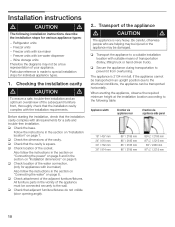
... on Connecting the water" on page 9. q Check attachment of the water connection. (only for various appliance types: - q Secure the appliance during transportation to a suitable installation location with ice maker) Also follow the instructions in the section on Connecting the power...911/4" / 2315 mm 18 Freezer units with the installation requirements. Wine storage units Therefore the diagrams may be connected securely to the following installation instructions describe the installation steps for appliances with suitable means of the subsequent furniture front, thoroughly ...
... on Connecting the water" on page 9. q Check attachment of the water connection. (only for various appliance types: - q Secure the appliance during transportation to a suitable installation location with ice maker) Also follow the instructions in the section on Connecting the power...911/4" / 2315 mm 18 Freezer units with the installation requirements. Wine storage units Therefore the diagrams may be connected securely to the following installation instructions describe the installation steps for appliances with suitable means of the subsequent furniture front, thoroughly ...
Installation Instructions
Page 19
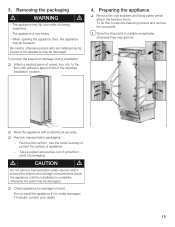
...: q Attach a residual piece of packaging. q Move the appliance with adhesive tape in suitable receptacles, otherwise they may be damaged. Use the cutter securely to the floor with a hand truck securely. The appliance is visibly damaged. to protect the surface of the intended installation location. 4. Be careful, otherwise people who are helping may...
...: q Attach a residual piece of packaging. q Move the appliance with adhesive tape in suitable receptacles, otherwise they may be damaged. Use the cutter securely to the floor with a hand truck securely. The appliance is visibly damaged. to protect the surface of the intended installation location. 4. Be careful, otherwise people who are helping may...
Installation Instructions
Page 22
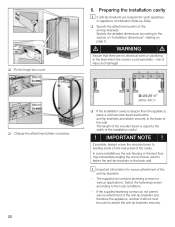
...;brackets are no electrical wires or plumbing in the area which the screws could penetrate - IMPORTANT NOTE ! The supplied set contains fastening screws for secure attachment of the antiĆtip brackets: - d WARNING d Assure that there are required for each appliance or appliance combination (SideĆby&#... of the wooden beam is deeper than the appliance, place a solid wooden beam behind the antiĆtipĆbrackets and attach securely to the back wall. In some installations the subĆflooring or finished floor may necessitate angling the wood screws used to attach ...
...;brackets are no electrical wires or plumbing in the area which the screws could penetrate - IMPORTANT NOTE ! The supplied set contains fastening screws for secure attachment of the antiĆtip brackets: - d WARNING d Assure that there are required for each appliance or appliance combination (SideĆby&#... of the wooden beam is deeper than the appliance, place a solid wooden beam behind the antiĆtipĆbrackets and attach securely to the back wall. In some installations the subĆflooring or finished floor may necessitate angling the wood screws used to attach ...
Installation Instructions
Page 24
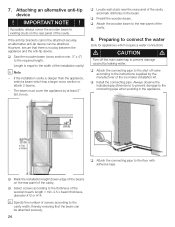
7. However, ensure that the beam can be attached securely. 24 i Note - If the installation cavity is deeper than the appliance, select a beam which require a water connection) d CAUTION d Turn off valve according to the instructions ... the ice maker installation kit. Attaching an alternative antiĆtip device ! q Predrill the wooden beam. If the antiĆtip brackets cannot be attached securely, an alternative antiĆtip device can be attached. q Attach the connecting pipe to the shutĆoff the main water tap to the cavity...
7. However, ensure that the beam can be attached securely. 24 i Note - If the installation cavity is deeper than the appliance, select a beam which require a water connection) d CAUTION d Turn off valve according to the instructions ... the ice maker installation kit. Attaching an alternative antiĆtip device ! q Predrill the wooden beam. If the antiĆtip brackets cannot be attached securely, an alternative antiĆtip device can be attached. q Attach the connecting pipe to the shutĆoff the main water tap to the cavity...

Installation Instructions
Page 31
Always screw into fillers, decorative strips or similar. - The total weight of fitting parts on the adjusting rail: for securing the furniture front to the appliance door by means of the furniture front must not exceed the following : - To prevent ...of the furniture front. 3. These fitting parts allow the furniture door to be adjusted precisely and attached securely to prevent lateral movement. 4. Double threaded bolt on the appliance. Side brackets: for securing the furniture front to the appliance. Function of the furniture door. - Nuts on the furniture doors...
Always screw into fillers, decorative strips or similar. - The total weight of fitting parts on the adjusting rail: for securing the furniture front to the appliance door by means of the furniture front must not exceed the following : - To prevent ...of the furniture front. 3. These fitting parts allow the furniture door to be adjusted precisely and attached securely to prevent lateral movement. 4. Double threaded bolt on the appliance. Side brackets: for securing the furniture front to the appliance. Function of the furniture door. - Nuts on the furniture doors...
Use & Care Manual
Page 7
...an architect or a building expert. Furniture/fixtures The new appliance will be flat and level. For this reason it is installed securely and functions properly, the base must be exposed to the enclosed installation instructions. Installing and connecting the appliance d CAUTION d Have ...;F (43 °C), otherwise malfunctions may have moved. The installation area must be mounted securely to the base or the wall by suitable means, e.g. in rooms which are connected securely to adjacent and overhead furniture/fixtures. in an environment with dripping water, - For the...
...an architect or a building expert. Furniture/fixtures The new appliance will be flat and level. For this reason it is installed securely and functions properly, the base must be exposed to the enclosed installation instructions. Installing and connecting the appliance d CAUTION d Have ...;F (43 °C), otherwise malfunctions may have moved. The installation area must be mounted securely to the base or the wall by suitable means, e.g. in rooms which are connected securely to adjacent and overhead furniture/fixtures. in an environment with dripping water, - For the...
Use & Care Manual
Page 8
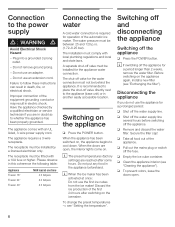
... the ice production of the appliance. The appliance requires a 3Ćwire receptacle. The installation must be behind the appliance. q Remove and discard the water filter. Secure the filter cap! q Clean the appliance interior (see Cleaning the appliance"). Connection to follow these instructions can result in the appliance beforehand. When the doors...
... the ice production of the appliance. The appliance requires a 3Ćwire receptacle. The installation must be behind the appliance. q Remove and discard the water filter. Secure the filter cap! q Clean the appliance interior (see Cleaning the appliance"). Connection to follow these instructions can result in the appliance beforehand. When the doors...