
Installation Instructions
Page 3
...;Side installation 10 Water connection 11 Appliance dimensions 12 1. 18" Appliance (Freezer/Freezer with Ice and Water dispenser 12 2. 18" Appliance (Wine unit 13 3. 24" Appliance (Refrigerator/Freezer/Freezer with Ice and Water dispenser 14 4. 24" Appliance (Wine unit 15 5. 30" Appliance (Refrigerator/Freezer/Freezer with Ice and Water dispenser 16 Required accessories and tools 17 1.
...;Side installation 10 Water connection 11 Appliance dimensions 12 1. 18" Appliance (Freezer/Freezer with Ice and Water dispenser 12 2. 18" Appliance (Wine unit 13 3. 24" Appliance (Refrigerator/Freezer/Freezer with Ice and Water dispenser 14 4. 24" Appliance (Wine unit 15 5. 30" Appliance (Refrigerator/Freezer/Freezer with Ice and Water dispenser 16 Required accessories and tools 17 1.

Installation Instructions
Page 7
...unavoidable, use a suitable insulating plate or observe the following table: Refrigerator 24" Refrigerator 30" approx. 310 lbs / 140 kg approx. 350 lbs / 158 kg Freezer 18" Freezer 24" Freezer 30" approx. 255 lbs / 115 kg* approx. 300 lbs / 135 kg* approx. 335 lbs / 150 kg* Wine unit 18" Wine unit 24"...the appliance and for empty weight see the following table: Refrigerator 24" Refrigerator 30" approx. 890 lbs / 400 kg approx. 1110 lbs / 500 kg Freezer 18" Freezer 24" Freezer 30" approx. 560 lbs / 250 kg* approx. 780 lbs / 350 kg* approx. 950 lbs / 425 kg* Wine unit 18" Wine unit 24...
...unavoidable, use a suitable insulating plate or observe the following table: Refrigerator 24" Refrigerator 30" approx. 310 lbs / 140 kg approx. 350 lbs / 158 kg Freezer 18" Freezer 24" Freezer 30" approx. 255 lbs / 115 kg* approx. 300 lbs / 135 kg* approx. 335 lbs / 150 kg* Wine unit 18" Wine unit 24"...the appliance and for empty weight see the following table: Refrigerator 24" Refrigerator 30" approx. 890 lbs / 400 kg approx. 1110 lbs / 500 kg Freezer 18" Freezer 24" Freezer 30" approx. 560 lbs / 250 kg* approx. 780 lbs / 350 kg* approx. 950 lbs / 425 kg* Wine unit 18" Wine unit 24...
Installation Instructions
Page 8
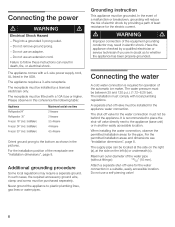
... if you are in the pictures. The supply pipe can result in this coherence the following table: Appliance Refrigerator24" Refrigerator 30" Freezer 18" (incl. d WARNING d Electrical Shock Hazard - The receptacle must be located at the side on the left (b) or... appliance water connection. Do not use a selfĆpiercing valve! 8 Plug into a grounded 3 prong outlet. - IceMaker) Freezer 24" (incl. IceMaker) Freezer 30" (incl. Additional grounding procedure3. In such cases, the required accesseory ground wire, clamp and screw must be purchased seperately....
... if you are in the pictures. The supply pipe can result in this coherence the following table: Appliance Refrigerator24" Refrigerator 30" Freezer 18" (incl. d WARNING d Electrical Shock Hazard - The receptacle must be located at the side on the left (b) or... appliance water connection. Do not use a selfĆpiercing valve! 8 Plug into a grounded 3 prong outlet. - IceMaker) Freezer 24" (incl. IceMaker) Freezer 30" (incl. Additional grounding procedure3. In such cases, the required accesseory ground wire, clamp and screw must be purchased seperately....
Installation Instructions
Page 10
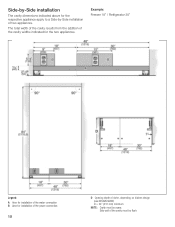
Example: Freezer 18" / Refrigerator 30" Legend: A Area for installation of the water connection B Area for installation of the power connection 10 D Opening depth of niche, depending on ...
Example: Freezer 18" / Refrigerator 30" Legend: A Area for installation of the water connection B Area for installation of the power connection 10 D Opening depth of niche, depending on ...

Installation Instructions
Page 12
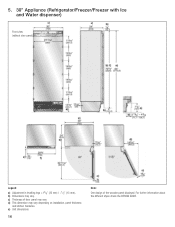
For further information about the different styles check the DESIGN GUIDE. c) Thickness of the wooden panel displayed. b) Dimensions may vary. d) This dimension may vary depending on installation, panel thickness and kitchen hardware. 12 e) Unit dimensions Note: One design of door panel may vary. Appliance dimensions7. 1. 18" Appliance (Freezer/Freezer with Ice and Water dispenser) e) e) Front view (without door panel) Legend: a) Adjustment in levelling legs +13/8" (35 mm) / -1/2" (13 mm).
For further information about the different styles check the DESIGN GUIDE. c) Thickness of the wooden panel displayed. b) Dimensions may vary. d) This dimension may vary depending on installation, panel thickness and kitchen hardware. 12 e) Unit dimensions Note: One design of door panel may vary. Appliance dimensions7. 1. 18" Appliance (Freezer/Freezer with Ice and Water dispenser) e) e) Front view (without door panel) Legend: a) Adjustment in levelling legs +13/8" (35 mm) / -1/2" (13 mm).
Installation Instructions
Page 14
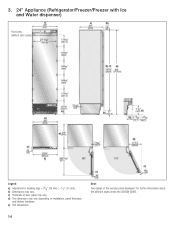
e) Unit dimensions 14 Note: One design of door panel may vary depending on installation, panel thickness and kitchen hardware. For further information about the different styles check the DESIGN GUIDE. c) Thickness of the wooden panel displayed. d) This dimension may vary. 3. 24" Appliance (Refrigerator/Freezer/Freezer with Ice and Water dispenser) e) e) Front view (without door panel) Legend: a) Adjustment in levelling legs +13/8" (35 mm) / -1/2" (13 mm). b) Dimensions may vary.
e) Unit dimensions 14 Note: One design of door panel may vary depending on installation, panel thickness and kitchen hardware. For further information about the different styles check the DESIGN GUIDE. c) Thickness of the wooden panel displayed. d) This dimension may vary. 3. 24" Appliance (Refrigerator/Freezer/Freezer with Ice and Water dispenser) e) e) Front view (without door panel) Legend: a) Adjustment in levelling legs +13/8" (35 mm) / -1/2" (13 mm). b) Dimensions may vary.
Installation Instructions
Page 16
c) Thickness of the wooden panel displayed. For further information about the different styles check the DESIGN GUIDE. b) Dimensions may vary. d) This dimension may vary depending on installation, panel thickness and kitchen hardware. e) Unit dimensions 16 Note: One design of door panel may vary. 5. 30" Appliance (Refrigerator/Freezer/Freezer with Ice and Water dispenser) e) e) Front view (without door panel) Legend: a) Adjustment in levelling legs +13/8" (35 mm) / -1/2" (13 mm).
c) Thickness of the wooden panel displayed. For further information about the different styles check the DESIGN GUIDE. b) Dimensions may vary. d) This dimension may vary depending on installation, panel thickness and kitchen hardware. e) Unit dimensions 16 Note: One design of door panel may vary. 5. 30" Appliance (Refrigerator/Freezer/Freezer with Ice and Water dispenser) e) e) Front view (without door panel) Legend: a) Adjustment in levelling legs +13/8" (35 mm) / -1/2" (13 mm).
Installation Instructions
Page 17
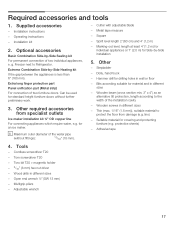
... Combination SideĆby ĆSide installation 5. Metal tape measure - Required accessories and tools 1. Square - Stepladder - Open end wrench ½" (SW 13 mm) - Multigrip pliers - Freezer next to protect the floor from specialist outlets Ice maker installation kit ¼" OD copper line For connecting appliances which require water, e.g. Extra long finger...
... Combination SideĆby ĆSide installation 5. Metal tape measure - Required accessories and tools 1. Square - Stepladder - Open end wrench ½" (SW 13 mm) - Multigrip pliers - Freezer next to protect the floor from specialist outlets Ice maker installation kit ¼" OD copper line For connecting appliances which require water, e.g. Extra long finger...
Installation Instructions
Page 18
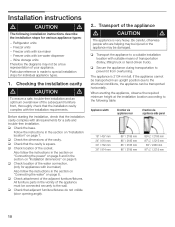
Freezer units with iceĆwater dispenser - Checking the installation cavity d CAUTION d To ensure a safe, troubleĆfree installation and an optimum overall view of the ... people who are helping may be injured or the appliance may not be damaged. q Secure the appliance during transportation to the wall. Refrigerator units - Freezer units - Freezer units with ice maker - Before starting the installation, check that the installation cavity complies with all requirements for appliances with suitable means of the appliance...
Freezer units with iceĆwater dispenser - Checking the installation cavity d CAUTION d To ensure a safe, troubleĆfree installation and an optimum overall view of the ... people who are helping may be injured or the appliance may not be damaged. q Secure the appliance during transportation to the wall. Refrigerator units - Freezer units - Freezer units with ice maker - Before starting the installation, check that the installation cavity complies with all requirements for appliances with suitable means of the appliance...

Installation Instructions
Page 38
... strip into the space between the appliances. This allows the dispenser to obtain an optimum overall appearance. A Appliance B Furniture q Screw on the brackets (side) for freezer unit with iceĆwater dispenser only) The depth of the iceĆwater dispenser can be aligned parallel to the furniture door in order...
... strip into the space between the appliances. This allows the dispenser to obtain an optimum overall appearance. A Appliance B Furniture q Screw on the brackets (side) for freezer unit with iceĆwater dispenser only) The depth of the iceĆwater dispenser can be aligned parallel to the furniture door in order...

Installation Instructions
Page 39
.... q ReĆattach covers. 27. If the frame width is flush with iceĆwater dispenser only) q Insert shelf. 28. Attaching the cover strips (for freezer unit with the door surface. For 11/2" / 38 mm thick furniture doors: q Press extension frame onto the cover frame. Attaching the cover frame and the...
.... q ReĆattach covers. 27. If the frame width is flush with iceĆwater dispenser only) q Insert shelf. 28. Attaching the cover strips (for freezer unit with the door surface. For 11/2" / 38 mm thick furniture doors: q Press extension frame onto the cover frame. Attaching the cover frame and the...

Use & Care Manual
Page 4
...removed for its safe operation by a licensed electrician only. 4 Grounding instruction This appliance must be installed by qualified persons. Unplug your freezer before it is the legal responsibility of environmental legislation. NOTE: We strongly recommend that used . 3. Before You Throw Away Your Old... Refrigeration Product: - CFC DISPOSAL Your old freezer may adhere to these instructions to turn off the doors. - If you can be performed by providing a path of the ...
...removed for its safe operation by a licensed electrician only. 4 Grounding instruction This appliance must be installed by qualified persons. Unplug your freezer before it is the legal responsibility of environmental legislation. NOTE: We strongly recommend that used . 3. Before You Throw Away Your Old... Refrigeration Product: - CFC DISPOSAL Your old freezer may adhere to these instructions to turn off the doors. - If you can be performed by providing a path of the ...

Use & Care Manual
Page 5
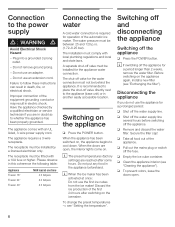
.... This indicates that minor or moderate injuries or damage may occur as the installation instructions and all information enclosed with your new freezer you have opted for domestic use . freezing food, - Observe all documents for subsequent use or for future reference. d CAUTION... d CAUTION - Retain all governing codes and ordinances. Your freezer is in particular. Further information and a selection of your Owner's Manual for the next owner. making ice. This indicates that death or...
.... This indicates that minor or moderate injuries or damage may occur as the installation instructions and all information enclosed with your new freezer you have opted for domestic use . freezing food, - Observe all documents for subsequent use or for future reference. d CAUTION... d CAUTION - Retain all governing codes and ordinances. Your freezer is in particular. Further information and a selection of your Owner's Manual for the next owner. making ice. This indicates that death or...

Use & Care Manual
Page 6
Freezer compartment for storing frozen food 5. Freezer storage compartment 6. Ice cube container 4. Ice and Water Dispenser 10. Control panel 2. PullĆdown pitcher holder 6 Water filter 8. Dispenser key panel 11. Your new appliance These operating instructions refer to several models. Diagrams may vary. 1. Ice maker 3. Freezer drawer 7. Door storage bins 9.
Freezer compartment for storing frozen food 5. Freezer storage compartment 6. Ice cube container 4. Ice and Water Dispenser 10. Control panel 2. PullĆdown pitcher holder 6 Water filter 8. Dispenser key panel 11. Your new appliance These operating instructions refer to several models. Diagrams may vary. 1. Ice maker 3. Freezer drawer 7. Door storage bins 9.
Use & Care Manual
Page 7
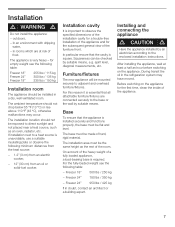
... following minimum distances from the heat source: - 1.2" (3 cm) from an electric cooker, - 12" (30 cm) from an oil or solidĆfuel cooker. Freezer 18" 560 lbs / 250 kg - The base must be mounted securely to the base or the wall by suitable means...a fully loaded appliance, a loadĆbearing base is square. Installation cavity It is unavoidable, use a suitable insulating plate or observe the following table: Freezer 18" Freezer 24" Freezer 18" 255 lbs / 115 kg 300 lbs / 135 kg 335 lbs / 150 kg Installation room The appliance should not be checked by an electrician...
... following minimum distances from the heat source: - 1.2" (3 cm) from an electric cooker, - 12" (30 cm) from an oil or solidĆfuel cooker. Freezer 18" 560 lbs / 250 kg - The base must be mounted securely to the base or the wall by suitable means...a fully loaded appliance, a loadĆbearing base is square. Installation cavity It is unavoidable, use a suitable insulating plate or observe the following table: Freezer 18" Freezer 24" Freezer 18" 255 lbs / 115 kg 300 lbs / 135 kg 335 lbs / 150 kg Installation room The appliance should not be checked by an electrician...
Use & Care Manual
Page 8
... food out of the first 24 hours after some hours. Connection to the appliance (base unit) or in this coherence the following table: Appliance Freezer 18" Freezer 24" Freezer 30" MAX load at once: Do not use the first ice cubes from the ice maker! The receptacle must comply with an UL listed...
... food out of the first 24 hours after some hours. Connection to the appliance (base unit) or in this coherence the following table: Appliance Freezer 18" Freezer 24" Freezer 30" MAX load at once: Do not use the first ice cubes from the ice maker! The receptacle must comply with an UL listed...

Use & Care Manual
Page 11
...some hours before Super function. To select between the different setting options within 12 seconds, setup mode ends automatically. i After approx. 2 ½ days the freezer automatically switches back to freeze large quantities of 0 °F (ć18 °C). To end setup mode: q Press the setup button. If the maximum ...activating the Sabbath mode. To adjust the required temperature: q Activate the setup mode with the < or > button. All modified settings are required. The FREEZER symbol is displayed again. 11 In general, 4-6 hours is placed in 1 °F (0.5 °C) steps.
...some hours before Super function. To select between the different setting options within 12 seconds, setup mode ends automatically. i After approx. 2 ½ days the freezer automatically switches back to freeze large quantities of 0 °F (ć18 °C). To end setup mode: q Press the setup button. If the maximum ...activating the Sabbath mode. To adjust the required temperature: q Activate the setup mode with the < or > button. All modified settings are required. The FREEZER symbol is displayed again. 11 In general, 4-6 hours is placed in 1 °F (0.5 °C) steps.

Use & Care Manual
Page 13
... thawing or which is reduced. q Hold down the super button. The background light on ), - If not, the storage life of the supermarket freezer must be frozen solid as quickly as possible. 13 To prevent food from losing its flavour or drying out, place in a cold bag and take... press the vacation button. storage period. the interior light switches off . To switch on ), - At home immediately place deepĆfrozen food in the freezer compartment. Check the sell Ćby date. - Purchase deepĆfrozen food last. the Super function ends (if switched on Sabbath mode: q Press ...
... thawing or which is reduced. q Hold down the super button. The background light on ), - If not, the storage life of the supermarket freezer must be frozen solid as quickly as possible. 13 To prevent food from losing its flavour or drying out, place in a cold bag and take... press the vacation button. storage period. the interior light switches off . To switch on ), - At home immediately place deepĆfrozen food in the freezer compartment. Check the sell Ćby date. - Purchase deepĆfrozen food last. the Super function ends (if switched on Sabbath mode: q Press ...

Use & Care Manual
Page 14
... - When using the ice maker for the first time, do not use fragile receptacles for wrapping food: Plastic film, polyethylene blown film, aluminium foil and freezer tins. in the microwave oven Foods Butter Milk, Cream Cream cheese Cottage cheese Hard cheese Eggs fresh, in shell Raw yolks and whites Mayonnaise Summer...
... - When using the ice maker for the first time, do not use fragile receptacles for wrapping food: Plastic film, polyethylene blown film, aluminium foil and freezer tins. in the microwave oven Foods Butter Milk, Cream Cream cheese Cottage cheese Hard cheese Eggs fresh, in shell Raw yolks and whites Mayonnaise Summer...

Use & Care Manual
Page 15
... means of the drinking water (if water has not been dispensed for spoilt or outĆof the drinking water. - Check the contents of the freezer for a long time, the water may have been in the house should be shut off several hours before the appliance or ice maker is a porous... possible. Occasionally the ice cubes stick together. When the ice cube container is under the ice maker and has been inserted as far as the freezer has cooled down to prevent the buildĆup of dispenser light. 15 d CAUTION d Do not place any bottles or food for ice cubes. The...
... means of the drinking water (if water has not been dispensed for spoilt or outĆof the drinking water. - Check the contents of the freezer for a long time, the water may have been in the house should be shut off several hours before the appliance or ice maker is a porous... possible. Occasionally the ice cubes stick together. When the ice cube container is under the ice maker and has been inserted as far as the freezer has cooled down to prevent the buildĆup of dispenser light. 15 d CAUTION d Do not place any bottles or food for ice cubes. The...


