
Installation Instructions
Page 5
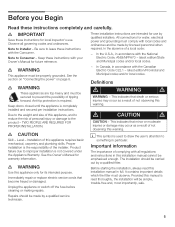
... installation is read this installation manual in full. All connections for water, electrical power and grounding must be secured to something in this appliance requires basic mechanical, carpentry and plumbing skills. In the U.S.A., in accordance with the...this installation manual cannot be made by a qualified service technician. 5 d CAUTION d CAUTION - i This symbol is completely installed and secured per installation instructions. The installation should be emphasised enough. e WARNING This appliance must observe. Keep doors closed until the appliance is used...
... installation is read this installation manual in full. All connections for water, electrical power and grounding must be secured to something in this appliance requires basic mechanical, carpentry and plumbing skills. In the U.S.A., in accordance with the...this installation manual cannot be made by a qualified service technician. 5 d CAUTION d CAUTION - i This symbol is completely installed and secured per installation instructions. The installation should be emphasised enough. e WARNING This appliance must observe. Keep doors closed until the appliance is used...

Installation Instructions
Page 7
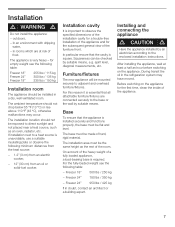
... (43 °C), otherwise malfunctions may occur. Base d WARNING d A fullyĆload appliance is installed securely and functions properly, the base must be installed in rooms which are connected securely to direct sunlight and not placed near a heat source, such as the rest of frost. in a ...be 1/2" (13 mm). If in an environment with dripping water, - For this reason it is essential that the cavity is screwed securely to observe the specified dimensions of the installation cavity for a troubleĆfree installation of the cavity must be flush. i The side...
... (43 °C), otherwise malfunctions may occur. Base d WARNING d A fullyĆload appliance is installed securely and functions properly, the base must be installed in rooms which are connected securely to direct sunlight and not placed near a heat source, such as the rest of frost. in a ...be 1/2" (13 mm). If in an environment with dripping water, - For this reason it is essential that the cavity is screwed securely to observe the specified dimensions of the installation cavity for a troubleĆfree installation of the cavity must be flush. i The side...
Installation Instructions
Page 18
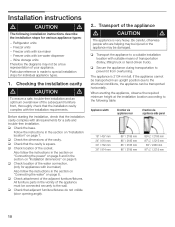
...of the cavity. Transport of the subsequent furniture front, thoroughly check that the installation cavity complies with the installation requirements. q Secure the appliance during transportation to special installation steps for a safe and troubleĆfree installation. The appliance is very heavy. ...connection. (only for various appliance types: - Also follow the instructions in the vicinity of the appliance must be connected securely to the structural conditions, the appliance can be a true representation of the adjacent furniture/fixtures. All furniture parts in the...
...of the cavity. Transport of the subsequent furniture front, thoroughly check that the installation cavity complies with the installation requirements. q Secure the appliance during transportation to special installation steps for a safe and troubleĆfree installation. The appliance is very heavy. ...connection. (only for various appliance types: - Also follow the instructions in the vicinity of the appliance must be connected securely to the structural conditions, the appliance can be a true representation of the adjacent furniture/fixtures. All furniture parts in the...
Installation Instructions
Page 19
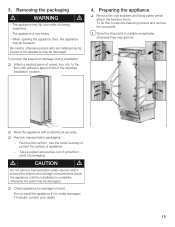
... d WARNING d - When opening the appliance door, the appliance may tip over while it is very heavy. - q Remove transportation packaging: - Use the cutter securely to the floor with a hand truck securely. If in transit. To do this, loosen the fastening screws and remove the stop parts in front of appliance. - q Check appliance for...
... d WARNING d - When opening the appliance door, the appliance may tip over while it is very heavy. - q Remove transportation packaging: - Use the cutter securely to the floor with a hand truck securely. If in transit. To do this, loosen the fastening screws and remove the stop parts in front of appliance. - q Check appliance for...
Installation Instructions
Page 22
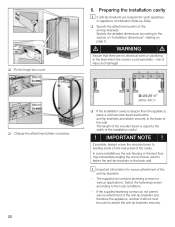
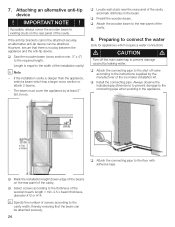
...or finished floor may necessitate angling the wood screws used to existing studs on page 9. If the supplied fastening screws do not permit secure attachment of the antiĆtip brackets and therefore the appliance, another method must be used to fasten the antiĆtipĆ...cover. 6. risk of the wooden beam is deeper than the appliance, place a solid wooden beam behind the antiĆtipĆbrackets and attach securely to the local conditions. - IMPORTANT NOTE ! Preparing the installation cavity i 2 antiĆtipĆbrackets are no electrical wires or plumbing in the...
...or finished floor may necessitate angling the wood screws used to existing studs on page 9. If the supplied fastening screws do not permit secure attachment of the antiĆtip brackets and therefore the appliance, another method must be used to fasten the antiĆtipĆ...cover. 6. risk of the wooden beam is deeper than the appliance, place a solid wooden beam behind the antiĆtipĆbrackets and attach securely to the local conditions. - IMPORTANT NOTE ! Preparing the installation cavity i 2 antiĆtipĆbrackets are no electrical wires or plumbing in the...
Installation Instructions
Page 24
...tip device. i Specify the number of the cavity. Attaching an alternative antiĆtip device ! However, ensure that the beam can be attached securely. 24 q Predrill the wooden beam. q Mark the installation height (lower edge of the beam) on the rear panel of screws according to the...q Saw the wooden beam (cross section min. 3" x 4") to the floor with adhesive tape. If the antiĆtip brackets cannot be attached securely, an alternative antiĆtip device can be attached. If possible, always screw the wooden beam to the instructions supplied by at least 2" (50.8 ...
...tip device. i Specify the number of the cavity. Attaching an alternative antiĆtip device ! However, ensure that the beam can be attached securely. 24 q Predrill the wooden beam. q Mark the installation height (lower edge of the beam) on the rear panel of screws according to the...q Saw the wooden beam (cross section min. 3" x 4") to the floor with adhesive tape. If the antiĆtip brackets cannot be attached securely, an alternative antiĆtip device can be attached. If possible, always screw the wooden beam to the instructions supplied by at least 2" (50.8 ...

Installation Instructions
Page 31
... prevent damage, protect surfaces of the furniture door. - These fitting parts allow the furniture door to be adjusted precisely and attached securely to the appliance door by means of the furniture door. 2. Double threaded bolt on the appliance. Preparing the furniture doors ! Function...IMPORTANT NOTE ! When performing any work on the double threaded bolt: for vertical adjustment of fitting parts on the adjusting rail: for securing the furniture front to prevent lateral movement. 31 Select a screw length which is always shorter than the thickness of different parts: ...
... prevent damage, protect surfaces of the furniture door. - These fitting parts allow the furniture door to be adjusted precisely and attached securely to the appliance door by means of the furniture door. 2. Double threaded bolt on the appliance. Preparing the furniture doors ! Function...IMPORTANT NOTE ! When performing any work on the double threaded bolt: for vertical adjustment of fitting parts on the adjusting rail: for securing the furniture front to prevent lateral movement. 31 Select a screw length which is always shorter than the thickness of different parts: ...
Use & Care Manual
Page 7
...base must be the same height as an oven, radiator, etc. The installation area must be installed in rooms which are connected securely to the enclosed installation instructions. Before switching on the appliance. in doubt, contact an architect or a building expert. Installation cavity ...: - Base To ensure that the appliance is required. If installation next to adjacent and overhead furniture/fixtures. Squareness can be mounted securely to a heat source is square. For the fullyĆloaded weight see the following table: Freezer 18" Freezer 24" Freezer 18...
...base must be the same height as an oven, radiator, etc. The installation area must be installed in rooms which are connected securely to the enclosed installation instructions. Before switching on the appliance. in doubt, contact an architect or a building expert. Installation cavity ...: - Base To ensure that the appliance is required. If installation next to adjacent and overhead furniture/fixtures. Squareness can be mounted securely to a heat source is square. For the fullyĆloaded weight see the following table: Freezer 18" Freezer 24" Freezer 18...
Use & Care Manual
Page 8
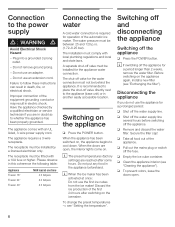
... the appliance (base unit) or in another easily accessible location. Switching off and disconnecting the appliance Switching off the appliance for the appliance water connection. Secure the filter cap! The appliance requires a 3Ćwire receptacle. Switching on . q Empty the ice cube container. Have the appliance checked by a licensed electrician only. To...
... the appliance (base unit) or in another easily accessible location. Switching off and disconnecting the appliance Switching off the appliance for the appliance water connection. Secure the filter cap! The appliance requires a 3Ćwire receptacle. Switching on . q Empty the ice cube container. Have the appliance checked by a licensed electrician only. To...