Bosch 1594K - NA Power Planer 3-1/4 Support and Manuals
Get Help and Manuals for this Bosch item
Bosch 1594K Videos

Bosch 1594K 6.5 Amp 3-1/4-Inch Planer Review
Duration: 4:01
Total Views: 16,952
Duration: 4:01
Total Views: 16,952
Popular Bosch 1594K Manual Pages
Operating Instructions - Page 2
... of electric shock. Dress properly.
Be sure switch is wider than the other practical way to secure and support the workpiece to "Recommended sizes of this manual.
Keep proper footing and balance at all instructions. Always wear eye protection.
Electrical Safety Double Insulated tools are equipped with your personal safety. If the plug...
Operating Instructions - Page 3
... planer before using. After changing blades, rotate the blade drum to bind and are hidden from the power source before blade is plugged in your model. Any alteration or modification is "OFF". Never leave the trigger locked "ON". Service or maintenance performed by qualified repair personnel.
Any tool that may be repaired. Unstable support can vibrate or chatter if blade...
Operating Instructions - Page 4
...power source if it becomes necessary to break.
!
Never place the plane down until the blade is running. Remove plug from bricks and cement and other
reproductive harm.
Do not put...those dust masks that are hidden from chemicallytreated lumber.
Always hold the tool firmly with blade drum will cause injury. To reduce your exposure to
cause cancer, birth defects or ...
Operating Instructions - Page 5
...
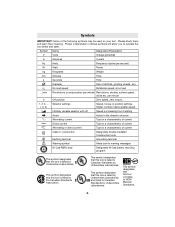
Revolutions or reciprocation per minute
0
Off position
Zero speed, zero torque...
1, 2, 3, ... Higher number means greater speed
0
Infinitely variable selector with off
Speed is increasing from 0 setting
Arrow
Action in the direction of arrow
Alternating current
Type or a characteristic of current
Direct current
Type or a characteristic of current
Alternating or direct current...
Operating Instructions - Page 6
Such preventive safety
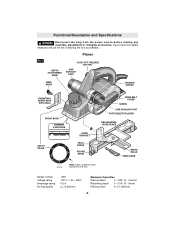
measures reduce the risk of starting the tool accidentally. Model number Voltage rating Amperage rating No load speed
1594 120 V 50 - 60Hz 6.5 A n0 16,500/min
Maximum Capacities
Planing depth
0 - 3/32" (0 - 2.6mm)
Rabbeting depth 0 - 5/16" (0 - 9mm)
Planing width
3-1/4" (82mm)
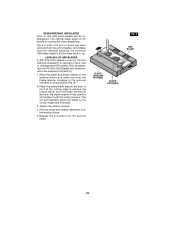
-6- Planer
FIG. 1
DEPTH ADJUSTMENT
KNOB
"LOCK-OFF" RELEASE BUTTON
CHIP EXHAUST
PORT...
Operating Instructions - Page 7
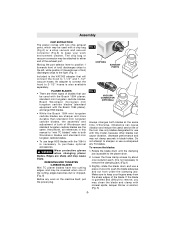
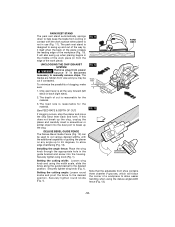
PLANER BLADES • There are three types of blades that will connect the hood to keep your fingers away from under the clamping jaw. standard mini tungsten carbide blades, Bosch Woodrazor micrograin mini tungsten carbide blades (standard equipment with the Bosch 1594 planer), and large HSS blades.
• While the Bosch 1594 mini tungsten carbide blades are sharper and more durable ...
Operating Instructions - Page 8
... thinner or alcohol, as shown in Figure 6.
2.
INSTALLATION PROCEDURE 1. However, if you believe that they will not touch against the sloping part of the blade holder and carefully slide the blade onto the blade holder, as shown in Figure 4, and your planer is best performed by a Bosch Factory Service or Bosch Authorized Service Center. Align the groove on top of...
Operating Instructions - Page 9

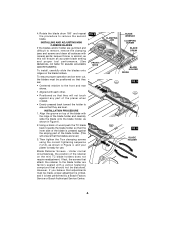
... operation and an even cut, the blades must engage in the groove. (Fig. 8)
BLADE RETAINER
FIG. 7
HSS BLADE
GROOVE
FIG. 8
2.
To install the blades, carefully slide the blade/retainer assembly sideways to the front and rear shoes.
• Aligned with each other.
• Positioned so that they will ensure an accurate blade setting and proper tool performance. The...
Operating Instructions - Page 10
... be maintained when sharpening. Once a total of 6 mm of steel has been removed from tips of the blades, both blades must be replaced because the minimum HSS blade height is required to tip. Press the plane blade against the stop in front of 50º should be resharpened. Repeat the procedure for this position and...
Operating Instructions - Page 11

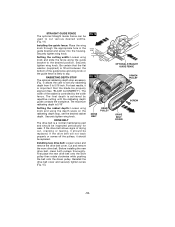
Operating Instructions
TRIGGER "ON/OFF" SWITCH
! To turn the tool "OFF": release the trigger switch and it will return to 3/32"... total depth, re-adjust the planing depth to a shallow setting for the final pass to obtain a good surface finish. ... the front shoe, which retracts and exposes the blade and determines the amount of the planer.
Adjusting the Depth of the cut to obtain ...
Operating Instructions - Page 12
...manually remove chips. DELUXE BEVEL GUIDE FENCE The Deluxe Bevel Guide Fence (Fig. 12) can be
cut various desired widths, with the work piece). Installing... 10). Setting the cutting angle: Loosen round knobs and pivot the fence to the desired position.
Setting the cutting... keep the blade from coming in contact with the additional capability of guiding the planer on any angle...
Operating Instructions - Page 13
... cut various desired widths. (Fig. 14)
Installing the guide fence: Place the wing knob through the appropriate hole in the guide bracket and screw into the housing. If the drive belt shows signs of the guide fence and wing knob or the guide fence is a normal maintenance part and should be replaced. FIG. 14
9 mm max
m8a2xmm...
Operating Instructions - Page 14
...blades (2) *
T-30 Torx blade wrench * Deluxe Bevel Guide Fence * Vacuum hose adapter ** Straight Guide Fence ** Rabbeting depth stop ** Chip bag *
High-Speed Steel Blades ** HSS Blade Leveling Fixture ** High-Speed Steel Blades with compressed air.
rized Bosch Service Station. It is ready to clean by a Bosch Factory Service...and solvents damage
plastic parts.
Always wear safety ...
Parts Diagram - Page 2
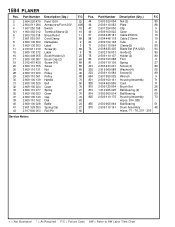
...PLANER
Pos.
2 3 4 5/1 6 7 8 9 11 15 16 17 19 20 26 28 29 30 31 32 33 35 37 38 40 41 43
Part...Pin
Service Notes:
F/C Pos. Part ... Blade Set (PA1202)
94
9 75 2 602 316 001 Guide ...65
36 203 2 609 110 084 Screw {6}
89
48 654 2 607 950 025 Wrench
9
74 801 2 609 100 141 Housing Assembly
71
50 805 3 604 460 555 Cord
11
70 810 2 609 120 064 Brush Set...Code AW = Refer to AW Labor Time Chart
Bosch 1594K Reviews
We have not received any reviews for Bosch yet.