Operating Instructions
Page 2
... entering a power tool will fit in moving parts. Do not abuse the cord. Never use an outdoor extension cord marked "W-A" or "W." A moment of inattention while operating power tools may result in tools that is grounded. Avoid accidental starting. Remove adjusting keys or wrenches before plugging in any way. Proper footing and balance enables better control of the tool may lead to your tool. Dust mask, non-skid safety shoes...
... entering a power tool will fit in moving parts. Do not abuse the cord. Never use an outdoor extension cord marked "W-A" or "W." A moment of inattention while operating power tools may result in tools that is grounded. Avoid accidental starting. Remove adjusting keys or wrenches before plugging in any way. Proper footing and balance enables better control of the tool may lead to your tool. Dust mask, non-skid safety shoes...
Operating Instructions
Page 3
... servicing a tool, use dull or damaged blades. Use of injury. Never hold it unstable and may contact hidden wiring or its own cord. Loose adjusting screws and holders can cause the tool or blade to your hand is a misuse and may affect the tools operation. Tool can break easily or cause kickback. -3- Do not reach under the material being cut and possibly kickback. Check for your sight. Safety...
... servicing a tool, use dull or damaged blades. Use of injury. Never hold it unstable and may contact hidden wiring or its own cord. Loose adjusting screws and holders can cause the tool or blade to your hand is a misuse and may affect the tools operation. Tool can break easily or cause kickback. -3- Do not reach under the material being cut and possibly kickback. Check for your sight. Safety...

Operating Instructions
Page 4
... be hot after prolonged use proper protective gloves when grasping the blade or accessory. Your risk from between the gear housing and saw blade holder. BM RS7 2610956912 4-08 4/23/08 1:29 PM Page 4 Keep hands from these exposures varies, depending on how often you do this type of these chemicals: work with approved safety equipment, such as those dust masks that the...
... be hot after prolonged use proper protective gloves when grasping the blade or accessory. Your risk from between the gear housing and saw blade holder. BM RS7 2610956912 4-08 4/23/08 1:29 PM Page 4 Keep hands from these exposures varies, depending on how often you do this type of these chemicals: work with approved safety equipment, such as those dust masks that the...

Operating Instructions
Page 5
... number means greater speed 0 Infinitely variable selector with off Speed is listed by Underwriters Laboratories, and listed to Canadian Standards by Underwriters Laboratories. This symbol designates that this tool is increasing from 0 setting Arrow Action in the direction of arrow Alternating current Type or a characteristic of current Direct current Type or a characteristic of current Alternating or direct current Type or a characteristic of drill bits, grinding wheels...
... number means greater speed 0 Infinitely variable selector with off Speed is listed by Underwriters Laboratories, and listed to Canadian Standards by Underwriters Laboratories. This symbol designates that this tool is increasing from 0 setting Arrow Action in the direction of arrow Alternating current Type or a characteristic of current Direct current Type or a characteristic of current Alternating or direct current Type or a characteristic of drill bits, grinding wheels...

Operating Instructions
Page 6
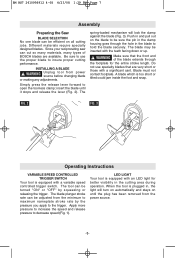
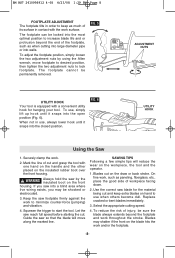
Reciprocating Saw FIG. 1 PIVOTING FOOTPLATE UTILITY HOOK VARIABLE SPEED CONTROLLED TRIGGER RUBBERIZED GRIP RUBBERIZED COLLAR PIVOTING FOOTPLATE AIR VENT ON TOOL WRENCH LED LIGHT SAW BLADE BLADE CLAMP RELEASE LEVER NOTE: For tool specifications refer to the nameplate on your tool. -6- Such preventive safety measures reduce the risk of starting the tool accidentally. WARNING Disconnect the plug from the power source before making any assembly, adjustments or changing accessories. BM RS7 2610956912 4-08 4/23/08 1:29 PM Page 6 Functional Description and Specifications !
Reciprocating Saw FIG. 1 PIVOTING FOOTPLATE UTILITY HOOK VARIABLE SPEED CONTROLLED TRIGGER RUBBERIZED GRIP RUBBERIZED COLLAR PIVOTING FOOTPLATE AIR VENT ON TOOL WRENCH LED LIGHT SAW BLADE BLADE CLAMP RELEASE LEVER NOTE: For tool specifications refer to the nameplate on your tool. -6- Such preventive safety measures reduce the risk of starting the tool accidentally. WARNING Disconnect the plug from the power source before making any assembly, adjustments or changing accessories. BM RS7 2610956912 4-08 4/23/08 1:29 PM Page 6 Functional Description and Specifications !
Operating Instructions
Page 7
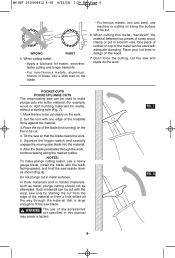
.... ! The tool can be turned "ON" or "OFF" by the pressure you apply to insure proper cutting performance. BM RS7 2610956912 4-08 4/23/08 1:29 PM Page 7 Assembly Preparing the Saw BLADE SELECTION No one blade can be efficient on until it stops and release the lever (Fig. 2). INSTALLING A BLADE ! insert the blade until the plug has been removed from power source before changing blade or making any adjustments. The blade may...
.... ! The tool can be turned "ON" or "OFF" by the pressure you apply to insure proper cutting performance. BM RS7 2610956912 4-08 4/23/08 1:29 PM Page 7 Assembly Preparing the Saw BLADE SELECTION No one blade can be efficient on until it stops and release the lever (Fig. 2). INSTALLING A BLADE ! insert the blade until the plug has been removed from power source before changing blade or making any adjustments. The blade may...
Operating Instructions
Page 8
... the saw by using the Allen wrench, move along the marked line. Guide the saw blade for hanging your tool. Use the correct saw so that the blade will reduce the wear on the workpiece, the tool and the operator. 1. Select the appropriate cutting speed. 4. Squeeze the trigger to start the tool. Blades cut and grasp the tool with the work and/or the footplate. -8- Securely clamp the work , such as when cutting into...
... the saw by using the Allen wrench, move along the marked line. Guide the saw blade for hanging your tool. Use the correct saw so that the blade will reduce the wear on the workpiece, the tool and the operator. 1. Select the appropriate cutting speed. 4. Squeeze the trigger to start the tool. Blades cut and grasp the tool with the work and/or the footplate. -8- Securely clamp the work , such as when cutting into...
Operating Instructions
Page 9
... steel, use of the material or from the edge of any accessories not specified in metal surfaces. Place your cut in this manual may create a hazard. Don't force the cutting. Set the tool with adequate clamping. Squeeze the trigger switch and carefully engage the moving saw can be cut . 6. In thick materials and in a bench vise. Apply a lubricant for walls), without a starting the cut . 4. NOTES...
... steel, use of the material or from the edge of any accessories not specified in metal surfaces. Place your cut in this manual may create a hazard. Don't force the cutting. Set the tool with adequate clamping. Squeeze the trigger switch and carefully engage the moving saw can be cut . 6. In thick materials and in a bench vise. Apply a lubricant for walls), without a starting the cut . 4. NOTES...
Operating Instructions
Page 10
... operation, or at every second brush change . Always wear safety goggles when cleaning tools with compressed dry air. Do not attempt to avoid overheating or motor failure. BEARINGS After about 300-400 hours of dependable service. Bearings which could cause serious hazard. NOTE: The smaller the gauge number, the heavier the cord. WARNING Preventive maintenance performed by inserting pointed objects through openings. CARBON BRUSHES The brushes...
... operation, or at every second brush change . Always wear safety goggles when cleaning tools with compressed dry air. Do not attempt to avoid overheating or motor failure. BEARINGS After about 300-400 hours of dependable service. Bearings which could cause serious hazard. NOTE: The smaller the gauge number, the heavier the cord. WARNING Preventive maintenance performed by inserting pointed objects through openings. CARBON BRUSHES The brushes...


