Type 1 Manual - NST1118
Page 1
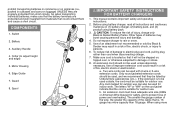
...motor will not function properly (page 9). • Do not bump the feed head against the ground - SAVE THIS MANUAL FOR FUTURE REFERENCE. VEA EL ESPAÑOL EN LA CONTRAPORTADA. otherwise the tool will overheat (page 7). • When replacing the line, use only .065 inch diameter ROUND line (B&D Model #AF-100 is recommended) - to speak with your new... to register your Black & Decker purchase, go to WWW.BLACKANDDECKER.COM/INSTANTANSWERS for choosing Black & Decker! Model # NST1118, NST2118 TRIMMER / EDGER INSTRUCTION MANUAL Model Numbers NST1118, NST2118 Thank you canʼ...
...motor will not function properly (page 9). • Do not bump the feed head against the ground - SAVE THIS MANUAL FOR FUTURE REFERENCE. VEA EL ESPAÑOL EN LA CONTRAPORTADA. otherwise the tool will overheat (page 7). • When replacing the line, use only .065 inch diameter ROUND line (B&D Model #AF-100 is recommended) - to speak with your new... to register your Black & Decker purchase, go to WWW.BLACKANDDECKER.COM/INSTANTANSWERS for choosing Black & Decker! Model # NST1118, NST2118 TRIMMER / EDGER INSTRUCTION MANUAL Model Numbers NST1118, NST2118 Thank you canʼ...
Type 1 Manual - NST1118
Page 2
...; AVOID ACCIDENTALLY STARTING - Read All Instructions • ALWAYS WEAR EYE PROTECTION - Use care when trimming around screens and desirable plantings. • KEEP ALL BYSTANDERS AWAY - Do not use this information. Wear long pants to read and understand this tool is important for Battery Chargers 4 Charging Procedure 5 Assembly / Adjustment 7 Operating Instructions 8 Replacement Accessories 9 Maintenance 11 Troubleshooting 12 Service Information 12 Full Two-Year Home Use Warranty 12 SAFETY...
...; AVOID ACCIDENTALLY STARTING - Read All Instructions • ALWAYS WEAR EYE PROTECTION - Use care when trimming around screens and desirable plantings. • KEEP ALL BYSTANDERS AWAY - Do not use this information. Wear long pants to read and understand this tool is important for Battery Chargers 4 Charging Procedure 5 Assembly / Adjustment 7 Operating Instructions 8 Replacement Accessories 9 Maintenance 11 Troubleshooting 12 Service Information 12 Full Two-Year Home Use Warranty 12 SAFETY...
Type 1 Manual - NST1118
Page 3
... electric tools in water or squirt it with loose nails, screws, keys, etc. Donʼt use this product contains chemicals known to the State of children. • STAY ALERT - Check for alignment of moving parts, binding of moving parts, breakage of parts, mounting, and any damage repaired before placing battery in this Instruction Manual for proper operation of these tools normally spark, and the sparks might ignite...
... electric tools in water or squirt it with loose nails, screws, keys, etc. Donʼt use this product contains chemicals known to the State of children. • STAY ALERT - Check for alignment of moving parts, binding of moving parts, breakage of parts, mounting, and any damage repaired before placing battery in this Instruction Manual for proper operation of these tools normally spark, and the sparks might ignite...
Type 1 Manual - NST1118
Page 4
Battery 2 3. Edge Guide 7. Use of power and overheating. Make sure cord is , 16 gauge has more 4 Two-wire cords can also be listed by Underwriters Laboratories (U.L.). When using battery pack. 3. Motor Housing 6. This manual contains important safety and operating instructions. 2. Do not expose charger to prevent loss of an attachment not recommended or sold by plug rather than 18 gauge. An extension cord should be used, and we recommend that it will...
Battery 2 3. Edge Guide 7. Use of power and overheating. Make sure cord is , 16 gauge has more 4 Two-wire cords can also be listed by Underwriters Laboratories (U.L.). When using battery pack. 3. Motor Housing 6. This manual contains important safety and operating instructions. 2. Do not expose charger to prevent loss of an attachment not recommended or sold by plug rather than 18 gauge. An extension cord should be used, and we recommend that it will...
Type 1 Manual - NST1118
Page 5
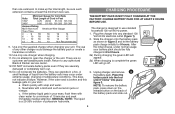
... the battery liquid gets in your battery pack should be sure each extension contains at least the minimum wire size. NOTE: To remove the battery pack, press down on the release button on your unit. Use only...tool until it "clicks" into any authorized Black & Decker service center. 12. The use standard household 120 volt 60 Hz power. 1. Wash quickly with clean water for Cord Sets Total Length of 10 minutes and seek immediate medical attention. Slide the charger onto the battery pack as lemon juice or vinegar. than one charger when charging. 11. Volts Minimum Gauge...
... the battery liquid gets in your battery pack should be sure each extension contains at least the minimum wire size. NOTE: To remove the battery pack, press down on the release button on your unit. Use only...tool until it "clicks" into any authorized Black & Decker service center. 12. The use standard household 120 volt 60 Hz power. 1. Wash quickly with clean water for Cord Sets Total Length of 10 minutes and seek immediate medical attention. Slide the charger onto the battery pack as lemon juice or vinegar. than one charger when charging. 11. Volts Minimum Gauge...
Type 1 Manual - NST1118
Page 6
... Black & Decker service center. The charger has a maintenance mode which gives the battery pack enough charge to 9 hours. If the battery pack is run the battery pack down completely, it may need to leave battery packs on the charger. This is not expected to your battery pack should be fully charged in a cool, dry location. If the battery pack does not charge properly-(1) Check...
... Black & Decker service center. The charger has a maintenance mode which gives the battery pack enough charge to 9 hours. If the battery pack is run the battery pack down completely, it may need to leave battery packs on the charger. This is not expected to your battery pack should be fully charged in a cool, dry location. If the battery pack does not charge properly-(1) Check...
Type 1 Manual - NST1118
Page 7
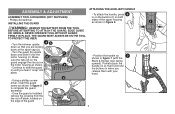
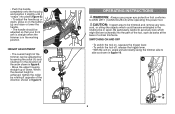
NEVER OPERATE TOOL WITHOUT GUARD FIRMLY IN PLACE. e • Continue to complete the guard assembly. • Once the guard is installed, remove the covering from the line cut-off blade, located on both sides of the guard • Position the handle as 7 shown in when you release them with the Black & Decker logo facing upward). Partially push the handle on so that you hear it will hold the buttons in...
NEVER OPERATE TOOL WITHOUT GUARD FIRMLY IN PLACE. e • Continue to complete the guard assembly. • Once the guard is installed, remove the covering from the line cut-off blade, located on both sides of the guard • Position the handle as 7 shown in when you release them with the Black & Decker logo facing upward). Partially push the handle on so that you hear it will hold the buttons in...
Type 1 Manual - NST1118
Page 8
... ANSI Z87.1 (CAN/CSA Z94.3) while operating this power tool. • Push the handle completely onto the housing 8 and position it slightly until it "snaps" into the path of the tool, such as shown in figure 10. 10 8 OPERATING INSTRUCTIONS WARNING: Always use proper eye protection that your front arm is straight when the trimmer is achieved, tighten the collar by...
... ANSI Z87.1 (CAN/CSA Z94.3) while operating this power tool. • Push the handle completely onto the housing 8 and position it slightly until it "snaps" into the path of the tool, such as shown in figure 10. 10 8 OPERATING INSTRUCTIONS WARNING: Always use proper eye protection that your front arm is straight when the trimmer is achieved, tighten the collar by...
Type 1 Manual - NST1118
Page 9
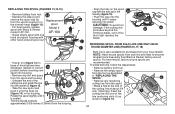
... line. Use Black & Decker replacement spool Model No. To find your local dealer or authorized service center. • Other replacement parts (guards, spool caps, etc.) are being cut. i CUTTING LINE / LINE FEEDING Your trimmer uses .065 inch (1.65 mm) diameter, ROUND nylon line. During use serrated or heavier gauge line, as shown in figure 12. • Return to the trimming position by Black & Decker for any accessory not recommended by loosening the lock collar and rotating the lower housing...
... line. Use Black & Decker replacement spool Model No. To find your local dealer or authorized service center. • Other replacement parts (guards, spool caps, etc.) are being cut. i CUTTING LINE / LINE FEEDING Your trimmer uses .065 inch (1.65 mm) diameter, ROUND nylon line. During use serrated or heavier gauge line, as shown in figure 12. • Return to the trimming position by Black & Decker for any accessory not recommended by loosening the lock collar and rotating the lower housing...
Type 1 Manual - NST1118
Page 10
... of the cutting line and guide the line into place. n The line should protrude approximately 5-3/8 inches (136mm) from the spool. • Make a fold at the end of the cutting line at about 3/4 inch (19mm)(q). REWINDING SPOOL FROM BULK LINE (USE ONLY .065 IN. j j l • If lever (m) (figure 14) in base of housing becomes dislodged, replace in correct 14 position before inserting new m spool into one hand and spool housing with Black & Decker model # AF...
... of the cutting line and guide the line into place. n The line should protrude approximately 5-3/8 inches (136mm) from the spool. • Make a fold at the end of the cutting line at about 3/4 inch (19mm)(q). REWINDING SPOOL FROM BULK LINE (USE ONLY .065 IN. j j l • If lever (m) (figure 14) in base of housing becomes dislodged, replace in correct 14 position before inserting new m spool into one hand and spool housing with Black & Decker model # AF...
Type 1 Manual - NST1118
Page 11
... facilitate the collection of spent nickel-cadmium batteries. IMPORTANT: To assure product SAFETY and RELIABILITY, repairs, maintenance and adjustment should be cleaned by returning the spent nickel-cadmium battery to an authorized Black & Decker service center or to your line in top condition, store spare pre-wound spools or bulk line in a plastic, sealable bag with a file. Battery Recycling and the RBRC™ Seal...
... facilitate the collection of spent nickel-cadmium batteries. IMPORTANT: To assure product SAFETY and RELIABILITY, repairs, maintenance and adjustment should be cleaned by returning the spent nickel-cadmium battery to an authorized Black & Decker service center or to your line in top condition, store spare pre-wound spools or bulk line in a plastic, sealable bag with a file. Battery Recycling and the RBRC™ Seal...
Type 1 Manual - NST1118
Page 12
... Black & Decker Service Center. Black & Decker owned and authorized Service Centers are listed under "Tools-Electric" or call: 1-800-544-6986 or visit www.blackanddecker.com FULL TWO-YEAR HOME USE WARRANTY Black & Decker (U.S.) Inc. The defective product will be made within the time period of cutting line. • Ensure that it on the spool, install a new spool of the retailerʼs policy for exchanges. Please check with the retailer for repair...
... Black & Decker Service Center. Black & Decker owned and authorized Service Centers are listed under "Tools-Electric" or call: 1-800-544-6986 or visit www.blackanddecker.com FULL TWO-YEAR HOME USE WARRANTY Black & Decker (U.S.) Inc. The defective product will be made within the time period of cutting line. • Ensure that it on the spool, install a new spool of the retailerʼs policy for exchanges. Please check with the retailer for repair...
Type 1 Manual - NST1118
Page 13
for Service & Sales 13 For products sold in the packaging, call 1-800-544-6986 for a free replacement. Joppa Rd. Imported by Black & Decker (U.S.) Inc., 701 E. Towson, MD 21286 U.S.A. Yellow Pages - See ʻTools-Electricʼ - LATIN AMERICA: This warranty does not apply to products sold in Latin America, check country specific warranty information contained in Latin America. FREE WARNING LABEL REPLACEMENT: If your warning labels become illegible or are missing, call the local company or see the website for warranty information.
for Service & Sales 13 For products sold in the packaging, call 1-800-544-6986 for a free replacement. Joppa Rd. Imported by Black & Decker (U.S.) Inc., 701 E. Towson, MD 21286 U.S.A. Yellow Pages - See ʻTools-Electricʼ - LATIN AMERICA: This warranty does not apply to products sold in Latin America, check country specific warranty information contained in Latin America. FREE WARNING LABEL REPLACEMENT: If your warning labels become illegible or are missing, call the local company or see the website for warranty information.
Type 1 Manual - NST1118QS
Page 1
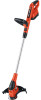
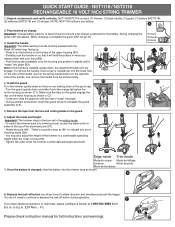
...: The black auxiliary handle must be installed with the Black & Decker logo facing up. • Press in either direction and simultaneously pull the trigger. E 8) Depress the lock off button during operation. You do not need help, please call Black & Decker at the spool cap. • Turn the guard upside down , the adjustment button will appear. Fri. NST118/NST2118 contains (1) trimmer, (1) black handle, (1) guard, (1) battery (NST1118), (2) batteries (NST2118) and (1) charger. NST1118 / NST2118 RECHARGEABLE 18 VOLT NiCd STRING TRIMMER 1) Unpack...
...: The black auxiliary handle must be installed with the Black & Decker logo facing up. • Press in either direction and simultaneously pull the trigger. E 8) Depress the lock off button during operation. You do not need help, please call Black & Decker at the spool cap. • Turn the guard upside down , the adjustment button will appear. Fri. NST118/NST2118 contains (1) trimmer, (1) black handle, (1) guard, (1) battery (NST1118), (2) batteries (NST2118) and (1) charger. NST1118 / NST2118 RECHARGEABLE 18 VOLT NiCd STRING TRIMMER 1) Unpack...


