Warranty
Page 1
... apply to locate a BISSELL Authorized Service Center in accordance with new or remanufactured components or products), at BISSELL's option, free of charge from the date of purchase by E-mail, telephone, or regular mail as filters, bags, belts, or brushes. BISSELL's liability will repair or replace (with the User's Guide is not liable for warranty repair. --The machine should require service". LIMITED THREE YEAR WARRANTY Subject to fans or routine maintenance components...
... apply to locate a BISSELL Authorized Service Center in accordance with new or remanufactured components or products), at BISSELL's option, free of charge from the date of purchase by E-mail, telephone, or regular mail as filters, bags, belts, or brushes. BISSELL's liability will repair or replace (with the User's Guide is not liable for warranty repair. --The machine should require service". LIMITED THREE YEAR WARRANTY Subject to fans or routine maintenance components...
User Guide
Page 1
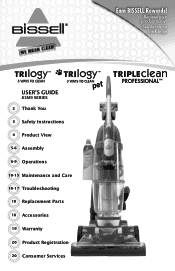
See details on back page USER'S GUIDE 81M9 SERIES 2 Thank You 3 Safety Instructions 4 Product View 5-6 Assembly 6-9 Operations 10-15 Maintenance and Care 16-17 Troubleshooting 18 Replacement Parts 18 Accessories 19 Warranty 20 Product Registration 20 Consumer Services Register your product today! Earn BISSELL Rewards!
See details on back page USER'S GUIDE 81M9 SERIES 2 Thank You 3 Safety Instructions 4 Product View 5-6 Assembly 6-9 Operations 10-15 Maintenance and Care 16-17 Troubleshooting 18 Replacement Parts 18 Accessories 19 Warranty 20 Product Registration 20 Consumer Services Register your product today! Earn BISSELL Rewards!
User Guide
Page 3
... Keep cord away from outlet when cleaning or servicing ■ Allow carpet cleaning solution to dry completely before servicing. ■ Do not use outdoors or on cord. Do not use and before attaching the TurboBrush® Tool. ■ Do not pick up flammable materials (lighter fluid, gasoline, kerosene, etc.) or use in the presence of electric shock, this user's guide. ■ Use only manufacturer's recommended attachments. ■ Do not use with wet hands...
... Keep cord away from outlet when cleaning or servicing ■ Allow carpet cleaning solution to dry completely before servicing. ■ Do not use outdoors or on cord. Do not use and before attaching the TurboBrush® Tool. ■ Do not pick up flammable materials (lighter fluid, gasoline, kerosene, etc.) or use in the presence of electric shock, this user's guide. ■ Use only manufacturer's recommended attachments. ■ Do not use with wet hands...
User Guide
Page 4
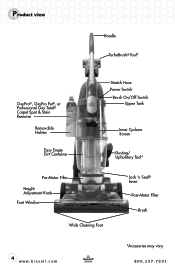
Product view Handle TurboBrush® Tool* OxyPro®, OxyPro Pet®, or Professional Oxy Total® Carpet Spot & Stain Remover Removable Holster Easy Empty Dirt Container Stretch Hose Power Switch Brush On/Off Switch Upper Tank Inner Cyclone Screen Dusting/ Upholstery Tool* Pre-Motor Filter Height Adjustment Knob Foot Window Wide Cleaning Foot Lock 'n Seal® Lever Post-Motor Filter Brush 4 www.bissell.com *Accesories may vary 800.237.7691
Product view Handle TurboBrush® Tool* OxyPro®, OxyPro Pet®, or Professional Oxy Total® Carpet Spot & Stain Remover Removable Holster Easy Empty Dirt Container Stretch Hose Power Switch Brush On/Off Switch Upper Tank Inner Cyclone Screen Dusting/ Upholstery Tool* Pre-Motor Filter Height Adjustment Knob Foot Window Wide Cleaning Foot Lock 'n Seal® Lever Post-Motor Filter Brush 4 www.bissell.com *Accesories may vary 800.237.7691
User Guide
Page 5
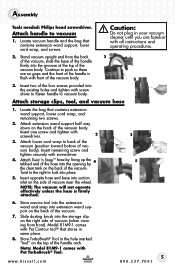
... screwdriver. 2 3 3. Assembly Tools needed: Philips head screwdriver. Caution: Do not plug in same place. 8. Store crevice tool into the extension wand and snap into extension wand support on the back of the vacuum. 7. Model 81M9-1 comes with Pet Contour tool® that stores in your vacuum cleaner until you are no gaps and the front of the vacuum body. 3 3. Locate vacuum handle and the bag that contains extension wand support, lower cord wrap...
... screwdriver. 2 3 3. Assembly Tools needed: Philips head screwdriver. Caution: Do not plug in same place. 8. Store crevice tool into the extension wand and snap into extension wand support on the back of the vacuum. 7. Model 81M9-1 comes with Pet Contour tool® that stores in your vacuum cleaner until you are no gaps and the front of the vacuum body. 3 3. Locate vacuum handle and the bag that contains extension wand support, lower cord wrap...
User Guide
Page 6
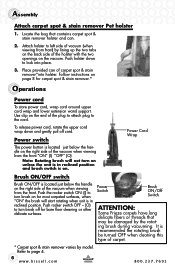
... is in reclined position. Place provided can . 2. Power switch Power Cord Wrap The power button is on page 8 for carpet spot & stain remover.* Operations Power cord To store power cord, wrap cord around upper cord wrap and lower extension wand support. It is in reclined position and brush switch is located just below the handle on the vacuum. Follow instructions on . Push rocker switch OFF - (O) to page 4. 6 www.bissell.com 800.237.7691 Assembly Attach carpet spot & stain remover Pet holster 1.
... is in reclined position. Place provided can . 2. Power switch Power Cord Wrap The power button is on page 8 for carpet spot & stain remover.* Operations Power cord To store power cord, wrap cord around upper cord wrap and lower extension wand support. It is in reclined position and brush switch is located just below the handle on the vacuum. Follow instructions on . Push rocker switch OFF - (O) to page 4. 6 www.bissell.com 800.237.7691 Assembly Attach carpet spot & stain remover Pet holster 1.
User Guide
Page 7
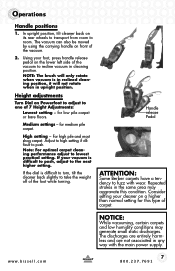
... Berber carpets have a tendency to push. Operations Handle positions 1. Adjust to high setting if difficult to fuzz with the main power supply. If the dial is in reclined cleaning position, it will not rotate when in any way with wear. NOTE: The brush will only rotate when vacuum is difficult to turn, tilt the cleaner back slightly to room. www.bissell...
... Berber carpets have a tendency to push. Operations Handle positions 1. Adjust to high setting if difficult to fuzz with the main power supply. If the dial is in reclined cleaning position, it will not rotate when in any way with wear. NOTE: The brush will only rotate when vacuum is difficult to turn, tilt the cleaner back slightly to room. www.bissell...
User Guide
Page 8
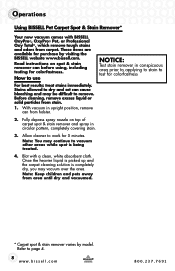
... to dry and set can cause bleaching and may vacuum over the area. Fully depress spray nozzle on spot & stain remover can from stain. 1. Refer to test for 5 minutes. Allow cleaner to remove. With vacuum in upright position, remove can before using, including testing for purchase by model. Operations Using BISSELL Pet Carpet Spot & Stain Remover* Your new vacuum comes with a clean, white absorbent cloth. Note: Keep children and pets away from carpet. Once...
... to dry and set can cause bleaching and may vacuum over the area. Fully depress spray nozzle on spot & stain remover can from stain. 1. Refer to test for 5 minutes. Allow cleaner to remove. With vacuum in upright position, remove can before using, including testing for purchase by model. Operations Using BISSELL Pet Carpet Spot & Stain Remover* Your new vacuum comes with a clean, white absorbent cloth. Note: Keep children and pets away from carpet. Once...
User Guide
Page 9
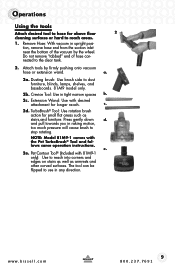
Attach tools by the wheel. Crevice Tool: Use in upright position, remove hose end from the suction inlet near the bottom of hose connected to stop rotating. Press gently down d. Pet Contour Tool® (Included with the Pet TurboBrush® Tool and follows same operation instructions. www.bissell.com 9 800.237.7691 a. 2a. NOTE: Model 81M9-1 comes with 81M9-1 only): Use to use in raking motion, too much pressure will cause brush to...
Attach tools by the wheel. Crevice Tool: Use in upright position, remove hose end from the suction inlet near the bottom of hose connected to stop rotating. Press gently down d. Pet Contour Tool® (Included with the Pet TurboBrush® Tool and follows same operation instructions. www.bissell.com 9 800.237.7691 a. 2a. NOTE: Model 81M9-1 comes with 81M9-1 only): Use to use in raking motion, too much pressure will cause brush to...
User Guide
Page 10
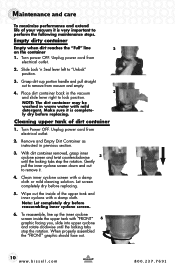
... to remove from vacuum and empty. 4. Cleaning upper tank of your vacuum it is very important to perform the following maintenance steps. Turn Power OFF. When properly assembled the "FRONT" graphic should face out. 10 www.bissell.com 800.237.7691 Wipe out the inside the upper tank with mild detergent. Unplug power cord from electrical outlet. 2. With dirt container removed, grasp inner cyclone screen...
... to remove from vacuum and empty. 4. Cleaning upper tank of your vacuum it is very important to perform the following maintenance steps. Turn Power OFF. When properly assembled the "FRONT" graphic should face out. 10 www.bissell.com 800.237.7691 Wipe out the inside the upper tank with mild detergent. Unplug power cord from electrical outlet. 2. With dirt container removed, grasp inner cyclone screen...
User Guide
Page 11
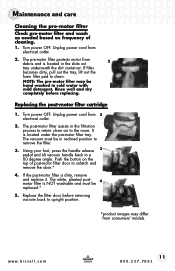
...-motor filter is NOT washable and must be 4 replaced.* 5. The vacuum must be in the filtration process to return clean air to unlatch and remove the door.* 4. Replace the filter door before replacing. Using your foot, press the handle release 3 pedal and tilt vacuum handle back to clean. The pre-motor filter protects motor from consumers' models. It is located in cold water with mild detergent. Maintenance and care Cleaning the pre-motor filter Check pre-motor filter and wash...
...-motor filter is NOT washable and must be 4 replaced.* 5. The vacuum must be in the filtration process to return clean air to unlatch and remove the door.* 4. Replace the filter door before replacing. Using your foot, press the handle release 3 pedal and tilt vacuum handle back to clean. The pre-motor filter protects motor from consumers' models. It is located in cold water with mild detergent. Maintenance and care Cleaning the pre-motor filter Check pre-motor filter and wash...
User Guide
Page 12
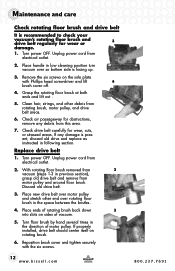
Place handle in low cleaning position turn vacuum over rotating floor brush in previous section), grasp old drive belt and remove from rotating brush, motor pulley, and drive belt areas. 6. Remove the six screws on the sole plate with the six screws. 12 www.bissell.com 800.237.7691 Replace drive belt 1. Turn power OFF. Discard old drive belt. 3. If properly installed, drive belt should center itself on sides of motor pulley. Maintenance and care Check rotating floor brush and drive belt It is facing...
Place handle in low cleaning position turn vacuum over rotating floor brush in previous section), grasp old drive belt and remove from rotating brush, motor pulley, and drive belt areas. 6. Remove the six screws on the sole plate with the six screws. 12 www.bissell.com 800.237.7691 Replace drive belt 1. Turn power OFF. Discard old drive belt. 3. If properly installed, drive belt should center itself on sides of motor pulley. Maintenance and care Check rotating floor brush and drive belt It is facing...
User Guide
Page 13
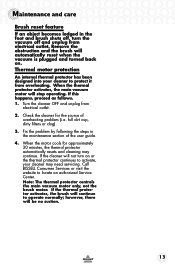
... the thermal protector activates, the main vacuum motor will automatically reset when the vacuum is plugged and turned back on or the thermal protector continues to activate, your cleaner to protect it from overheating. Check the cleaner for approximately 30 minutes, the thermal protector automatically resets and cleaning may need servicing. Remove the obstruction and the brush will stop operating. Maintenance and care Brush reset feature If an object becomes lodged in the maintenance section of overheating problem (i.e. Turn the cleaner OFF...
... the thermal protector activates, the main vacuum motor will automatically reset when the vacuum is plugged and turned back on or the thermal protector continues to activate, your cleaner to protect it from overheating. Check the cleaner for approximately 30 minutes, the thermal protector automatically resets and cleaning may need servicing. Remove the obstruction and the brush will stop operating. Maintenance and care Brush reset feature If an object becomes lodged in the maintenance section of overheating problem (i.e. Turn the cleaner OFF...
User Guide
Page 14
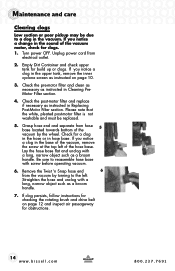
... Cleaning PreMotor Filter section. 4. Unplug power cord from the vacuum by the wheel. Remove the Twist 'n Snap hose end 6 from electrical outlet. 2. Maintenance and care Clearing clogs Low suction or poor pickup may be replaced. 5. Please note that the white, pleated post-motor filter is not washable and must be due to a clog in the sound of the vacuum, remove the screw at the top left . Turn power OFF. Check the pre-motor filter...
... Cleaning PreMotor Filter section. 4. Unplug power cord from the vacuum by the wheel. Remove the Twist 'n Snap hose end 6 from electrical outlet. 2. Maintenance and care Clearing clogs Low suction or poor pickup may be replaced. 5. Please note that the white, pleated post-motor filter is not washable and must be due to a clog in the sound of the vacuum, remove the screw at the top left . Turn power OFF. Check the pre-motor filter...
User Guide
Page 15
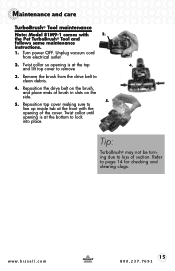
... to loss of brush in slots on the brush, and place ends of suction. Unplug vacuum cord from the drive belt to remove 3. and lift top cover to clean debris. 4. Refer to lock into place. Turn power OFF. www.bissell.com 15 800.237.7691 Reposition the drive belt on the side. 5. 5. the Pet TurboBrush® Tool and follows same maintenance instructions. 1. Twist collar so opening is at the...
... to loss of brush in slots on the brush, and place ends of suction. Unplug vacuum cord from the drive belt to remove 3. and lift top cover to clean debris. 4. Refer to lock into place. Turn power OFF. www.bissell.com 15 800.237.7691 Reposition the drive belt on the side. 5. 5. the Pet TurboBrush® Tool and follows same maintenance instructions. 1. Twist collar so opening is at the...
User Guide
Page 16
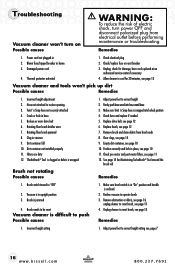
...Dirt container full 9. Brush is wrapped 12. Hose not attached to "Off" 1. Make sure brush switch is reclined. 2. Troubleshooting Vacuum cleaner won 't pick up dirt Possible causes Remedies 1. Thermal protector activated 4. Replace drive belt, see page 10 11. Remedies 1. Check electrical plug 2. Rotating floor brush jammed 7. Dirt container not installed properly 10. Brush switch turned to suction opening 2. Recline vacuum to operate brush 3. Incorrect height setting 1. Broken or worn drive belt 5. Blown fuse/tripped breaker in "On" position and handle...
...Dirt container full 9. Brush is wrapped 12. Hose not attached to "Off" 1. Make sure brush switch is reclined. 2. Troubleshooting Vacuum cleaner won 't pick up dirt Possible causes Remedies 1. Thermal protector activated 4. Replace drive belt, see page 10 11. Remedies 1. Check electrical plug 2. Rotating floor brush jammed 7. Dirt container not installed properly 10. Brush switch turned to suction opening 2. Recline vacuum to operate brush 3. Incorrect height setting 1. Broken or worn drive belt 5. Blown fuse/tripped breaker in "On" position and handle...
User Guide
Page 17
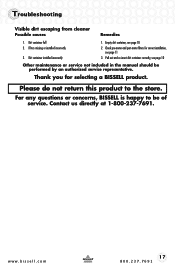
... correct installation, see page 10 2. Dirt container installed incorrectly 3. Contact us directly at 1-800-237-7691. For any questions or concerns, BISSELL is happy to the store. Empty dirt container, see page 11 3. Please do not return this product to be performed by an authorized service representative. Troubleshooting Visible dirt escaping from cleaner Possible causes Remedies 1. Check pre-motor and post-motor filters for selecting a BISSELL product.
... correct installation, see page 10 2. Dirt container installed incorrectly 3. Contact us directly at 1-800-237-7691. For any questions or concerns, BISSELL is happy to the store. Empty dirt container, see page 11 3. Please do not return this product to be performed by an authorized service representative. Troubleshooting Visible dirt escaping from cleaner Possible causes Remedies 1. Check pre-motor and post-motor filters for selecting a BISSELL product.
User Guide
Page 18
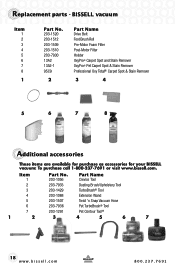
... Drive Belt Foot Brush Roll Pre-Motor Foam Filter Post-Motor Filter Holster OxyPro® Carpet Spot and Stain Remover OxyPro® Pet Carpet Spot & Stain Remover Professional Oxy Total® Carpet Spot & Stain Remover 3 4 5 6 7 8 Additional accessories These items are available for purchase as accessories for your BISSELL vacuum: To purchase call 1-800-237-7691 or visit www.bissell.com. Item 1 Part No. 203-1056 Part Name Crevice Tool 2 203-7933 Dusting Brush...
... Drive Belt Foot Brush Roll Pre-Motor Foam Filter Post-Motor Filter Holster OxyPro® Carpet Spot and Stain Remover OxyPro® Pet Carpet Spot & Stain Remover Professional Oxy Total® Carpet Spot & Stain Remover 3 4 5 6 7 8 Additional accessories These items are available for purchase as accessories for your BISSELL vacuum: To purchase call 1-800-237-7691 or visit www.bissell.com. Item 1 Part No. 203-1056 Part Name Crevice Tool 2 203-7933 Dusting Brush...
User Guide
Page 19
... personal, and not commercial or rental service. Friday 8 a.m. - 10 p.m. ET Or Write: BISSELL Homecare, Inc. IS NOT LIABLE FOR INCIDENTAL OR CONSEQUENTIAL DAMAGES OF ANY NATURE ASSOCIATED WITH THE USE OF THIS PRODUCT. will repair or replace (with the User's Guide is not covered. ANY IMPLIED WARRANTIES WHICH MAY ARISE BY OPERATION OF LAW, INCLUDING THE IMPLIED WARRANTIES OF MERCHANTABILITY AND FITNESS...
... personal, and not commercial or rental service. Friday 8 a.m. - 10 p.m. ET Or Write: BISSELL Homecare, Inc. IS NOT LIABLE FOR INCIDENTAL OR CONSEQUENTIAL DAMAGES OF ANY NATURE ASSOCIATED WITH THE USE OF THIS PRODUCT. will repair or replace (with the User's Guide is not covered. ANY IMPLIED WARRANTIES WHICH MAY ARISE BY OPERATION OF LAW, INCLUDING THE IMPLIED WARRANTIES OF MERCHANTABILITY AND FITNESS...
User Guide
Page 20
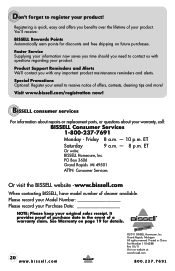
... your Model Number Please record your Purchase Date NOTE: Please keep your email to receive notice of offers, contests, cleaning tips and more! See Warranty on future purchases. Registering is quick, easy and offers you benefits over the lifetime of a warranty claim. Visit www.bissell.com/registration now! BISSELL consumer services For information about repairs or replacement parts, or questions about your product. ET...
... your Model Number Please record your Purchase Date NOTE: Please keep your email to receive notice of offers, contests, cleaning tips and more! See Warranty on future purchases. Registering is quick, easy and offers you benefits over the lifetime of a warranty claim. Visit www.bissell.com/registration now! BISSELL consumer services For information about repairs or replacement parts, or questions about your product. ET...


