
Setup Manual
Page 2
... 5.1 Operation System 23 5.2 Raid Arrays 23 5.3 How RAID Works 23 Chapter 6: T-Power BIOS & Software 27 6.1 T-Power BIOS 27 6.2 T-Power Software 35 Chapter 7: Useful Help 45 7.1 Driver Installation Note 45 7.2 Extra Information 46 7.3 AMI BIOS Beep Code 47 7.4 AMI BIOS Post Code 48 7.5 Troubleshooting 50 Appendencies: SPEC In Other Language 52 German...
... 5.1 Operation System 23 5.2 Raid Arrays 23 5.3 How RAID Works 23 Chapter 6: T-Power BIOS & Software 27 6.1 T-Power BIOS 27 6.2 T-Power Software 35 Chapter 7: Useful Help 45 7.1 Driver Installation Note 45 7.2 Extra Information 46 7.3 AMI BIOS Beep Code 47 7.4 AMI BIOS Post Code 48 7.5 Troubleshooting 50 Appendencies: SPEC In Other Language 52 German...
Setup Manual
Page 3
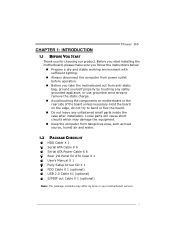
... working environment with sufficient lighting. „ Always disconnect the computer from power outlet before operation. „ Before you for ATX Case X 1 User's Manual X 1 Fully Setup Driver CD X 1 FDD Cable X 1 (optional) USB 2.0 Cable X1 (optional) S/PDIF out Cable X 1 (optional) Note: The package contents may damage the equipment. „ Keep the computer from...
... working environment with sufficient lighting. „ Always disconnect the computer from power outlet before operation. „ Before you for ATX Case X 1 User's Manual X 1 Fully Setup Driver CD X 1 FDD Cable X 1 (optional) USB 2.0 Cable X1 (optional) S/PDIF out Cable X 1 (optional) Note: The package contents may damage the equipment. „ Keep the computer from...
Setup Manual
Page 23
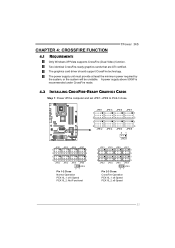
... is recommended under CrossFire mode. 4.2 INSTALLING CROSSFIRE-READY GRAPHICS CARDS Step 1: Power off the computer and set JPE1~JPE9 to Pin2-3 close. The graphics card driver should support CrossFire technology. JPE1 1 3 1 3 JPE2 JPE3 JPE4 JPE5 JPE7 1 3 1 JPE6 3 3 JPE8 1 JPE9 JPE1 JPE3 JPE5 JPE7 1 1 3 3 1 1 3 3 JPE2 JPE4 JPE6 JPE8 JPE 9 31 Pin 1-2 Close...
... is recommended under CrossFire mode. 4.2 INSTALLING CROSSFIRE-READY GRAPHICS CARDS Step 1: Power off the computer and set JPE1~JPE9 to Pin2-3 close. The graphics card driver should support CrossFire technology. JPE1 1 3 1 3 JPE2 JPE3 JPE4 JPE5 JPE7 1 3 1 JPE6 3 3 JPE8 1 JPE9 JPE1 JPE3 JPE5 JPE7 1 1 3 3 1 1 3 3 JPE2 JPE4 JPE6 JPE8 JPE 9 31 Pin 1-2 Close...
Setup Manual
Page 37
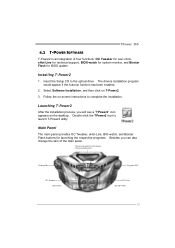
... Panel The main panel provides OC Tweaker, eHot-Line, BIO-watch for system monitor, and Biostar Flash for launching the respective programs. Besides you will see a "TPower2" icon appears on -screen instructions to launch T-Power2 utility. The drivers installation program would appear if the Autorun function has been enabled. 2. Installing T-Power2 1. Thi...
... Panel The main panel provides OC Tweaker, eHot-Line, BIO-watch for system monitor, and Biostar Flash for launching the respective programs. Besides you will see a "TPower2" icon appears on -screen instructions to launch T-Power2 utility. The drivers installation program would appear if the Autorun function has been enabled. 2. Installing T-Power2 1. Thi...

Setup Manual
Page 47
... click on the Manual icon to launch the installation program. C. Note: If this window didn't show up after you insert the Driver CD, please use file browser to open the manual file. You will see the following window after you insert the CD The setup guide will... need Acrobat Reader to locate and execute the file SETUP.EXE under your optical drive and install the driver for your motherboard and operating system. Please download the latest version of Acrobat Reader software from the paperback manual, we also provide manual in the...
... click on the Manual icon to launch the installation program. C. Note: If this window didn't show up after you insert the Driver CD, please use file browser to open the manual file. You will see the following window after you insert the CD The setup guide will... need Acrobat Reader to locate and execute the file SETUP.EXE under your optical drive and install the driver for your motherboard and operating system. Please download the latest version of Acrobat Reader software from the paperback manual, we also provide manual in the...


