
Setup Manual
Page 2
... 5.1 Operation System 21 5.2 Raid Arrays 21 5.3 How RAID Works 21 Chapter 6: T-Series BIOS & Software 25 6.1 T-Series BIOS 25 6.2 T-Series Software 33 Chapter 7: Useful Help 43 7.1 Driver Installation Note 43 7.2 Extra Information 44 7.3 AMI BIOS Beep Code 45 7.4 Troubleshooting 46 Appendix: SPEC In Other Language 48 German...48 France ...50 Italian...52...
... 5.1 Operation System 21 5.2 Raid Arrays 21 5.3 How RAID Works 21 Chapter 6: T-Series BIOS & Software 25 6.1 T-Series BIOS 25 6.2 T-Series Software 33 Chapter 7: Useful Help 43 7.1 Driver Installation Note 43 7.2 Extra Information 44 7.3 AMI BIOS Beep Code 45 7.4 Troubleshooting 46 Appendix: SPEC In Other Language 48 German...48 France ...50 Italian...52...

Setup Manual
Page 3
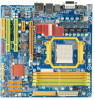
...with sufficient lighting. „ Always disconnect the computer from power outlet before operation. „ Before you for ATX Case X 1 User's Manual X 1 Fully Setup Driver CD X 1 FDD Cable X 1 (optional) USB 2.0 Cable X1 (optional) S/PDIF out Cable X 1 (optional) Note: The package contents may damage the ...grounded wrist strap to bend or flex the board. „ Do not leave any unfastened small parts inside the case after installation. TA790GX XE/TA790GX M2+/TA790GXB M2+ CHAPTER 1: INTRODUCTION 1.1 BEFORE YOU START Thank you take the motherboard out from dangerous area, such as heat ...
...with sufficient lighting. „ Always disconnect the computer from power outlet before operation. „ Before you for ATX Case X 1 User's Manual X 1 Fully Setup Driver CD X 1 FDD Cable X 1 (optional) USB 2.0 Cable X1 (optional) S/PDIF out Cable X 1 (optional) Note: The package contents may damage the ...grounded wrist strap to bend or flex the board. „ Do not leave any unfastened small parts inside the case after installation. TA790GX XE/TA790GX M2+/TA790GXB M2+ CHAPTER 1: INTRODUCTION 1.1 BEFORE YOU START Thank you take the motherboard out from dangerous area, such as heat ...
Setup Manual
Page 4
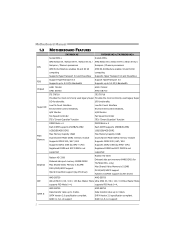
...memory 128MB DDR2 Max Shared Video Memory is 512MB DX10/UVD/HDCP support Hybrid CrossFireX support (by ATI driver) Radeon HD 3300 Onboard side port memory 64MB DDR2 (for TA790GX M2+ only) Max Shared Video Memory is 512MB DX10/UVD/HDCP support Hybrid CrossFireX support (by ATI... driver) AMD SB750 AMD SB750 IDE Ultra DMA 33 / 66 / 100 / 133 Bus Master Mode Ultra DMA 33 / 66 / 100 / 133 Bus Master Mode supports PIO Mode 0~4, supports PIO Mode 0~4, SATA II AMD SB750 Data transfer rates up to 3 Gb/s. RAID 0,1,5,1+0 support 2 Motherboard Manual 1.3 MOTHERBOARD FEATURES TA790GX XE TA790GX ...
...memory 128MB DDR2 Max Shared Video Memory is 512MB DX10/UVD/HDCP support Hybrid CrossFireX support (by ATI driver) Radeon HD 3300 Onboard side port memory 64MB DDR2 (for TA790GX M2+ only) Max Shared Video Memory is 512MB DX10/UVD/HDCP support Hybrid CrossFireX support (by ATI... driver) AMD SB750 AMD SB750 IDE Ultra DMA 33 / 66 / 100 / 133 Bus Master Mode Ultra DMA 33 / 66 / 100 / 133 Bus Master Mode supports PIO Mode 0~4, supports PIO Mode 0~4, SATA II AMD SB750 Data transfer rates up to 3 Gb/s. RAID 0,1,5,1+0 support 2 Motherboard Manual 1.3 MOTHERBOARD FEATURES TA790GX XE TA790GX ...

Setup Manual
Page 22
The power supply unit must provide at least the minimum power required by the system, or the system will be unstable. The graphics card driver should support Hybrid CrossFireX technology. NOTE For more detail information of Hybrid CrossFireX function, please visit following web-sites: http://game.amd.com/us-en/...
The power supply unit must provide at least the minimum power required by the system, or the system will be unstable. The graphics card driver should support Hybrid CrossFireX technology. NOTE For more detail information of Hybrid CrossFireX function, please visit following web-sites: http://game.amd.com/us-en/...
Setup Manual
Page 35
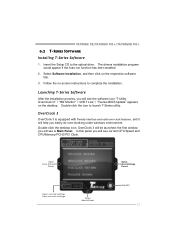
TA790GX XE/TA790GX M2+/TA790GXB M2+ 6.2 T-SERIES SOFTWARE Installing T-Series Software 1. Insert the Setup CD to launch T-Series utility. Open Over Clock Panel Ope n a saved setting/ Save cur r ent se ttings Open Abou t Pane l Open Over Voltage Panel ON/OFF 33 The drivers installation program would appear if the Auto-run function has been enabled...
TA790GX XE/TA790GX M2+/TA790GXB M2+ 6.2 T-SERIES SOFTWARE Installing T-Series Software 1. Insert the Setup CD to launch T-Series utility. Open Over Clock Panel Ope n a saved setting/ Save cur r ent se ttings Open Abou t Pane l Open Over Voltage Panel ON/OFF 33 The drivers installation program would appear if the Auto-run function has been enabled...

Setup Manual
Page 45
... installation program. Click on the Manual icon to open the manual file. C. TA790GX XE/TA790GX M2+/TA790GXB M2+ CHAPTER 7: USEFUL HELP 7.1 DRIVER INSTALLATION NOTE After you installed your operating system, please insert the Fully Setup Driver CD into your optical drive and install the driver for available manual. B. Note: If this window didn't show up after...
... installation program. Click on the Manual icon to open the manual file. C. TA790GX XE/TA790GX M2+/TA790GXB M2+ CHAPTER 7: USEFUL HELP 7.1 DRIVER INSTALLATION NOTE After you installed your operating system, please insert the Fully Setup Driver CD into your optical drive and install the driver for available manual. B. Note: If this window didn't show up after...
Setup Manual
Page 66
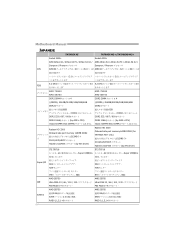
Motherboard Manual JAPANESE TA790GX XE TA790GX M2+/TA790GXB M2+ Socket AM2+ Socket AM2+ AMD Athlon 64 / Athlon 64 FX / Athlon 64 X2 / AMD Athlon 64 / Athlon 64 FX / Athlon 64 X2 / ... memory 128MB DDR2 512MBです ス DX10/UVD/HDCP Hybrid CrossFireX by ATI driver) Radeon HD 3300 Onboard side port memory 64MB DDR2 (for TA790GX M2+ only 512MBです DX10/UVD/HDCP Hybrid CrossFireX by ATI driver) ITE IT8718 ITE IT8718 Super I/O Super I/O機能を Super I/O H/W H/W ITE ITE AMD SB750...
Motherboard Manual JAPANESE TA790GX XE TA790GX M2+/TA790GXB M2+ Socket AM2+ Socket AM2+ AMD Athlon 64 / Athlon 64 FX / Athlon 64 X2 / AMD Athlon 64 / Athlon 64 FX / Athlon 64 X2 / ... memory 128MB DDR2 512MBです ス DX10/UVD/HDCP Hybrid CrossFireX by ATI driver) Radeon HD 3300 Onboard side port memory 64MB DDR2 (for TA790GX M2+ only 512MBです DX10/UVD/HDCP Hybrid CrossFireX by ATI driver) ITE IT8718 ITE IT8718 Super I/O Super I/O機能を Super I/O H/W H/W ITE ITE AMD SB750...

Bios Manual
Page 18
... the built-in driver that allows the onbo ard ID E controller to provide boot information and VGA compatibility. Reserved: Specified IRQ is a toggle for use by PCI/PnP devices. Options: 64 (Default) / 0-255 Allocate IRQ to PCI V GA T his item allows BIOS to choose a IRQ to take place. TA790GX XE/TA790GX M2+/TA790GXB M2...
... the built-in driver that allows the onbo ard ID E controller to provide boot information and VGA compatibility. Reserved: Specified IRQ is a toggle for use by PCI/PnP devices. Options: 64 (Default) / 0-255 Allocate IRQ to PCI V GA T his item allows BIOS to choose a IRQ to take place. TA790GX XE/TA790GX M2+/TA790GXB M2...
Update Manual
Page 1
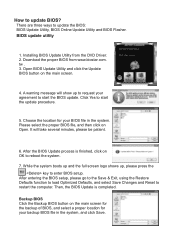
Installing BIOS Update Utility from www.biostar.com. Open BIOS Update Utility and click the Update BIOS button on Open. While the system boots up and the full screen logo shows up ..., using the Restore Defaults function to load Optimized Defaults, and select Save Changes and Reset to update BIOS? Download the proper BIOS from the DVD Driver. 2. Choose the location for your BIOS file in the system, and click Save. Please select the proper BIOS file, and then click on the main...
Installing BIOS Update Utility from www.biostar.com. Open BIOS Update Utility and click the Update BIOS button on Open. While the system boots up and the full screen logo shows up ..., using the Restore Defaults function to load Optimized Defaults, and select Save Changes and Reset to update BIOS? Download the proper BIOS from the DVD Driver. 2. Choose the location for your BIOS file in the system, and click Save. Please select the proper BIOS file, and then click on the main...
Update Manual
Page 2
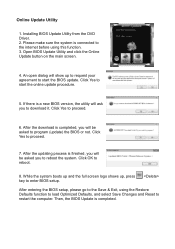
... to load Optimized Defaults, and select Save Changes and Reset to reboot the system. Click OK to proceed. 7. Installing BIOS Update Utility from the DVD Driver. 2. Click Yes to reboot. 8. After the updating process is completed. While the system boots up and the full screen logo shows up to request your...
... to load Optimized Defaults, and select Save Changes and Reset to reboot the system. Click OK to proceed. 7. Installing BIOS Update Utility from the DVD Driver. 2. Click Yes to reboot. 8. After the updating process is completed. While the system boots up and the full screen logo shows up to request your...


