
Setup Manual
Page 2
... 1.3 Motherboard Features 2 1.4 Rear Panel Connectors 4 1.5 Motherboard Layout 5 Chapter 2: Hardware Installation 6 2.1 Installing Central Processing Unit (CPU 6 2.2 FAN Headers 8 2.3 Installing System Memory 9 2.4 Connectors and Slots 11 Chapter 3: Headers & Jumpers Setup 14 3.1 How ... Requirements 22 4.2 CrossFireX Installation 22 4.3 Hybrid CrossFireX Requirements 23 4.4 Hybrid CrossFireX Installation 23 4.5 Operation Modes Supporting List 24 Chapter 5: RAID Functions 25 5.1 Operation System 25 5.2 Raid Arrays 25 5.3 How RAID Works 25...
... 1.3 Motherboard Features 2 1.4 Rear Panel Connectors 4 1.5 Motherboard Layout 5 Chapter 2: Hardware Installation 6 2.1 Installing Central Processing Unit (CPU 6 2.2 FAN Headers 8 2.3 Installing System Memory 9 2.4 Connectors and Slots 11 Chapter 3: Headers & Jumpers Setup 14 3.1 How ... Requirements 22 4.2 CrossFireX Installation 22 4.3 Hybrid CrossFireX Requirements 23 4.4 Hybrid CrossFireX Installation 23 4.5 Operation Modes Supporting List 24 Chapter 5: RAID Functions 25 5.1 Operation System 25 5.2 Raid Arrays 25 5.3 How RAID Works 25...
Setup Manual
Page 4
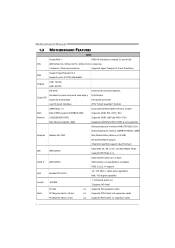
... Mode DDR2 memory module Main Each DIMM supports 256MB/512MB/ Supports DDR2 533 / 667 / 800 Memory 1GB/2GB/4GB DDR2 Supports DDR2 1066 (by AM2+ CPU) Max Memory Capicity 16GB Registered DIMM and ECC DIMM is not supported Onboard side port memory 64MB (TA790GX A2+) Onboard side port memory 128MB (TA790GX 128M) Graphics Radeon HD 3300 Max Shared...
... Mode DDR2 memory module Main Each DIMM supports 256MB/512MB/ Supports DDR2 533 / 667 / 800 Memory 1GB/2GB/4GB DDR2 Supports DDR2 1066 (by AM2+ CPU) Max Memory Capicity 16GB Registered DIMM and ECC DIMM is not supported Onboard side port memory 64MB (TA790GX A2+) Onboard side port memory 128MB (TA790GX 128M) Graphics Radeon HD 3300 Max Shared...
Setup Manual
Page 5
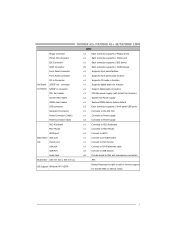
TA790GX A2+/TA790GX A2+ SE/TA790GX 128M SPEC Floppy connector x1 Each connector supports 2 Floppy drives Printer Port connector x1 Each connector supports 1 Printer port IDE Connector x1 Each connector supports 2 IDE device SATA Connector x6 Each connector supports 1 SATA devices Front Panel Connector x1 Supports front panel facilities Front Audio Connector x1 Supports front panel audio function CD-in Connector x1...
TA790GX A2+/TA790GX A2+ SE/TA790GX 128M SPEC Floppy connector x1 Each connector supports 2 Floppy drives Printer Port connector x1 Each connector supports 1 Printer port IDE Connector x1 Each connector supports 2 IDE device SATA Connector x6 Each connector supports 1 SATA devices Front Panel Connector x1 Supports front panel facilities Front Audio Connector x1 Supports front panel audio function CD-in Connector x1...

Setup Manual
Page 9
... encounter the situation that the new system failed to complete the installation. TA790GX A2+/TA790GX A2+ SE/TA790GX 128M Step 4: Hold the CPU down firmly, and then close the lever toward direct B to boot while using AM2+ CPUs. Connect the CPU FAN power cable to the latest version while using new AM2+ CPUs.... Note: Please update the BIOS to the JCFAN1. In this case, please install one standard AM2 CPU to boot your system, and update the latest BIOS from our website for AM2+ CPUs support. 7 Step 5: Put the CPU Fan on the CPU and buckle it. This completes the installation.
... encounter the situation that the new system failed to complete the installation. TA790GX A2+/TA790GX A2+ SE/TA790GX 128M Step 4: Hold the CPU down firmly, and then close the lever toward direct B to boot while using AM2+ CPUs. Connect the CPU FAN power cable to the latest version while using new AM2+ CPUs.... Note: Please update the BIOS to the JCFAN1. In this case, please install one standard AM2 CPU to boot your system, and update the latest BIOS from our website for AM2+ CPUs support. 7 Step 5: Put the CPU Fan on the CPU and buckle it. This completes the installation.

Setup Manual
Page 10
... is the positive and should be connected to pin#2, and the black wire is Ground and should be different according to the fan manufacturer. JCFAN1: CPU Fan Header 1 4 Pin Assignment 1 Ground 2 +12V 3 FAN RPM rate sense 4 Smart Fan Control (By Fan) JNFAN1: NorthBridge Fan Header JSFAN1: ...System Fan Header JNFAN1 13 JSFAN1 Pin Assignment 1 Ground 2 +12V 3 FAN RPM rate sense 31 Note: The JCFAN1, JNFAN1, and JSFAN1 support 4-pin and 3-pin head connectors. The fan cable and connector may be connected to pin#1. Motherboard Manual 2.2 FAN HEADERS These fan headers...
... is the positive and should be connected to pin#2, and the black wire is Ground and should be different according to the fan manufacturer. JCFAN1: CPU Fan Header 1 4 Pin Assignment 1 Ground 2 +12V 3 FAN RPM rate sense 4 Smart Fan Control (By Fan) JNFAN1: NorthBridge Fan Header JSFAN1: ...System Fan Header JNFAN1 13 JSFAN1 Pin Assignment 1 Ground 2 +12V 3 FAN RPM rate sense 31 Note: The JCFAN1, JNFAN1, and JSFAN1 support 4-pin and 3-pin head connectors. The fan cable and connector may be connected to pin#1. Motherboard Manual 2.2 FAN HEADERS These fan headers...
Setup Manual
Page 45
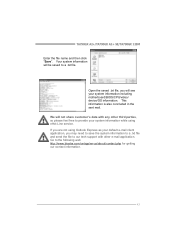
...will not share customer's data with other third parties, so please feel free to our tech support with any other e-mail application. This information is also concluded in the sent mail. TA790GX A2+/TA790GX A2+ SE/TA790GX 128M Enter the file name and then click "Save". Open the saved .txt file, you ...mail client application, you will see your system information including motherboard/BIOS/CPU/video/ device/OS information. If you are not using eHot-Line service. We will be saved to the following web http://www.biostar.com.tw/app/en-us/about/contact.php for getting our contact ...
...will not share customer's data with other third parties, so please feel free to our tech support with any other e-mail application. This information is also concluded in the sent mail. TA790GX A2+/TA790GX A2+ SE/TA790GX 128M Enter the file name and then click "Save". Open the saved .txt file, you ...mail client application, you will see your system information including motherboard/BIOS/CPU/video/ device/OS information. If you are not using eHot-Line service. We will be saved to the following web http://www.biostar.com.tw/app/en-us/about/contact.php for getting our contact ...

Bios Setup
Page 3
... right corner, and you can use these keys to ensure optimum performan ce of the selected item. TA790GX A2+/TA790GX A2+ SE/TA790GX 128M BIOS Manual PCI Bus Support T his AMI BIOS supports the AMD CPU. Supported CP Us T his AMI BIOS also supports Version 2.3 of the Intel PCI (Peripheral Component Interconn ect) local bus speci fication. General Help Navigation...
... right corner, and you can use these keys to ensure optimum performan ce of the selected item. TA790GX A2+/TA790GX A2+ SE/TA790GX 128M BIOS Manual PCI Bus Support T his AMI BIOS supports the AMD CPU. Supported CP Us T his AMI BIOS also supports Version 2.3 of the Intel PCI (Peripheral Component Interconn ect) local bus speci fication. General Help Navigation...


