

M7VIZ user's manual
Page 2
...M7VIZ 1 COMPONENT INDEX 2 ENGLISH 3 M7VIZ Features ...3 Package contents ...4 How to set up Jumper 5 CPU Installation ...5 DDR DIMM Modules: DDR1, DDR2 6 Installing DDR Module 6 Jumpers, Headers, Connectors & Slots 7 DEUTSCH 14 Spezifikationen von M7VIZ 14 Verpackungsinhalt 15 Einstellung der Jumper 16 Installation der CPU 16 DDR DIMM Modules: DDR1, DDR2 17 Installation von DDR-Modul 17 Jumpers..., Headers, Anschlüsse & Steckplätze 18 FRANÇAIS 25 Caractéristiques de la M7VIZ 25 Contenu du carton 26 STUDIOFUN 27...
...M7VIZ 1 COMPONENT INDEX 2 ENGLISH 3 M7VIZ Features ...3 Package contents ...4 How to set up Jumper 5 CPU Installation ...5 DDR DIMM Modules: DDR1, DDR2 6 Installing DDR Module 6 Jumpers, Headers, Connectors & Slots 7 DEUTSCH 14 Spezifikationen von M7VIZ 14 Verpackungsinhalt 15 Einstellung der Jumper 16 Installation der CPU 16 DDR DIMM Modules: DDR1, DDR2 17 Installation von DDR-Modul 17 Jumpers..., Headers, Anschlüsse & Steckplätze 18 FRANÇAIS 25 Caractéristiques de la M7VIZ 25 Contenu du carton 26 STUDIOFUN 27...
M7VIZ user's manual
Page 8
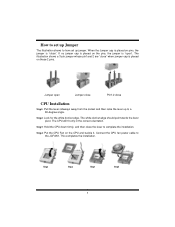
How to set up Jumper The illustration shows to a 90-degree angle. Jumper open ". Step4: Put the CPU Fan on pins, the jumper is placed on the CPU and buckle it. Connect the CPU fan power cable to complete the installation. Step2: Look for the white dot/cut ... socket and then raise the lever up to how set up jumper. Step1 Step2 Step3 Step4 5 When the Jumper cap is "close " when jumper cap is placed on the pins, the jumper is placed on these 2 pins. This completes the installation. If no jumper cap is "open Jumper close Pin1-2 close the lever to the JCFAN1. The...
How to set up Jumper The illustration shows to a 90-degree angle. Jumper open ". Step4: Put the CPU Fan on pins, the jumper is placed on the CPU and buckle it. Connect the CPU fan power cable to complete the installation. Step2: Look for the white dot/cut ... socket and then raise the lever up to how set up jumper. Step1 Step2 Step3 Step4 5 When the Jumper cap is "close " when jumper cap is placed on the pins, the jumper is placed on these 2 pins. This completes the installation. If no jumper cap is "open Jumper close Pin1-2 close the lever to the JCFAN1. The...

M7VIZ user's manual
Page 13
Set the jumper to "Pin 1-2 Close". 5. Wait for five seconds. 4. Power on the AC. 6. Case Open Connector: JCI1 1 Pin Assignment 1 Case Open Signal JCI1 2 Ground Serial ATA Connector: ... Assignment 1 Left Channel Input 2 Ground 3 Ground 4 Right Channel Input 10 Reset your desired password or clear the CMOS data. Remove AC power line. 2. Clear CMOS Jumper: JCMOS1 JCMOS1 Assignment 3 Normal Operation (default) 1 Pin 1-2 Close 3 Clear CMOS Data 1 Pin 2-3 Close ※ Clear CMOS Procedures...
Set the jumper to "Pin 1-2 Close". 5. Wait for five seconds. 4. Power on the AC. 6. Case Open Connector: JCI1 1 Pin Assignment 1 Case Open Signal JCI1 2 Ground Serial ATA Connector: ... Assignment 1 Left Channel Input 2 Ground 3 Ground 4 Right Channel Input 10 Reset your desired password or clear the CMOS data. Remove AC power line. 2. Clear CMOS Jumper: JCMOS1 JCMOS1 Assignment 3 Normal Operation (default) 1 Pin 1-2 Close 3 Clear CMOS Data 1 Pin 2-3 Close ※ Clear CMOS Procedures...

M7VIZ user's manual
Page 53
... disk is securely plugged in the standard CMOS setup. * Backing up data and applications files. PROBABLE SOLUTION Cannot boot system after installing second hard * Set master/slave jumpers correctly. correct information is extremely important. PROBABLE SOLUTION Screen message says "Invalid Configuration" or * Review system's equipment . drive. * Run SETUP program and select correct...
... disk is securely plugged in the standard CMOS setup. * Backing up data and applications files. PROBABLE SOLUTION Cannot boot system after installing second hard * Set master/slave jumpers correctly. correct information is extremely important. PROBABLE SOLUTION Screen message says "Invalid Configuration" or * Review system's equipment . drive. * Run SETUP program and select correct...


