
M7VIP user's manual
Page 11
...monitor will take advantage of AGP technology for expansion cards, which supports audio, and modem only. Floppy Disk Connector: FDD1 The motherboard provides a standard floppy disk connector that provides PIO Mode 0~4, Bus Master, and Ultra DMA 33/ 66/ 100/ 133 functionality.... is equipped with an Accelerated Graphics Port. MMootthheerrbbooaarrdd DDeessccrriippttiioonn Jumpers, Headers, Connectors & Slots Hard Disk Connectors: IDE1/ IDE2 The motherboard has a 32-bit Enhanced PCI IDE Controller that supports 360K, 720K, 1.2M, 1.44M and 2.88M floppy disk types. ...
...monitor will take advantage of AGP technology for expansion cards, which supports audio, and modem only. Floppy Disk Connector: FDD1 The motherboard provides a standard floppy disk connector that provides PIO Mode 0~4, Bus Master, and Ultra DMA 33/ 66/ 100/ 133 functionality.... is equipped with an Accelerated Graphics Port. MMootthheerrbbooaarrdd DDeessccrriippttiioonn Jumpers, Headers, Connectors & Slots Hard Disk Connectors: IDE1/ IDE2 The motherboard has a 32-bit Enhanced PCI IDE Controller that supports 360K, 720K, 1.2M, 1.44M and 2.88M floppy disk types. ...
M7VIP user's manual
Page 30
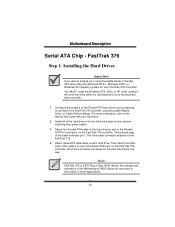
... you 're preparing to connect to one way. No changes are keyed so they will only attach one of the connectors are necessary in the Motherboard CMOS Setup for resources or drive types in most applications. 28 Then attach the other ends of your hard drive. 2. Install all of the hard...
... you 're preparing to connect to one way. No changes are keyed so they will only attach one of the connectors are necessary in the Motherboard CMOS Setup for resources or drive types in most applications. 28 Then attach the other ends of your hard drive. 2. Install all of the hard...
M7VIP user's manual
Page 37
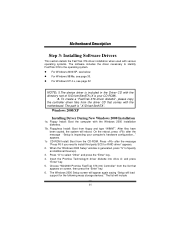
To create a "FastTrak 376 driver diskette", please copy the controller driver files from the list that comes with the motherboard. The path is inspecting your CD-ROM). 2. Windows 2000/XP Installing Driver During New Windows 2000 Installation 1a. On the reboot, press after the message "...
To create a "FastTrak 376 driver diskette", please copy the controller driver files from the list that comes with the motherboard. The path is inspecting your CD-ROM). 2. Windows 2000/XP Installing Driver During New Windows 2000 Installation 1a. On the reboot, press after the message "...
M7VIP user's manual
Page 61
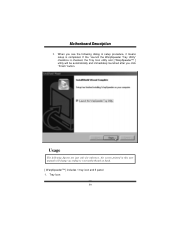
Usage The following dialog in this user manual will be automatically and immediately launched after you see the following figures are just only for reference, the screen printed in setup procedure, it means setup is completed. When you click "Finish" button. If the "Launch the WarpSpeeder Tray Utility" checkbox is checked, the Tray Icon utility and [ WarpSpeeder™ ] utility will change according to your motherboard on hand. [ WarpSpeeder™ ] includes 1 tray icon and 5 panel: 1. MMootthheerrbbooaarrdd DDeessccrriippttiioonn 2. Tray Icon: 59
Usage The following dialog in this user manual will be automatically and immediately launched after you see the following figures are just only for reference, the screen printed in setup procedure, it means setup is completed. When you click "Finish" button. If the "Launch the WarpSpeeder Tray Utility" checkbox is checked, the Tray Icon utility and [ WarpSpeeder™ ] utility will change according to your motherboard on hand. [ WarpSpeeder™ ] includes 1 tray icon and 5 panel: 1. MMootthheerrbbooaarrdd DDeessccrriippttiioonn 2. Tray Icon: 59
M7VIP compatibility test report
Page 2
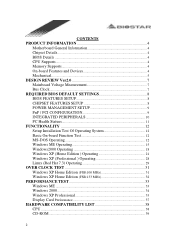
CONTENTS PRODUCT INFORMATION 4 Motherboard General Information 4 Chipset Details...4 BIOS Details ...4 CPU Supports...4 Memory Supports 4 On-board Features and Devices 4 Mechanical...5 DESIGN REVIEW Ver2.0 7 Mainboard Voltage Measurement 7 Bus Clock ...7 REQUIRED ...
CONTENTS PRODUCT INFORMATION 4 Motherboard General Information 4 Chipset Details...4 BIOS Details ...4 CPU Supports...4 Memory Supports 4 On-board Features and Devices 4 Mechanical...5 DESIGN REVIEW Ver2.0 7 Mainboard Voltage Measurement 7 Bus Clock ...7 REQUIRED ...
M7VIP compatibility test report
Page 4
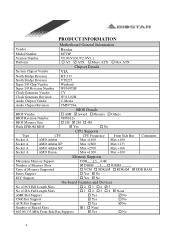
... Number of Memory Supported DDR 1.5 (GB) ; No ; 1 † None 66/100/133 MHz Front Side Bus Supports ; Yes † No 4 PRODUCT INFORMATION Vendor Motherboard General Information Biostar Model Number M7VIP Version Number V0.90/V0.91/V2.0/V1.1 Platform † AT ; DDR RAM Parity Support ECC Support † Yes ; None † Yes ; No...
... Number of Memory Supported DDR 1.5 (GB) ; No ; 1 † None 66/100/133 MHz Front Side Bus Supports ; Yes † No 4 PRODUCT INFORMATION Vendor Motherboard General Information Biostar Model Number M7VIP Version Number V0.90/V0.91/V2.0/V1.1 Platform † AT ; DDR RAM Parity Support ECC Support † Yes ; None † Yes ; No...
M7VIP compatibility test report
Page 50
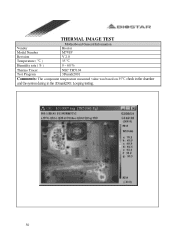
THERMAL IMAGE TEST Motherboard General Information Vendor Biostar Model Number M7VIP Revision V 2.0 Temperature ( ) 35 Humidity rate ( % ) 0 ~ 60 Thermo Tracer NEC TH5104 Test Program 3Dmark2001 Comments: The component temperature measured value was based on 35 50
THERMAL IMAGE TEST Motherboard General Information Vendor Biostar Model Number M7VIP Revision V 2.0 Temperature ( ) 35 Humidity rate ( % ) 0 ~ 60 Thermo Tracer NEC TH5104 Test Program 3Dmark2001 Comments: The component temperature measured value was based on 35 50
M7VIP BIOS setup guide
Page 23
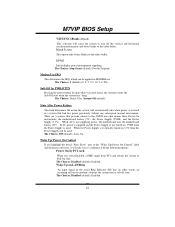
... provide current to Full On state. While AC is restored to the video buffer. M7VIP BIOS Setup V/H SYNC+Blank (default) This selection will cause the system to turn off state. The Choices: Delay 4 Sec, Instant-Off (default). the motherboard battery (3V), the Power Supply (5VSB), and the Power Supply (3.3V). Blank Screen... Enter" next to the "Wake Up/ Power On Control" label and then press enter key, it will take when power is not supplying power, the motherboard uses the motherboard battery (3V).
... provide current to Full On state. While AC is restored to the video buffer. M7VIP BIOS Setup V/H SYNC+Blank (default) This selection will cause the system to turn off state. The Choices: Delay 4 Sec, Instant-Off (default). the motherboard battery (3V), the Power Supply (5VSB), and the Power Supply (3.3V). Blank Screen... Enter" next to the "Wake Up/ Power On Control" label and then press enter key, it will take when power is not supplying power, the motherboard uses the motherboard battery (3V).

