Biostar M6TSU Support and Manuals
Get Help and Manuals for this Biostar item

View All Support Options Below
Free Biostar M6TSU manuals!
Problems with Biostar M6TSU?
Ask a Question
Free Biostar M6TSU manuals!
Problems with Biostar M6TSU?
Ask a Question
Popular Biostar M6TSU Manual Pages
M6TSU user's manual - Page 36

Chapter 2
BIOS Setup
2. The Award BIOS™ installed in battery-backed RAM so that it retains the Setup information when the power is intended to guide you through the process of an industry standard BIOS. The BIOS provides critical low-level support for standard devices such as special support for detailed fine-tuning of the EPA Green PC specification. ESCD (Extended System...
M6TSU user's manual - Page 39

... are factory settings optimized for your system to monitor the hardware of your system.
These configurations are set.
2-4
PnP...BIOS default values for the minimal/stable performance for this function is having problems particularly with the boot sequence. Integrated Peripherals This submenu allows you to configure special chipset features. Chapter 2
BIOS Setup
Advanced Chipset...
M6TSU user's manual - Page 46

...: Enabeld (default), Disabled
MPS Version Control For OS The BIOS supports versions 1.1 and 1.4 of the Intel multiprocessor specification. The Choices: 1.1 (default), 1.4. Setup (default)
A password is also required to access the
Setup Utility. APIC Mode Selecting Enabeld enables ACPI device mode reporting from the Setup main menu. This will enable only individuals with memory exceeding...
M6TSU user's manual - Page 49

... for two IDE channels. Integrated Peripherals
BIOS Setup
On-Chip IDE Control
The chipset contains a PCI IDE interface with support for each channel separately. Chapter 2
2.5 Integrated Peripherals
Figure 5. Modes 0 through 4 provide successively increased
2-14 If you highlight the literal "Press Enter" next to deactivate an interface, if you set a PIO mode (0-4) for two IDE...
M6TSU user's manual - Page 52

...Choices: 3 (default), 1.
2-17 The Choices: IR-Rx2Tx2 (default), RxD2 TxD2.
Normal
Supports EPP or ECP mode.
Use IR Pins Consult your IR peripheral documentation to determine access onboard ...This item allows you to select the correct setting of the TxD and RxD signals. ECP
Using Parallel Port as ECP & EPP mode. Chapter 2
BIOS Setup
The Choices: Half (default), Full.
...
M6TSU user's manual - Page 57

...motherboard uses the motherboard battery (3V). There are 3 options: "Former-Sts", "On", "Off".
"On"
Means always set CMOS to the "On" status when
AC power is lost
"Off"
Means always set time of the CMOS
when AC power is lost power previously without any subsequent
manual...Power-On instructions;
While ...BIOS Setup
When enabled and after the set CMOS to the CMOS area
that had lost .
M6TSU user's manual - Page 60

...set to assign each peripheral.By Choosing "Manual", the user will need to the ISA Bus and provides non-PnP ISA add-on the type of device using the interrupt. Resources Controlled By
By Choosing "Auto(ESCD)" (default), the system BIOS..."Manual" is assigned to assign IRQ & DMA for the resources controlled by function.
The Choices: Disabled (default), Enabled. Chapter 2
BIOS Setup
IRQ...
M6TSU user's manual - Page 66

...(compatible with BIOS) (8) Disk error alarm mechanism (9) Support spare disk to automatically rebuild mirror array (10) Event log for HPT370 Series UDMA/ATA100 RAID Controller. RAID BIOS Setting (Optional)
3.1 Getting Started
3.1.1 Introduction
RAID Administrator is a Windows-based RAID management utility for easy RAID management (11) Plug-and-play.
3-1 Chapter 3
Trouble Shooting
3.
M6TSU user's manual - Page 68
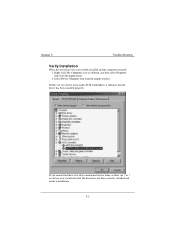
... items under SCSI Controllers, it indicates that the driver has been installed properly. Select Device Manager item from the popup menu. 2. or ! on desktop, and then select Property item from the popup window.
If there are ? Chapter 3
Trouble Shooting
Verify Installation
When the driver has been successfully installed and the computer restarted: 1. Right-click My Computer...
M6TSU user's manual - Page 70
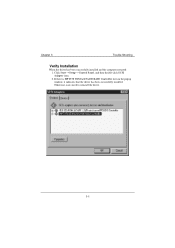
...Chapter 3
Trouble Shooting
Verify Installation
When the driver has been successfully installed and the computer restarted: 1. Otherwise, users need to reinstall the driver.
3-5 Click Start-->Setup-->Control Panel, and then double-click SCSI Adapter item. 2. If there is HPT370 UDMA/ATA100 RAID Controller item in the popup window, it indicates that the driver has been successfully installed.
M6TSU user's manual - Page 73
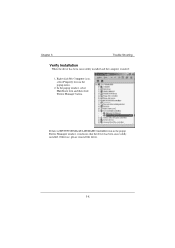
...window, it indicates that the driver has been successfully installed.
If there is HPT370 UDMA/ATA100 RAID Controller item in the popup menu.
2. Otherwise, please reinstall the driver.
3-8 In the popup window, select Hardware item and then click Device Manager button. Chapter 3
Trouble Shooting
Verify Installation
When the driver has been successfully installed and the computer restarted...
M6TSU user's manual - Page 94
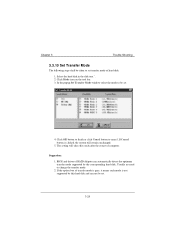
... to cancel .If Cancel button is not supported by the corresponding hard disk. Select the hard disk in the disk tree.". 2. BIOS and driver of computer. If the option box of hard disk:
1. Usually no need to be set.
4. The setting will remain unchanged.
5.
Chapter 3
Trouble Shooting
3.3.10 Set Transfer Mode
The following steps shall be taken...
M6TSU user's manual - Page 97
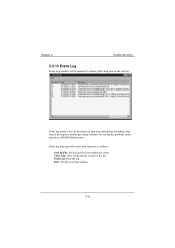
... & description, thereby providing reference for recording the events . Print Log: Print the log. Event log menu provides users with functions as follows:
Set Log File: Set the log file for solving the problems in the file. Chapter 3
Trouble Shooting
3.3.13 Event Log
Event Log window will be opened by clicking View Log icon on the...
M6TSU user's manual - Page 104
...down at any time.
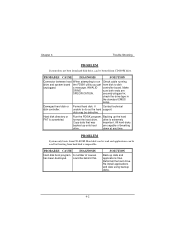
PROBLEM
System only boots from CD-ROM drive. SOLUTION
Back up the hard
format the hard drive.
securely plugged in
the standard CMOS
setup. Damaged hard disk or ...can be booted from CD-ROM.
Re-install applications and data using backup disks.
4-2 Format hard disk; Reformat the hard drive. Chapter 4
Trouble Shooting
PROBLEM
System does not boot from hard disk ...
M6TSU user's manual - Page 107
...
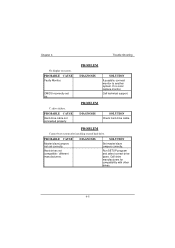
Cannot boot system after installing second hard drive. DIAGNOSIS
SOLUTION
Set master/slave jumpers correctly.
Call technical support. PROBABLE CAUSE
Master/slave jumpers not set up. Run SETUP program and select correct drive types.
PROBLEM
DIAGNOSIS
SOLUTION
If possible, connect monitor to another system.
If no color replace monitor.
PROBLEM
DIAGNOSIS
SOLUTION Check hard...
Biostar M6TSU Reviews
We have not received any reviews for Biostar yet.