Setup Manual
Page 2
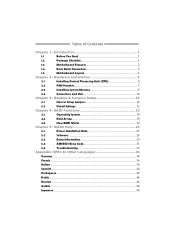
... to Setup Jumpers 12 3.2 Detail Settings 12 Chapter 4: RAID Functions 19 4.1 Operating System 19 4.2 Raid Arrays 19 4.3 How RAID Works 19 Chapter 5: Useful Help 23 5.1 Driver Installation Note 23 5.2 Software 24 5.3 Extra Information 29 5.4 AMI BIOS Beep Code 31 5.5 Troubleshooting 32 Appendix: SPEC In Other Languages 34 German...34 French ...36...
... to Setup Jumpers 12 3.2 Detail Settings 12 Chapter 4: RAID Functions 19 4.1 Operating System 19 4.2 Raid Arrays 19 4.3 How RAID Works 19 Chapter 5: Useful Help 23 5.1 Driver Installation Note 23 5.2 Software 24 5.3 Extra Information 29 5.4 AMI BIOS Beep Code 31 5.5 Troubleshooting 32 Appendix: SPEC In Other Languages 34 German...34 French ...36...

Setup Manual
Page 3
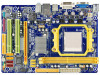
GF8100 M2+ TE/GF8200C M2+ CHAPTER 1: INTRODUCTION 1.1 BEFORE YOU START Thank you take the motherboard out from anti-static bag, ground yourself properly by touching any unfastened small parts inside ) ... package contents may damage the equipment. „ Keep the computer from power outlet before operation. „ Before you for ATX Case X 1 Installation Guide X 1 Fully Setup Driver CD X 1 (full version manual files inside the case after installation. Hold the board on the edge, do not try to bend or flex the board...
GF8100 M2+ TE/GF8200C M2+ CHAPTER 1: INTRODUCTION 1.1 BEFORE YOU START Thank you take the motherboard out from anti-static bag, ground yourself properly by touching any unfastened small parts inside ) ... package contents may damage the equipment. „ Keep the computer from power outlet before operation. „ Before you for ATX Case X 1 Installation Guide X 1 Fully Setup Driver CD X 1 (full version manual files inside the case after installation. Hold the board on the edge, do not try to bend or flex the board...
Setup Manual
Page 5
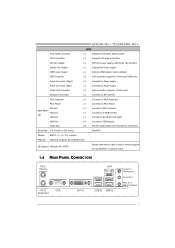
GF8100 M2+ TE/GF8200C M2+ SPEC Front Audio Connector x1 Supports front panel audio function CD-in Connector x1 Supports CD audio-in function CPU Fan Header x1 CPU Fan ... Audio-In/Out and microphone connection Board Size 175 mm(W) x 245 mm(L) MicroATX Special RAID 0 / 1 / 5 / 0+1 support Features Hybrid SLI support (by nVIDIA driver) OS Support Windows XP / VISTA Biostar reserves the right to add or remove support for any OS With or without notice. 1.4 REAR PANEL CONNECTORS PS/2 Mouse PS/2 Keyboard VGA...
GF8100 M2+ TE/GF8200C M2+ SPEC Front Audio Connector x1 Supports front panel audio function CD-in Connector x1 Supports CD audio-in function CPU Fan Header x1 CPU Fan ... Audio-In/Out and microphone connection Board Size 175 mm(W) x 245 mm(L) MicroATX Special RAID 0 / 1 / 5 / 0+1 support Features Hybrid SLI support (by nVIDIA driver) OS Support Windows XP / VISTA Biostar reserves the right to add or remove support for any OS With or without notice. 1.4 REAR PANEL CONNECTORS PS/2 Mouse PS/2 Keyboard VGA...
Setup Manual
Page 24
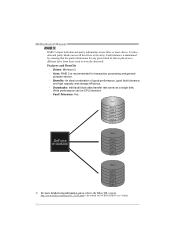
... block data transfer rate same as a single disk. It writes data and parity blocks across three or more detailed setup information, please refer to the Driver CD, or go to http://www.nvidia.com/object/IO_28159.html to store the data itself. Write performance can be CPU intensive. - Disk 1 DATA 1 DATA...
... block data transfer rate same as a single disk. It writes data and parity blocks across three or more detailed setup information, please refer to the Driver CD, or go to http://www.nvidia.com/object/IO_28159.html to store the data itself. Write performance can be CPU intensive. - Disk 1 DATA 1 DATA...
Setup Manual
Page 25
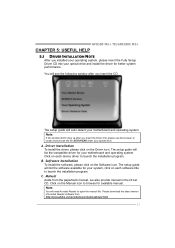
... each software title to launch the installation program. GF8100 M2+ TE/GF8200C M2+ CHAPTER 5: USEFUL HELP 5.1 DRIVER INSTALLATION NOTE After you installed your operating system, please insert the Fully Setup Driver CD into your optical drive and install the driver for your system, click on each device driver to launch the installation program. You will see the...
... each software title to launch the installation program. GF8100 M2+ TE/GF8200C M2+ CHAPTER 5: USEFUL HELP 5.1 DRIVER INSTALLATION NOTE After you installed your operating system, please insert the Fully Setup Driver CD into your optical drive and install the driver for your system, click on each device driver to launch the installation program. You will see the...
Setup Manual
Page 26
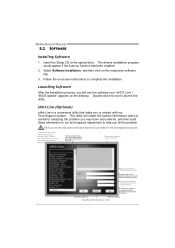
... mail. Provide the e-ma il addr ess that helps you fix the problem. Exi t thi s dialog. Insert the Setup CD to launch the utility. The drivers installation program would like to send the copy to. *Provid e the name of your system. *Select your default e-mail clientapplication program. *represents important informa ti...
... mail. Provide the e-ma il addr ess that helps you fix the problem. Exi t thi s dialog. Insert the Setup CD to launch the utility. The drivers installation program would like to send the copy to. *Provid e the name of your system. *Select your default e-mail clientapplication program. *represents important informa ti...
Bios Setup
Page 21
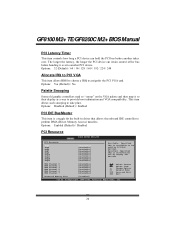
... [Available] [Available] [Available] [Available] [Available] [Available] [Disabled] Select Screen Select Item +- Reserved: Specified IRQ is a toggle for the built-in driver that allows the onbo ard ID E controller to perform DMA (Direct Memory Access) trans fers. T he longer the latency, the longer the PCI device can.... Change Option F1 General Help F10 Save and Exit ESC Exit vxx.xx (C)Copyright 1985-200x, American Megatrends, Inc. 20 GF8100 M2+ TE/GF8200C M2+ BIOSManual PCI Latency Timer T his item controls how long a PCI device can retain control of the bus before another takes over...
... [Available] [Available] [Available] [Available] [Available] [Available] [Disabled] Select Screen Select Item +- Reserved: Specified IRQ is a toggle for the built-in driver that allows the onbo ard ID E controller to perform DMA (Direct Memory Access) trans fers. T he longer the latency, the longer the PCI device can.... Change Option F1 General Help F10 Save and Exit ESC Exit vxx.xx (C)Copyright 1985-200x, American Megatrends, Inc. 20 GF8100 M2+ TE/GF8200C M2+ BIOSManual PCI Latency Timer T his item controls how long a PCI device can retain control of the bus before another takes over...


