
Setup Manual
Page 2
Table of Contents Chapter 1: Introduction 1 1.1 Before You Start 1 1.2 Package Checklist 1 1.3 Motherboard Features 2 1.4 Rear Panel Connectors 3 1.5 Motherboard Layout 4 Chapter 2: Hardware Installation 5 2.1 Installing Central Processing Unit (CPU 5 2.2 FAN Headers 7 2.3 Installing System Memory 8 2.4 Connectors and Slots 10 Chapter 3: Headers & Jumpers Setup 13 3.1 How to Setup Jumpers 13 3.2 Detail Settings 13 Chapter 4: RAID Functions ...
Table of Contents Chapter 1: Introduction 1 1.1 Before You Start 1 1.2 Package Checklist 1 1.3 Motherboard Features 2 1.4 Rear Panel Connectors 3 1.5 Motherboard Layout 4 Chapter 2: Hardware Installation 5 2.1 Installing Central Processing Unit (CPU 5 2.2 FAN Headers 7 2.3 Installing System Memory 8 2.4 Connectors and Slots 10 Chapter 3: Headers & Jumpers Setup 13 3.1 How to Setup Jumpers 13 3.2 Detail Settings 13 Chapter 4: RAID Functions ...

Setup Manual
Page 4
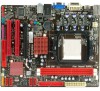
Motherboard Manual 1.3 MOTHERBOARD FEATURES CPU FSB Chipset A880GU3Z A880GZ Socket AM3+ Socket AM3+ AMD Sempron/Athlon II/Phenom II/FX AMD Sempron/Athlon II/Phenom II/FX processors processors AMD ...
Motherboard Manual 1.3 MOTHERBOARD FEATURES CPU FSB Chipset A880GU3Z A880GZ Socket AM3+ Socket AM3+ AMD Sempron/Athlon II/Phenom II/FX AMD Sempron/Athlon II/Phenom II/FX processors processors AMD ...

Setup Manual
Page 5
...x2 Audio Jack x3 Board Size 200 mm(W) x 244 mm(L) Special Features RAID 0 / 1 / 5 / 10 support Windows XP / Vista / 7 OS Support Biostar reserves the right to add or remove support for any OS With or without notice. 1.4 REAR PANEL CONNECTORS P S/2 Keyboard / Mouse USB2.0X2 HDMI DVI-D VGA...OS With or without notice. A880GU3Z/A880GZ A880GZ SATA Connector x4 Front Panel Connector x1 Front Audio Connector x1 S/PDIF Out Connector x1 CPU Fan Header x1 System Fan Header x1 CMOS clear Header x1 USB 2.0 Connector x2 Power Connector (24pin) x1 Power Connector (4pin)...
...x2 Audio Jack x3 Board Size 200 mm(W) x 244 mm(L) Special Features RAID 0 / 1 / 5 / 10 support Windows XP / Vista / 7 OS Support Biostar reserves the right to add or remove support for any OS With or without notice. 1.4 REAR PANEL CONNECTORS P S/2 Keyboard / Mouse USB2.0X2 HDMI DVI-D VGA...OS With or without notice. A880GU3Z/A880GZ A880GZ SATA Connector x4 Front Panel Connector x1 Front Audio Connector x1 S/PDIF Out Connector x1 CPU Fan Header x1 System Fan Header x1 CMOS clear Header x1 USB 2.0 Connector x2 Power Connector (24pin) x1 Power Connector (4pin)...
Setup Manual
Page 7
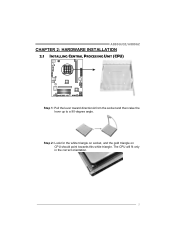
The CPU will fit only in the correct orientation. 5 Step 2: Look for the white triangle on socket, and the gold triangle on CPU should point towards this white triangle. A880GU3Z/A880GZ CHAPTER 2: HARDWARE INSTALLATION 2.1 INSTALLING CENTRAL PROCESSING UNIT (CPU) Step 1: Pull the lever toward direction A from the socket and then raise the lever up to a 90-degree angle.
The CPU will fit only in the correct orientation. 5 Step 2: Look for the white triangle on socket, and the gold triangle on CPU should point towards this white triangle. A880GU3Z/A880GZ CHAPTER 2: HARDWARE INSTALLATION 2.1 INSTALLING CENTRAL PROCESSING UNIT (CPU) Step 1: Pull the lever toward direction A from the socket and then raise the lever up to a 90-degree angle.
Setup Manual
Page 8
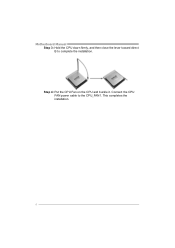
Connect the CPU FAN power cable to complete the installation. This completes the installation. 6 Step 4: Put the CPU Fan on the CPU and buckle it. Motherboard Manual Step 3: Hold the CPU down firmly, and then close the lever toward direct B to the CPU_FAN1.
Connect the CPU FAN power cable to complete the installation. This completes the installation. 6 Step 4: Put the CPU Fan on the CPU and buckle it. Motherboard Manual Step 3: Hold the CPU down firmly, and then close the lever toward direct B to the CPU_FAN1.

Setup Manual
Page 9
CPU_FAN1: CPU Fan Header 1 4 Pin Assignment 1 Ground 2 +12V 3 FAN RPM rate sense 4 Smart Fan Control (By Fan) SYS_FAN1: System Fan Header 13 Pin Assignment 1 Ground 2 +12V 3 FAN ...
CPU_FAN1: CPU Fan Header 1 4 Pin Assignment 1 Ground 2 +12V 3 FAN RPM rate sense 4 Smart Fan Control (By Fan) SYS_FAN1: System Fan Header 13 Pin Assignment 1 Ground 2 +12V 3 FAN ...
Setup Manual
Page 12
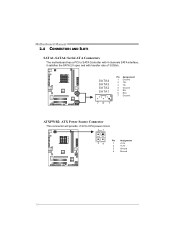
Motherboard Manual 2.4 CONNECTORS AND SLOTS SATA1~SATA4: Serial ATA Connectors The motherboard has a PCI to CPU power circuit. 21 34 Pin Assignment 1 +12V 2 +12V 3 Ground 4 Ground 10 SA TA4 SA TA3 SA TA2 SA TA1 74 1 Pin Assignment 1 Ground 2 TX+ 3 TX4 Ground 5 RX6 RX+ 7 Ground ATXPWR2: ATX Power Source Connector This connector will provide +12V to SATA Controller with 4 channels SATA interface, it satisfies the SATA 2.0 spec and with transfer rate of 3.0Gb/s.
Motherboard Manual 2.4 CONNECTORS AND SLOTS SATA1~SATA4: Serial ATA Connectors The motherboard has a PCI to CPU power circuit. 21 34 Pin Assignment 1 +12V 2 +12V 3 Ground 4 Ground 10 SA TA4 SA TA3 SA TA2 SA TA1 74 1 Pin Assignment 1 Ground 2 TX+ 3 TX4 Ground 5 RX6 RX+ 7 Ground ATXPWR2: ATX Power Source Connector This connector will provide +12V to SATA Controller with 4 channels SATA interface, it satisfies the SATA 2.0 spec and with transfer rate of 3.0Gb/s.

Setup Manual
Page 23
Write performance can be CPU intensive. Fault Tolerance: Yes. Fault tolerance is maintained by ensuring that the parity information for any given block of data is recommended for transaction ...
Write performance can be CPU intensive. Fault Tolerance: Yes. Fault tolerance is maintained by ensuring that the parity information for any given block of data is recommended for transaction ...

Setup Manual
Page 26
click "Send" to confirm or "Do Not Send" to a .txt file. Your system information will see your system information including motherboard/BIOS/CPU/video/ device/OS information. and then you will be saved to cancel. This information is also concluded in the sent mail. We will see a ... other third parties, so please feel free to enter file name. Motherboard Manual After filling up this information to the following web http://www.biostar.com.tw/app/en-us/about/contact.php for your confirmation; A warning dialog would appear asking for getting our contact information. 24
click "Send" to confirm or "Do Not Send" to a .txt file. Your system information will see your system information including motherboard/BIOS/CPU/video/ device/OS information. and then you will be saved to cancel. This information is also concluded in the sent mail. We will see a ... other third parties, so please feel free to enter file name. Motherboard Manual After filling up this information to the following web http://www.biostar.com.tw/app/en-us/about/contact.php for your confirmation; A warning dialog would appear asking for getting our contact information. 24

Setup Manual
Page 29
... 2. After confirmed, please follow steps below to avoid a damage of the CPU, and the system may not power on again. CPU fan speed is placed evenly with the CPU speed. A880GU3Z/A880GZ 5.3 EXTRA INFORMATION CPU Overheated If the system shutdown automatically after power on system for seconds. 3. ... 1. In this case, please double check: 1. Plug in the power cord and boot up the system. CPU fan is over heated, the motherboard will shutdown automatically to relief the CPU protection function. 1. Clear the CMOS data. (See "Close CMOS Header: JCMOS1" section) 2. Wait for seconds...
... 2. After confirmed, please follow steps below to avoid a damage of the CPU, and the system may not power on again. CPU fan speed is placed evenly with the CPU speed. A880GU3Z/A880GZ 5.3 EXTRA INFORMATION CPU Overheated If the system shutdown automatically after power on system for seconds. 3. ... 1. In this case, please double check: 1. Plug in the power cord and boot up the system. CPU fan is over heated, the motherboard will shutdown automatically to relief the CPU protection function. 1. Clear the CMOS data. (See "Close CMOS Header: JCMOS1" section) 2. Wait for seconds...

Bios Setup
Page 3
A880GU3Z/A880GZ UEFI BIOS Manual Supported CPUs This AMI UEFI BIOS supports the Intel CPU. The actual UEFI BIOS information and settings on board may be responsible for your reference only. We will see General Help description at the bottom ...
A880GU3Z/A880GZ UEFI BIOS Manual Supported CPUs This AMI UEFI BIOS supports the Intel CPU. The actual UEFI BIOS information and settings on board may be responsible for your reference only. We will see General Help description at the bottom ...

Bios Setup
Page 5
Notice z Beware of that setting inappropriate values in items of CPU, Super I/O, Power Management, and other system devices. PCI Subsystem Settings 4 A880GU3Z/A880GZ UEFI BIOS Manual 2 Advanced Menu The Advanced Menu allows you to configure the settings of this menu may cause system to malfunction.
Notice z Beware of that setting inappropriate values in items of CPU, Super I/O, Power Management, and other system devices. PCI Subsystem Settings 4 A880GU3Z/A880GZ UEFI BIOS Manual 2 Advanced Menu The Advanced Menu allows you to configure the settings of this menu may cause system to malfunction.

Bios Setup
Page 9
... ACPI sleep state the system will boot up from S5 The item enables the system to wake on the hr::min::sec specified. Options: S1 (CPU Stop Clock) (Default) / S3 (Suspend to RAM) / Suspend Dis abled Lock Legacy Resources This item allows you to specify. Options: Disabled (Default) / Enabled 8 This option...
... ACPI sleep state the system will boot up from S5 The item enables the system to wake on the hr::min::sec specified. Options: S1 (CPU Stop Clock) (Default) / S3 (Suspend to RAM) / Suspend Dis abled Lock Legacy Resources This item allows you to specify. Options: Disabled (Default) / Enabled 8 This option...
Bios Setup
Page 10
... when Keyboard PowerOn is set "Stroke Key." PS2 Mouse PowerOn This item allows you to control the mouse power on function. Options: Disabled (Default) / Enabled CPU Configuration 9 Options: Disabled (Default) / Enabled PS2 Keyboard PowerOn This item allows you to control the keyboard power on function. Press Enter to wake from S5...
... when Keyboard PowerOn is set "Stroke Key." PS2 Mouse PowerOn This item allows you to control the mouse power on function. Options: Disabled (Default) / Enabled CPU Configuration 9 Options: Disabled (Default) / Enabled PS2 Keyboard PowerOn This item allows you to control the keyboard power on function. Press Enter to wake from S5...

Bios Setup
Page 11
... State. This feature will let your run multiple OS (guest) on the same physical hardware by CPU. A880GU3Z/A880GZ UEFI BIOS Manual Limit CPUID Maximum When the computer is set CPU Downcoring. Options: Disabled (Default) / Enabled SVM This item allows you to save power consumption. Options...: Enabled (Default) / Disabled Core Leveling This item set "Manual," CPU Computer Units can be adjustable. Options: Auto (Default) / Manual 10 When this feature will reduce power consumed by decoupling OS and physical ...
... State. This feature will let your run multiple OS (guest) on the same physical hardware by CPU. A880GU3Z/A880GZ UEFI BIOS Manual Limit CPUID Maximum When the computer is set CPU Downcoring. Options: Disabled (Default) / Enabled SVM This item allows you to save power consumption. Options...: Enabled (Default) / Disabled Core Leveling This item set "Manual," CPU Computer Units can be adjustable. Options: Auto (Default) / Manual 10 When this feature will reduce power consumed by decoupling OS and physical ...

Bios Setup
Page 14
... Fan function. Options: 10 (℃) (default) Fan Ctrl On(℃) When CPU temperature is lower than this value, the CPU fan will turn on. Options: Quiet / Aggressive / Manual Fan Ctrl OFF(℃) When CPU temperature is higher than this value, the CPU fan controller will keep lowest RPM. Control Mode This item provides several...
... Fan function. Options: 10 (℃) (default) Fan Ctrl On(℃) When CPU temperature is lower than this value, the CPU fan will turn on. Options: Quiet / Aggressive / Manual Fan Ctrl OFF(℃) When CPU temperature is higher than this value, the CPU fan controller will keep lowest RPM. Control Mode This item provides several...

Bios Setup
Page 15
... Power Loss This setting specifies how your system should behave after power recovers. A880GU3Z/A880GZ UEFI BIOS Manual Fan Ctrl Start Value This item sets CPU FAN Start Speed Value.
... Power Loss This setting specifies how your system should behave after power recovers. A880GU3Z/A880GZ UEFI BIOS Manual Fan Ctrl Start Value This item sets CPU FAN Start Speed Value.

Bios Setup
Page 18
Options: Disabled (Default) / 70℃/158℉ / 75℃/167℉ / 80℃/176℉ / 85℃/185℉ / 90℃/194℉ 17 A880GU3Z/A880GZ UEFI BIOS Manual H/W Monitor Shutdown Temperature This item allows you to set up the CPU shutdown Temperature.
Options: Disabled (Default) / 70℃/158℉ / 75℃/167℉ / 80℃/176℉ / 85℃/185℉ / 90℃/194℉ 17 A880GU3Z/A880GZ UEFI BIOS Manual H/W Monitor Shutdown Temperature This item allows you to set up the CPU shutdown Temperature.

Bios Setup
Page 19
PCI, or Personal Computer Interconnect, is a system which allows I/O devices to operate at speeds nearing the speed of this menu may cause system to malfunction. Notice z Beware of that setting inappropriate values in items of the CPU itself uses when communicating with its own special components. AMD 880 Configuration 18 A880GU3Z/A880GZ UEFI BIOS Manual 3 Chipset Menu This section describes configuring the PCI bus system.
PCI, or Personal Computer Interconnect, is a system which allows I/O devices to operate at speeds nearing the speed of this menu may cause system to malfunction. Notice z Beware of that setting inappropriate values in items of the CPU itself uses when communicating with its own special components. AMD 880 Configuration 18 A880GU3Z/A880GZ UEFI BIOS Manual 3 Chipset Menu This section describes configuring the PCI bus system.

Bios Setup
Page 30
... item allows you to select Chipset Voltage Control. 29 Chipset Voltage This item allows you to select CPU NB Voltage Control. Memory Over Voltage This item allows you to select CPU Voltage Control. Changing the voltage and clock improperly may damage the device.) Notice z Beware of that... setting inappropriate values in items of various devices. (However, we suggest you use the default setting. CPU Over Voltage This item allows you to select Memory Voltage Control. A880GU3Z/A880GZ UEFI BIOS Manual 6 Performance Menu This submenu allows you to ...
... item allows you to select Chipset Voltage Control. 29 Chipset Voltage This item allows you to select CPU NB Voltage Control. Memory Over Voltage This item allows you to select CPU Voltage Control. Changing the voltage and clock improperly may damage the device.) Notice z Beware of that... setting inappropriate values in items of various devices. (However, we suggest you use the default setting. CPU Over Voltage This item allows you to select Memory Voltage Control. A880GU3Z/A880GZ UEFI BIOS Manual 6 Performance Menu This submenu allows you to ...


