

User Manual
Page 1
ALTERNATIVE ARRANGEMENTS SHOULD BE MADE FOR ACCESS TO EMERGENCY SERVICES. Before operating this set, please read these instructions carefully. USER GUIDE Eclipse Plus Single/Twin/Triple/Quad DECT Telephone with Answering Machine Binatone Helpline (for UK only) Monday to Friday from 9:00am to 5:00pm Tel: 0845 345 9677** **Please note that all calls are charged at local rate. Or visit our websites: www.binatonetelecom.com www.iDECTonline.com THIS EQUIPMENT IS NOT DESIGNED FOR MAKING EMERGENCY TELEPHONE CALLS WITHOUT MAINS POWER.
ALTERNATIVE ARRANGEMENTS SHOULD BE MADE FOR ACCESS TO EMERGENCY SERVICES. Before operating this set, please read these instructions carefully. USER GUIDE Eclipse Plus Single/Twin/Triple/Quad DECT Telephone with Answering Machine Binatone Helpline (for UK only) Monday to Friday from 9:00am to 5:00pm Tel: 0845 345 9677** **Please note that all calls are charged at local rate. Or visit our websites: www.binatonetelecom.com www.iDECTonline.com THIS EQUIPMENT IS NOT DESIGNED FOR MAKING EMERGENCY TELEPHONE CALLS WITHOUT MAINS POWER.
User Manual
Page 2
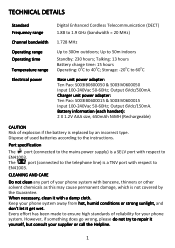
...-60Hz; Keep your phone system with a damp cloth. Up to 300m outdoors; Charger unit power adapter: Ten Pao: S003IB0600015 & S003IV0600015 Input 100-240Vac 50-60Hz; CLEANING AND CARE Do not clean any part of explosion if the battery is not covered by an incorrect type. TECHNICAL DETAILS Standard Frequency range Channel bandwidth Operating range Operating time Temperature range Electrical power Digital Enhanced Cordless Telecommunication (DECT) 1.88 to 1.9 GHz (bandwidth = 20 MHz) 1.728 MHz Up...
...-60Hz; Keep your phone system with a damp cloth. Up to 300m outdoors; Charger unit power adapter: Ten Pao: S003IB0600015 & S003IV0600015 Input 100-240Vac 50-60Hz; CLEANING AND CARE Do not clean any part of explosion if the battery is not covered by an incorrect type. TECHNICAL DETAILS Standard Frequency range Channel bandwidth Operating range Operating time Temperature range Electrical power Digital Enhanced Cordless Telecommunication (DECT) 1.88 to 1.9 GHz (bandwidth = 20 MHz) 1.728 MHz Up...
User Manual
Page 6
....6 Change the Recall Time 65 10.7 Reset the Unit 66 11 ANSWERING MACHINE 67 11.1 Turning the Answering Machine On/Off 67 11.2 Answer Mode 68 11.2.1 Set Answer Mode 68 11.3 Answering Machine Settings 69 11.3.1 Set the Ring Delay 69 11.3.2 Activate/Deactivate Remote Access 70 11.3.3 Change the Voice Language 71 11.4 Message Playback 72 11.5 Delete All Messages 73 11.6 Announcement 74 11.6.1 Record a Personal Announcement 74 11.6.2 Listen to an announcement 75 11.6.3 Delete...
....6 Change the Recall Time 65 10.7 Reset the Unit 66 11 ANSWERING MACHINE 67 11.1 Turning the Answering Machine On/Off 67 11.2 Answer Mode 68 11.2.1 Set Answer Mode 68 11.3 Answering Machine Settings 69 11.3.1 Set the Ring Delay 69 11.3.2 Activate/Deactivate Remote Access 70 11.3.3 Change the Voice Language 71 11.4 Message Playback 72 11.5 Delete All Messages 73 11.6 Announcement 74 11.6.1 Record a Personal Announcement 74 11.6.2 Listen to an announcement 75 11.6.3 Delete...
User Manual
Page 8
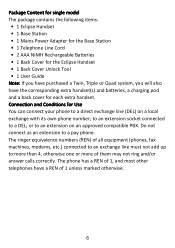
... Power Adapter for the Base Station • 1 Telephone Line Cord • 2 AAA NiMH Rechargeable Batteries • 1 Back Cover for the Eclipse Handset • 1 Back Cover Unlock Tool • 1 User Guide Note: If you have purchased a Twin, Triple or Quad system, you will also have a REN of them may not ring and/or answer calls correctly. or to a DEL; The ringer equivalence numbers (REN) of all equipment (phones, fax machines, modems...
... Power Adapter for the Base Station • 1 Telephone Line Cord • 2 AAA NiMH Rechargeable Batteries • 1 Back Cover for the Eclipse Handset • 1 Back Cover Unlock Tool • 1 User Guide Note: If you have purchased a Twin, Triple or Quad system, you will also have a REN of them may not ring and/or answer calls correctly. or to a DEL; The ringer equivalence numbers (REN) of all equipment (phones, fax machines, modems...
User Manual
Page 9
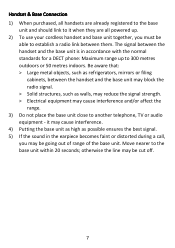
... a DECT phone: Maximum range up . 2) To use your cordless handset and base unit together, you must be able to another telephone, TV or audio equipment - Move nearer to 300 metres outdoors or 50 metres indoors. it when they are all powered up to the base unit within 20 seconds; otherwise the line may cause interference and/or affect the range. 3) Do not place the base unit...
... a DECT phone: Maximum range up . 2) To use your cordless handset and base unit together, you must be able to another telephone, TV or audio equipment - Move nearer to 300 metres outdoors or 50 metres indoors. it when they are all powered up to the base unit within 20 seconds; otherwise the line may cause interference and/or affect the range. 3) Do not place the base unit...
User Manual
Page 10
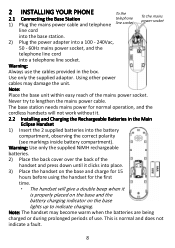
... the handset and press down until it . 2.2 Installing and Charging the Rechargeable Batteries in the box. Note: The handset may damage the unit. This is properly placed on the base and the battery charging indicator on the base and charge for 15 hours before using the handset for normal operation, and the cordless handsets will give a double beep when it is normal and does not indicate a fault. 8 Using other power cables...
... the handset and press down until it . 2.2 Installing and Charging the Rechargeable Batteries in the box. Note: The handset may damage the unit. This is properly placed on the base and the battery charging indicator on the base and charge for 15 hours before using the handset for normal operation, and the cordless handsets will give a double beep when it is normal and does not indicate a fault. 8 Using other power cables...
User Manual
Page 13
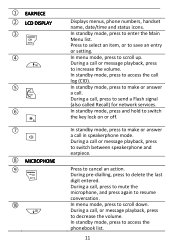
... access the phonebook list. 11 During a call , press to mute the microphone, and press again to resume conversation. In standby mode, press to make or answer a call in speakerphone mode. In standby mode, press to make or answer a call . During a call or message playback, press to switch between speakerphone and earpiece. In standby mode, press to save an entry or setting. Displays menus, phone numbers, handset name, date/time and status icons. In menu mode...
... access the phonebook list. 11 During a call , press to mute the microphone, and press again to resume conversation. In standby mode, press to make or answer a call in speakerphone mode. In standby mode, press to make or answer a call . During a call or message playback, press to switch between speakerphone and earpiece. In standby mode, press to save an entry or setting. Displays menus, phone numbers, handset name, date/time and status icons. In menu mode...
User Manual
Page 14
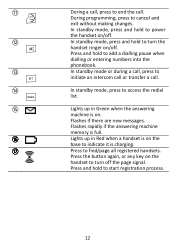
... and exit without making changes. Lights up in Green when the answering machine is full. Press to turn the handset ringer on/off. Press and hold to turn off . Flashes rapidly if the answering machine memory is on /off the page signal. Flashes if there are new messages. In standby mode or during a call, press to initiate an intercom call or transfer a call . Press and hold to power the handset on . ⑪ O ⑫...
... and exit without making changes. Lights up in Green when the answering machine is full. Press to turn the handset ringer on/off. Press and hold to turn off . Flashes rapidly if the answering machine memory is on /off the page signal. Flashes if there are new messages. In standby mode or during a call, press to initiate an intercom call or transfer a call . Press and hold to power the handset on . ⑪ O ⑫...

User Manual
Page 16
... handset ringer is full. Flashes slowly when there are new answering machine message(s) or when the answering machine memory is turned off. Displays when the handset is registered and within range of selection or programming is on . 14 Displays when the answering machine is available. Turns on during menu mode when you can return to delete the last digit. Turns on during phonebook editing mode to the previous state or previous step. Turns on when the screen display...
... handset ringer is full. Flashes slowly when there are new answering machine message(s) or when the answering machine memory is turned off. Displays when the handset is registered and within range of selection or programming is on . 14 Displays when the answering machine is available. Turns on during menu mode when you can return to delete the last digit. Turns on during phonebook editing mode to the previous state or previous step. Turns on when the screen display...
User Manual
Page 18
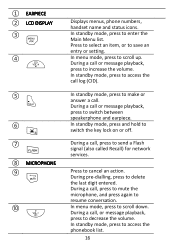
... hold to scroll down. In standby mode, press to make or answer a call , press to send a Flash signal (also called Recall) for network services. In menu mode, press to switch the key lock on or off. Displays menus, phone numbers, handset name and status icons. During a call . In standby mode, press to access the call or message playback, press to increase the volume. Press to enter the Main Menu...
... hold to scroll down. In standby mode, press to make or answer a call , press to send a Flash signal (also called Recall) for network services. In menu mode, press to switch the key lock on or off. Displays menus, phone numbers, handset name and status icons. During a call . In standby mode, press to access the call or message playback, press to increase the volume. Press to enter the Main Menu...

User Manual
Page 20
... charged. Displays when the line is an incoming call log is almost empty. Flashes when there is in use. Displays when the phonebook is set. Displays when the alarm is accessed. Blinks (3s on / 1s off) when the battery level is partly discharged. Flashes when the handset is out of the base station. Flashes (1s on / 1s off . Displays when handset ringer is searching for Twin, Triple and Quad Models Only) The home screen of the phone...
... charged. Displays when the line is an incoming call log is almost empty. Flashes when there is in use. Displays when the phonebook is set. Displays when the alarm is accessed. Blinks (3s on / 1s off) when the battery level is partly discharged. Flashes when the handset is out of the base station. Flashes (1s on / 1s off . Displays when handset ringer is searching for Twin, Triple and Quad Models Only) The home screen of the phone...
User Manual
Page 23
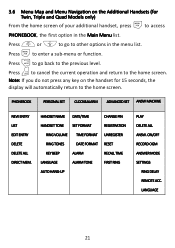
... DIRECT MEM. HANDSETNAME DATE/TIME CHANGE PIN HANDSETTONE SETFORMAT REGISTRATION RINGVOLUME TIMEFORMAT UNREGISTER RING TONES DATEFORMAT RESET KEY BEEP ALARM RECALL TIME LANGUAGE ALARM TONE FIRST RING AUTO HANG-UP PLAY DELETE ALL ANSW. LANGUAGE 21 ON/OFF RECORD OGM ANSWER MODE SETTINGS RING DELAY REMOTE ACC. Press + or - O Press to cancel the current operation and return to the previous level. Note: If you do not press any key on the Additional Handsets (for 15 seconds, the display...
... DIRECT MEM. HANDSETNAME DATE/TIME CHANGE PIN HANDSETTONE SETFORMAT REGISTRATION RINGVOLUME TIMEFORMAT UNREGISTER RING TONES DATEFORMAT RESET KEY BEEP ALARM RECALL TIME LANGUAGE ALARM TONE FIRST RING AUTO HANG-UP PLAY DELETE ALL ANSW. LANGUAGE 21 ON/OFF RECORD OGM ANSWER MODE SETTINGS RING DELAY REMOTE ACC. Press + or - O Press to cancel the current operation and return to the previous level. Note: If you do not press any key on the Additional Handsets (for 15 seconds, the display...
User Manual
Page 30
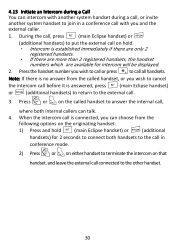
... one handset to call , press (main Eclipse handset) or (additional handsets) on either handset. 28 If you try to make a call while another , and set up a 3-way conference with two handsets and an external call in conference mode automatically, without giving any two handsets registered to the other parties. 4.11 Initiate an Intercom Call I I 1. Press (main Eclipse handset) or (additional handsets) on a called handset to answer the internal call between any warning to the same telephone base...
... one handset to call , press (main Eclipse handset) or (additional handsets) on either handset. 28 If you try to make a call while another , and set up a 3-way conference with two handsets and an external call in conference mode automatically, without giving any two handsets registered to the other parties. 4.11 Initiate an Intercom Call I I 1. Press (main Eclipse handset) or (additional handsets) on a called handset to answer the internal call between any warning to the same telephone base...
User Manual
Page 32
... the call in a conference call is connected, you can choose from the called handset to answer the internal call connected to the external call all handsets. Note: If there is no answer from the following options on the originating handset: I I 1. Press the handset number you wish to call or press to put the external call on hold (main Eclipse handset) or (additional handsets) for intercom will be displayed. * 2. 4.13 Initiate an Intercom during a call...
... the call in a conference call is connected, you can choose from the called handset to answer the internal call connected to the external call all handsets. Note: If there is no answer from the following options on the originating handset: I I 1. Press the handset number you wish to call or press to put the external call on hold (main Eclipse handset) or (additional handsets) for intercom will be displayed. * 2. 4.13 Initiate an Intercom during a call...
User Manual
Page 33
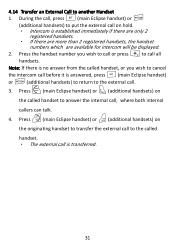
... handset number you wish to cancel I the intercom call before it is answered, press (main Eclipse handset) I 1. During the call, press (main Eclipse handset) or (additional handsets) to put the external call on the originating handset to transfer the external call to the called handset to call is established immediately if there are only 2 registered handsets. • If there are more than 2 registered handsets, the handset numbers which are available for intercom will be displayed...
... handset number you wish to cancel I the intercom call before it is answered, press (main Eclipse handset) I 1. During the call, press (main Eclipse handset) or (additional handsets) to put the external call on the originating handset to transfer the external call to the called handset to call is established immediately if there are only 2 registered handsets. • If there are more than 2 registered handsets, the handset numbers which are available for intercom will be displayed...

User Manual
Page 69
... press to new callers. to ANSW MACHINE and then press to your announcement. M 3. If you a message. M 3. Press to return to ANS. Press / to standby mode. - Press / to select ON or OFF and then press to 3 minutes long. M 2. M 4. On Your Main Eclipse Handset M 1. From the home screen, press . Press +\- 11 ANSWERING MACHINE Your phone includes a telephone answering machine that records unanswered calls when it is on , calls are answered after...
... press to new callers. to ANSW MACHINE and then press to your announcement. M 3. If you a message. M 3. Press to return to ANS. Press / to standby mode. - Press / to select ON or OFF and then press to 3 minutes long. M 2. M 4. On Your Main Eclipse Handset M 1. From the home screen, press . Press +\- 11 ANSWERING MACHINE Your phone includes a telephone answering machine that records unanswered calls when it is on , calls are answered after...
User Manual
Page 70
... Eclipse Handset M 1. O 5. Press +\- Press to return to select. + - 4. M 2. Press / to ANSWER MODE and then press to standby mode. 68 This can be changed and Remote Access is activated, it will not answer any messages on the additional handsets. Press to return to leave any incoming calls. Note: If the answering machine is OFF and the Master PIN is still set at its default 0000, the answering machine will answer incoming calls after 14 rings...
... Eclipse Handset M 1. O 5. Press +\- Press to return to select. + - 4. M 2. Press / to ANSWER MODE and then press to standby mode. 68 This can be changed and Remote Access is activated, it will not answer any messages on the additional handsets. Press to return to leave any incoming calls. Note: If the answering machine is OFF and the Master PIN is still set at its default 0000, the answering machine will answer incoming calls after 14 rings...

User Manual
Page 72
... select. + - 3. From the home screen, press . Press +\- Note: If you select TOLL SAVER on the Main Eclipse Handset or ECONOMY on the additional handset, the answering machine will answer an incoming call on the fifth ring if you have no new messages and on the third ring, then you can save you the cost of a long-distance call your messages remotely. 11.3.2 Activate/Deactivate Remote Access - SETTING and then press...
... select. + - 3. From the home screen, press . Press +\- Note: If you select TOLL SAVER on the Main Eclipse Handset or ECONOMY on the additional handset, the answering machine will answer an incoming call on the fifth ring if you have no new messages and on the third ring, then you can save you the cost of a long-distance call your messages remotely. 11.3.2 Activate/Deactivate Remote Access - SETTING and then press...
User Manual
Page 84
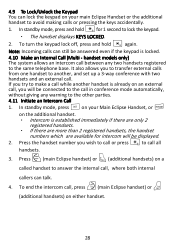
... base unit is plugged in the user guide to the base unit. Switch off . Everyday use "I cannot make calls" * If the handset display shows KEYS LOCKED, press and hold on the Main Eclipse Handset or press on the base unit or charging pod to an external line at a time. Make sure that the base unit's mains power adapter is switched on the display. Check that you make or answer calls" If the handset's display is blank, it before you are using the telephone line...
... base unit is plugged in the user guide to the base unit. Switch off . Everyday use "I cannot make calls" * If the handset display shows KEYS LOCKED, press and hold on the Main Eclipse Handset or press on the base unit or charging pod to an external line at a time. Make sure that the base unit's mains power adapter is switched on the display. Check that you make or answer calls" If the handset's display is blank, it before you are using the telephone line...
User Manual
Page 87
... making a call does not work, and you have entered the correct Remote Access PIN (same as your Master PIN). If the call , the fault may be full. Disconnect the base unit from the telephone line and plug a different phone into the socket. Contact the service provider. 85 Make sure that you are using a two-way socket adapter, remove it and plug a telephone directly into the Eclipse telephone socket. Disconnect all other instruments connected...
... making a call does not work, and you have entered the correct Remote Access PIN (same as your Master PIN). If the call , the fault may be full. Disconnect the base unit from the telephone line and plug a different phone into the socket. Contact the service provider. 85 Make sure that you are using a two-way socket adapter, remove it and plug a telephone directly into the Eclipse telephone socket. Disconnect all other instruments connected...


