User Manual
Page 1
User Guide R430 2nd edition www.binatonetelecom.com Binatone Navigation software Binatone Helpline (for UK only) Monday to Friday from 9:00am to 5:00pm Tel : 0845 345 9677 ** Please note that all calls are charged at local rate
User Guide R430 2nd edition www.binatonetelecom.com Binatone Navigation software Binatone Helpline (for UK only) Monday to Friday from 9:00am to 5:00pm Tel : 0845 345 9677 ** Please note that all calls are charged at local rate
User Manual
Page 2
... a satellite signal. SAFETY IMPORTANT Satellite signals are not using the device indoors or in Navigation Mode. Keep your guarantee. This is not advised. 2 Unpacking your Binatone Navigation System In the box you are required for products of no use the unit, you later need to function in areas where the satellite...
... a satellite signal. SAFETY IMPORTANT Satellite signals are not using the device indoors or in Navigation Mode. Keep your guarantee. This is not advised. 2 Unpacking your Binatone Navigation System In the box you are required for products of no use the unit, you later need to function in areas where the satellite...

User Manual
Page 3
... care and attention. Battery Your PND uses a Li-polymer battery. Do not pierce or break the battery casing. Never modify the settings or program you Binatone Personal Navigation Device (PND). Any changes in GPS availability and accuracy, or in humid, wet or corrosive environments. Only look at the PND map when...
... care and attention. Battery Your PND uses a Li-polymer battery. Do not pierce or break the battery casing. Never modify the settings or program you Binatone Personal Navigation Device (PND). Any changes in GPS availability and accuracy, or in humid, wet or corrosive environments. Only look at the PND map when...
User Manual
Page 4
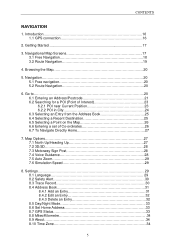
CONTENTS CONTENTS Important 02 In the Box 02 Safety 03 The Global Positioning System 03 Using Your PND in the Car 03 Prohibited Areas 03 Battery 03 Contents 04 Quick Start Guide 07 Position of the Controls 07 Charging the Battery 08 SD Memory Card 08 Car Adaptor 08 Turning the Sat Nav Unit On/Off 09 Turning the Sat Nav Unit Off (Sleep Mode 09 System Reset 09 Windscreen Holder Installation 10 Getting Started 11 Starting Up 11 Settings 12 Multi-Media 13 Picture Viewer 13 Document Viewer 14 GPS Receiver 15 Additional maps and upgrades 15 4
CONTENTS CONTENTS Important 02 In the Box 02 Safety 03 The Global Positioning System 03 Using Your PND in the Car 03 Prohibited Areas 03 Battery 03 Contents 04 Quick Start Guide 07 Position of the Controls 07 Charging the Battery 08 SD Memory Card 08 Car Adaptor 08 Turning the Sat Nav Unit On/Off 09 Turning the Sat Nav Unit Off (Sleep Mode 09 System Reset 09 Windscreen Holder Installation 10 Getting Started 11 Starting Up 11 Settings 12 Multi-Media 13 Picture Viewer 13 Document Viewer 14 GPS Receiver 15 Additional maps and upgrades 15 4
User Manual
Page 5
Navigation 20 5.1 Free navigation 20 5.2 Route Navigation 20 6. Getting Started 17 3. Go to 20 6.1 Entering an Address/Postcode 21 6.2 Searching for a POI (Point of Interest 23 6.2.1 POI near Current Position 23 6.2.2 POI in City 24 6.3 Selecting an Entry from the Address Book 25 6.4 Selecting a Recent Destination 25 6.5 Selecting a Point on the Map 26 6.6 Entering a set of Co-ordinates 26 6.7 To Navigate Directly Home 27 7. CONTENTS NAVIGATION 1. Introduction 16 1.1 GPS connection 16 2. Map Options 27 7.1 North Up/Heading Up 27 7.2 3D/2D 28 7.3 Motorway Sign Post 28 ...
Navigation 20 5.1 Free navigation 20 5.2 Route Navigation 20 6. Getting Started 17 3. Go to 20 6.1 Entering an Address/Postcode 21 6.2 Searching for a POI (Point of Interest 23 6.2.1 POI near Current Position 23 6.2.2 POI in City 24 6.3 Selecting an Entry from the Address Book 25 6.4 Selecting a Recent Destination 25 6.5 Selecting a Point on the Map 26 6.6 Entering a set of Co-ordinates 26 6.7 To Navigate Directly Home 27 7. CONTENTS NAVIGATION 1. Introduction 16 1.1 GPS connection 16 2. Map Options 27 7.1 North Up/Heading Up 27 7.2 3D/2D 28 7.3 Motorway Sign Post 28 ...
User Manual
Page 6
CONTENTS 8.11 Brightness 34 8.12 Calibration 35 9. Route Plan 35 9.1 Navigating 35 9.2 Waypoints 36 9.3 Simulate 37 9.4 Route Options 37 10. Route Navigation Menu 37 10.1 Route Plan 38 10.2 Detour 38 10.3 Cancel Route 38 10.4 Go to 38 10.5 Route Information 39 10.6 Map Options 39 10.7 Settings 39 Frequently asked questions 40 The map contains an error / POI's are missing 40 I am experiencing problems getting a GPS fix 40 Where can I get technical support 40 Where can I get additional maps and guides 40 Guarantee and service 41 Technical Specifications 42 EC ...
CONTENTS 8.11 Brightness 34 8.12 Calibration 35 9. Route Plan 35 9.1 Navigating 35 9.2 Waypoints 36 9.3 Simulate 37 9.4 Route Options 37 10. Route Navigation Menu 37 10.1 Route Plan 38 10.2 Detour 38 10.3 Cancel Route 38 10.4 Go to 38 10.5 Route Information 39 10.6 Map Options 39 10.7 Settings 39 Frequently asked questions 40 The map contains an error / POI's are missing 40 I am experiencing problems getting a GPS fix 40 Where can I get technical support 40 Where can I get additional maps and guides 40 Guarantee and service 41 Technical Specifications 42 EC ...
User Manual
Page 7
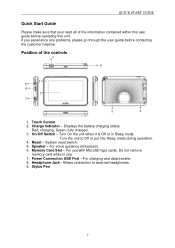
Position of the information contained within this unit. Turn On the unit when it is Off or in use with MicroSD type cards. Allows connection to Off or put into Sleep mode during operation. 4. On/Off Switch - System reset switch. 5. For voice guidance instructions. 6. Memory Card Slot - Charge Indicator - Turn the unit to external headphones. 9. For use . 7. Stylus Pen 7 Speaker - Power Connection USB Port - QUICK START GUIDE Quick Start Guide Please make sure that your read all of the controls 3 9 2 8 6 1 7 5 4 1. fully charged. 3. Do not remove ...
Position of the information contained within this unit. Turn On the unit when it is Off or in use with MicroSD type cards. Allows connection to Off or put into Sleep mode during operation. 4. On/Off Switch - System reset switch. 5. For voice guidance instructions. 6. Memory Card Slot - Charge Indicator - Turn the unit to external headphones. 9. For use . 7. Stylus Pen 7 Speaker - Power Connection USB Port - QUICK START GUIDE Quick Start Guide Please make sure that your read all of the controls 3 9 2 8 6 1 7 5 4 1. fully charged. 3. Do not remove ...
User Manual
Page 8
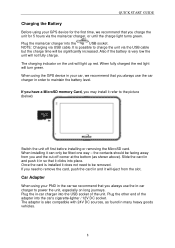
QUICK START GUIDE Charging the Battery Before using your GPS device for 5 hours via the mains/car charger, or until the charge light turns green. When installing it will eject from you and the cut-off first before installing or removing the MicroSD card. If you may install it refer to maintain the battery level. NOTE: Charging via the USB cable but the charge time will light up red. If you have a MicroSD memory Card, you need to remove the card, push the card in so that it does not need to be fitted one way - Slide the card in and push it in and it can only be ...
QUICK START GUIDE Charging the Battery Before using your GPS device for 5 hours via the mains/car charger, or until the charge light turns green. When installing it will eject from you and the cut-off first before installing or removing the MicroSD card. If you may install it refer to maintain the battery level. NOTE: Charging via the USB cable but the charge time will light up red. If you have a MicroSD memory Card, you need to remove the card, push the card in so that it does not need to be fitted one way - Slide the card in and push it in and it can only be ...
User Manual
Page 9
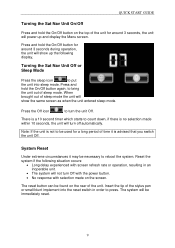
QUICK START GUIDE Turning the Sat Nav Unit On/Off Press and hold the On/Off button on the top of the unit. Press the Off icon to count down, if there is a 10 second timer which starts to turn the unit Off. There is no selection made on the rear of the unit for a long period of the stylus pen or small blunt implement into sleep mode. The reset button can be necessary to put the unit into the reset switch in an inoperable unit. • The system will show the same screen as when the unit entered sleep mode. Press and hold the On/Off button again, to press. ...
QUICK START GUIDE Turning the Sat Nav Unit On/Off Press and hold the On/Off button on the top of the unit. Press the Off icon to count down, if there is a 10 second timer which starts to turn the unit Off. There is no selection made on the rear of the unit for a long period of the stylus pen or small blunt implement into sleep mode. The reset button can be necessary to put the unit into the reset switch in an inoperable unit. • The system will show the same screen as when the unit entered sleep mode. Press and hold the On/Off button again, to press. ...

User Manual
Page 10
To remove the Car mount from the windscreen. 10 Lift the lever away from the windscreen, then gentle pull the tab on the end of the ball mount at the end of the car mount and then push down firmly, until it clicks in to place. A. Fitting the holding bracket It is attached to the windscreen. The bracket can only be fitted one way. Fitting the Unit Slide the unit into the bottom of the bracket. C. Fitting to windscreen Pull the lever away from the car mount; Press and lift the tab at the top. Slide the bracket onto the securing lug on the suction cup to release the ...
To remove the Car mount from the windscreen. 10 Lift the lever away from the windscreen, then gentle pull the tab on the end of the ball mount at the end of the car mount and then push down firmly, until it clicks in to place. A. Fitting the holding bracket It is attached to the windscreen. The bracket can only be fitted one way. Fitting the Unit Slide the unit into the bottom of the bracket. C. Fitting to windscreen Pull the lever away from the car mount; Press and lift the tab at the top. Slide the bracket onto the securing lug on the suction cup to release the ...

User Manual
Page 11
MAIN MENU Starting Up Press the On/Off button on the top until the following screens are displayed, When you press MENU, the following screens will be displayed: 11
MAIN MENU Starting Up Press the On/Off button on the top until the following screens are displayed, When you press MENU, the following screens will be displayed: 11
User Manual
Page 12
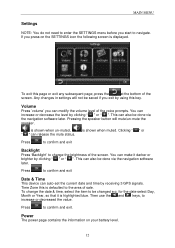
If you exit by clicking " " or " ". Any changes in settings will mute/un-mute the speaker. You can increase or decrease the level by receiving 3 GPS signals. is shown when un-muted, " " can release the mute status. MAIN MENU Settings NOTE: You do not need to enter the SETTINGS menu before you can modify the volume level of the voice prompts. Volume Press 'volume' you start to navigate. This can make it is defaulted to be saved if you press on your battery level. 12 Press to change the date & time, select the item to the area of sale. You can also be done ...
If you exit by clicking " " or " ". Any changes in settings will mute/un-mute the speaker. You can increase or decrease the level by receiving 3 GPS signals. is shown when un-muted, " " can release the mute status. MAIN MENU Settings NOTE: You do not need to enter the SETTINGS menu before you can modify the volume level of the voice prompts. Volume Press 'volume' you start to navigate. This can make it is defaulted to be saved if you press on your battery level. 12 Press to change the date & time, select the item to the area of sale. You can also be done ...
User Manual
Page 13
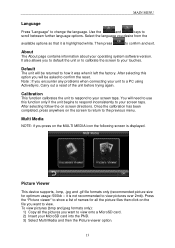
It also allows you to default the unit or to calibrate the screen to your unit to confirm the reset. Carry out a reset of names for optimum usage: 500kb - Picture Viewer This device supports, .bmp, .jpg and .gif file formats only (recommended picture size for all the pictures you will need to use this option you want to your MicroSD card into the PND. 3) Select Multi Media and then the Picture viewer option. 13 Default The unit will be asked to a PC using ActiveSync. After selecting this function only if the unit begins to respond inconsistently to view. Note : If ...
It also allows you to default the unit or to calibrate the screen to your unit to confirm the reset. Carry out a reset of names for optimum usage: 500kb - Picture Viewer This device supports, .bmp, .jpg and .gif file formats only (recommended picture size for all the pictures you will need to use this option you want to your MicroSD card into the PND. 3) Select Multi Media and then the Picture viewer option. 13 Default The unit will be asked to a PC using ActiveSync. After selecting this function only if the unit begins to respond inconsistently to view. Note : If ...

User Manual
Page 14
To go back through the menu structure press the option "..." Zoom in the list. 6. Full screen : Press to the above screen, double tap the screen. To return back to enlarge the picture so that it fills the whole screen. Document name : This shows the file name of the picture. 3. But once loaded the following screen will be shown: 8 12 345 67 Button function list of pictures on a picture or a further folder. Return : Press this to return back to the list of Picture Files: 1. MAIN MENU 4) Click on SDMMC folder to open it and then click on the unit. 2. Zoom out : Press to...
To go back through the menu structure press the option "..." Zoom in the list. 6. Full screen : Press to the above screen, double tap the screen. To return back to enlarge the picture so that it fills the whole screen. Document name : This shows the file name of the picture. 3. But once loaded the following screen will be shown: 8 12 345 67 Button function list of pictures on a picture or a further folder. Return : Press this to return back to the list of Picture Files: 1. MAIN MENU 4) Click on SDMMC folder to open it and then click on the unit. 2. Zoom out : Press to...
User Manual
Page 15
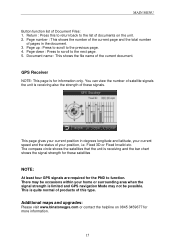
Page number : This shows the number of the current page and the total number of these satellites NOTE: At least four GPS signals are required for the PND to the list of documents on 0845 3459677 for information only. There may not be occasions within your home or surrounding area when the signal strength is for more information. 15 Return : Press this type. You can view the number of satellite signals the unit is receiving also the strength of pages in degrees longitude and latitude, your current speed and the status of Document Files: 1. Additional maps and upgrades: ...
Page number : This shows the number of the current page and the total number of these satellites NOTE: At least four GPS signals are required for the PND to the list of documents on 0845 3459677 for information only. There may not be occasions within your home or surrounding area when the signal strength is for more information. 15 Return : Press this type. You can view the number of satellite signals the unit is receiving also the strength of pages in degrees longitude and latitude, your current speed and the status of Document Files: 1. Additional maps and upgrades: ...
User Manual
Page 16
You can also use and intuitive interface, just by car or on foot. You can navigate and plan your route with an unobstructed view to the sky to find a strong signal. 16 It may take up to 10 minutes again to set off on the lower part of GPS satellites in a location with an easy-to-use this will be faster (30 seconds to 1 minute), but if you through the main features of the system. 1.1 GPS connection Your navigation device uses GPS technology for several days or are travelling by using it may take up your first satellite connection. In the car this application ...
You can also use and intuitive interface, just by car or on foot. You can navigate and plan your route with an unobstructed view to the sky to find a strong signal. 16 It may take up to 10 minutes again to set off on the lower part of GPS satellites in a location with an easy-to-use this will be faster (30 seconds to 1 minute), but if you through the main features of the system. 1.1 GPS connection Your navigation device uses GPS technology for several days or are travelling by using it may take up your first satellite connection. In the car this application ...
User Manual
Page 17
... behaves during navigation. Though the screens look very similar there are shown below. NAVIGATION 2 Getting Started Please make sure that you will be shown the Binatone screen, which you will see the warning statement screen. Switch on free navigation mode (see page 7). First you have read the statement and to "Don...
... behaves during navigation. Though the screens look very similar there are shown below. NAVIGATION 2 Getting Started Please make sure that you will be shown the Binatone screen, which you will see the warning statement screen. Switch on free navigation mode (see page 7). First you have read the statement and to "Don...
User Manual
Page 18
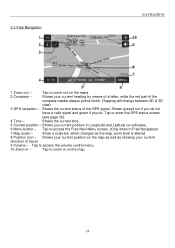
Shows your current heading by means of a letter, while the red part of the GPS signal, Shown greyed out if you do . Shows you do not have a valid signal and green if you current position in Free Navigation) 7 Map scale - Tap to access the Free Navi Menu screen. (Only when in Longitude and Latitude co-ordinates. 6 Menu button - 3.1 Free Navigation NAVIGATION 1 Zoom out - Tap to access the volume control menu. 10 Zoom in on the map as well as the map zoom level is altered 8 Position icon - Shows your current direction of travel. 9 Volume - Tap to zoom out on...
Shows your current heading by means of a letter, while the red part of the GPS signal, Shown greyed out if you do . Shows you do not have a valid signal and green if you current position in Free Navigation) 7 Map scale - Tap to access the Free Navi Menu screen. (Only when in Longitude and Latitude co-ordinates. 6 Menu button - 3.1 Free Navigation NAVIGATION 1 Zoom out - Tap to access the volume control menu. 10 Zoom in on the map as well as the map zoom level is altered 8 Position icon - Shows your current direction of travel. 9 Volume - Tap to zoom out on...

User Manual
Page 19
Show the position of a point of the road you will be followed. 18 Next road - Shows the remaining distance to your destination. Shows the estimated time you are currently on via the settings (see page 29). 12 POI icon - Indicates the planned route to the manoeuvre. Shows the name of the road you exceed the speed limit of the next manoeuvre and the distance to be using next. 19 Tap to access the navigation options. (Only when in Route Navigation) 16 Arrival time - Tap to replay the voice instruction. 14 Current road - Distance - Shown when you will ...
Show the position of a point of the road you will be followed. 18 Next road - Shows the remaining distance to your destination. Shows the estimated time you are currently on via the settings (see page 29). 12 POI icon - Indicates the planned route to the manoeuvre. Shows the name of the road you exceed the speed limit of the next manoeuvre and the distance to be using next. 19 Tap to access the navigation options. (Only when in Route Navigation) 16 Arrival time - Tap to replay the voice instruction. 14 Current road - Distance - Shown when you will ...
User Manual
Page 20
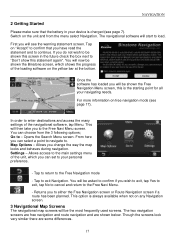
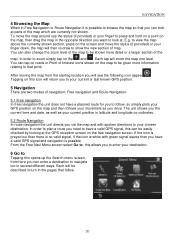
E.g. Each tap will see the following icon appear , Tapping on this opens up the Search menu screen, from here you can be easily checked by looking at the GPS reception screen on the map, then drag the map in the pages that follow , so simply plots your current or last known GPS position. 5 Navigation There are currently not shown. to view the map above the currently shown section, press on the map to be given more detail or a larger section of the map. You can tap on roads or Point of Interest icons shown on the screen and move the map around use the stylus (if provided) ...
E.g. Each tap will see the following icon appear , Tapping on this opens up the Search menu screen, from here you can be easily checked by looking at the GPS reception screen on the map, then drag the map in the pages that follow , so simply plots your current or last known GPS position. 5 Navigation There are currently not shown. to view the map above the currently shown section, press on the map to be given more detail or a larger section of the map. You can tap on roads or Point of Interest icons shown on the screen and move the map around use the stylus (if provided) ...