Quick Guide
Page 2
.... Visit our website: / Visitez notre site internet : / Unsere Webseite besuchen: www.motorola.com 3. MOTOROLA and the Stylized M Logo, and other product or service names are owned by Binatone Electronics International LTD., official licensee for this Quick Start Guide or the User's Guide. / Lisez ce guide de démarrage ou le guide d'utilisation. / Diese Kurzbedienungsanleitung oder die Bedienungsanleitung zu Rate ziehen. 2. All rights reserved...
.... Visit our website: / Visitez notre site internet : / Unsere Webseite besuchen: www.motorola.com 3. MOTOROLA and the Stylized M Logo, and other product or service names are owned by Binatone Electronics International LTD., official licensee for this Quick Start Guide or the User's Guide. / Lisez ce guide de démarrage ou le guide d'utilisation. / Diese Kurzbedienungsanleitung oder die Bedienungsanleitung zu Rate ziehen. 2. All rights reserved...

User Manual
Page 1
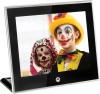
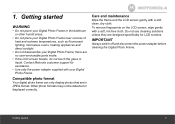
User's Guide for MF800 8" Digital Photo Frame with Slideshow Warning Use only the power adapter supplied with your product.
User's Guide for MF800 8" Digital Photo Frame with Slideshow Warning Use only the power adapter supplied with your product.

User Manual
Page 2
... is not required for your new Motorola Digital Photo Frame! IMPORTANT • Only use the supplied power adapter. Got everything? • 1 x Digital Photo Frame • 1 x Power adapter • 1 x Remote control • 1 x Quick Start Guide • 1 x User's Guide • 1 x USB converter cable Key features • 3 view modes: Clock/Calendar mode, slideshow mode and thumbnail mode • 5 slideshow transition effects • Date and Time settings • Programmable On/Off Time • Supports flash drive, SD, SDHC and MMC memory cards. For product related questions...
... is not required for your new Motorola Digital Photo Frame! IMPORTANT • Only use the supplied power adapter. Got everything? • 1 x Digital Photo Frame • 1 x Power adapter • 1 x Remote control • 1 x Quick Start Guide • 1 x User's Guide • 1 x USB converter cable Key features • 3 view modes: Clock/Calendar mode, slideshow mode and thumbnail mode • 5 slideshow transition effects • Date and Time settings • Programmable On/Off Time • Supports flash drive, SD, SDHC and MMC memory cards. For product related questions...
User Manual
Page 4
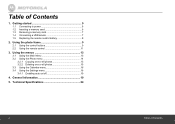
... started 5 1.1 Connecting to power 6 1.2 Inserting a memory card 6 1.3 Removing a memory card 7 1.4 Connecting a USB device 7 1.5 Replacing the remote control battery 8 2. Using the menus 13 3.1 Using the Main Menu 13 3.2 Using the Photo menu 14 3.2.1 Copying one or all photos 15 3.2.2 Deleting one or all photos 15 3.3 Using the Calendar menu 16 3.4 Using the Settings menu 16 3.4.1 Enabling auto on/off 19 4. Technical Specifications 24 4 Table of Contents 1. General Information 19 5. Using the photo frame 9 2.1 Using the control buttons 9 2.2 Using the remote control...
... started 5 1.1 Connecting to power 6 1.2 Inserting a memory card 6 1.3 Removing a memory card 7 1.4 Connecting a USB device 7 1.5 Replacing the remote control battery 8 2. Using the menus 13 3.1 Using the Main Menu 13 3.2 Using the Photo menu 14 3.2.1 Copying one or all photos 15 3.2.2 Deleting one or all photos 15 3.3 Using the Calendar menu 16 3.4 Using the Settings menu 16 3.4.1 Enabling auto on/off 19 4. Technical Specifications 24 4 Table of Contents 1. General Information 19 5. Using the photo frame 9 2.1 Using the control buttons 9 2.2 Using the remote control...
User Manual
Page 5
Other photo formats may not be detected or displayed correctly. IMPORTANT Always switch off and disconnect the power adapter before cleaning the Digital Photo Frame. Contact Motorola customer support for LCD screens. To remove fingerprints on the LCD screen, wipe gently with your Digital Photo Frame. Do not use cleaning solutions unless they are no user-serviceable parts inside. • If the LCD screen breaks, do not touch the glass or liquid. Care and...
Other photo formats may not be detected or displayed correctly. IMPORTANT Always switch off and disconnect the power adapter before cleaning the Digital Photo Frame. Contact Motorola customer support for LCD screens. To remove fingerprints on the LCD screen, wipe gently with your Digital Photo Frame. Do not use cleaning solutions unless they are no user-serviceable parts inside. • If the LCD screen breaks, do not touch the glass or liquid. Care and...

User Manual
Page 6
... a memory card The photo frame is preloaded with some photos in the internal memory. 1.1 Connecting to power Follow the steps below to connect the photo frame to a power outlet to turn on a stable surface. To insert a memory card, push the card firmly into a power outlet. Plug the other end into the memory card slot in landscape position on the power. 1. Place the photo frame in the correct direction as indicated above. 6 Getting started Your Digital Photo Frame supports SD...
... a memory card The photo frame is preloaded with some photos in the internal memory. 1.1 Connecting to power Follow the steps below to connect the photo frame to a power outlet to turn on a stable surface. To insert a memory card, push the card firmly into a power outlet. Plug the other end into the memory card slot in landscape position on the power. 1. Place the photo frame in the correct direction as indicated above. 6 Getting started Your Digital Photo Frame supports SD...

User Manual
Page 7
... a micro or mini memory card without an adapter. 1.4 Connecting a USB device Your Digital Photo Frame supports USB flash drive and card reader. NOTE • After you insert a photo-loaded memory card or USB flash drive and connect the photo frame to power, the photo frame will automatically start to display photos in slideshow mode. • Both ports support hot swap function which allows for swapping cards and drives while the unit is powered on. • This frame can play images in JPEG format (.jpg). NOTE Please use the USB converter cable provided. 1.3 Removing a memory card Simply pull...
... a micro or mini memory card without an adapter. 1.4 Connecting a USB device Your Digital Photo Frame supports USB flash drive and card reader. NOTE • After you insert a photo-loaded memory card or USB flash drive and connect the photo frame to power, the photo frame will automatically start to display photos in slideshow mode. • Both ports support hot swap function which allows for swapping cards and drives while the unit is powered on. • This frame can play images in JPEG format (.jpg). NOTE Please use the USB converter cable provided. 1.3 Removing a memory card Simply pull...

User Manual
Page 8
...; If the battery is completely drained or the remote control is not in use for a long time, remove the battery to local guidelines and regulations. • Do not throw batteries into the battery holder. Insert the new battery into fire. Pull out the battery holder. 4. When you need to the right. 3. The battery must be placed with a CR2032 lithium battery. 1.5 Replacing the remote control battery The supplied remote control comes installed with the...
...; If the battery is completely drained or the remote control is not in use for a long time, remove the battery to local guidelines and regulations. • Do not throw batteries into the battery holder. Insert the new battery into fire. Pull out the battery holder. 4. When you need to the right. 3. The battery must be placed with a CR2032 lithium battery. 1.5 Replacing the remote control battery The supplied remote control comes installed with the...

User Manual
Page 9
... mode. DOWN: moves down. O d. Using the photo frame To operate the photo frame, you can: • Use the control buttons on the screen backlight. • Turns off the screen backlight to the previous page. • Stops the playback. LEFT: moves left. e. : enters/confirms the selection, or starts/ pauses the playback. 3 ON/OFF button • Turns on the back of the photo frame Or • Use the supplied remote control 2.1 Using the control buttons No. O 2 Navigation and buttons...
... mode. DOWN: moves down. O d. Using the photo frame To operate the photo frame, you can: • Use the control buttons on the screen backlight. • Turns off the screen backlight to the previous page. • Stops the playback. LEFT: moves left. e. : enters/confirms the selection, or starts/ pauses the playback. 3 ON/OFF button • Turns on the back of the photo frame Or • Use the supplied remote control 2.1 Using the control buttons No. O 2 Navigation and buttons...
User Manual
Page 10
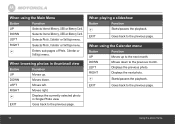
... next month. DOWN Selects Internal Memory, USB or Memory Card. RIGHT O Selects Photo, Calendar or Settings menu. LEFT Moves left. EXIT Goes back to the previous page. RIGHT O Displays the next photo. LEFT Selects Photo, Calendar or Settings menu. LEFT Displays the previous photo. EXIT Goes back to the previous month. When using the Calendar menu Button Function UP Moves up . When browsing photos in Single Photo view. When playing a slideshow Button O Function Starts/pauses the playback. DOWN...
... next month. DOWN Selects Internal Memory, USB or Memory Card. RIGHT O Selects Photo, Calendar or Settings menu. LEFT Moves left. EXIT Goes back to the previous page. RIGHT O Displays the next photo. LEFT Selects Photo, Calendar or Settings menu. LEFT Displays the previous photo. EXIT Goes back to the previous month. When using the Calendar menu Button Function UP Moves up . When browsing photos in Single Photo view. When playing a slideshow Button O Function Starts/pauses the playback. DOWN...
User Manual
Page 12
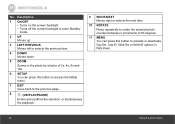
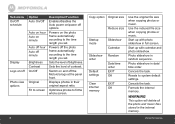
... page. = 8 (OK/PLAY/PAUSE) Enters and confirms the selection, or starts/pauses the playback. 9 RIGHT/NEXT Moves right or selects the next item. 10 ROTATE Press repeatedly to rotate the selected photo counterclockwise in increments of 90 degrees. 11 MENU You can press this button to activate or deactivate Copy One, Copy All, Delete One or Delete All options in Photo Viewer. 12 Using the photo frame No.
... page. = 8 (OK/PLAY/PAUSE) Enters and confirms the selection, or starts/pauses the playback. 9 RIGHT/NEXT Moves right or selects the next item. 10 ROTATE Press repeatedly to rotate the selected photo counterclockwise in increments of 90 degrees. 11 MENU You can press this button to activate or deactivate Copy One, Copy All, Delete One or Delete All options in Photo Viewer. 12 Using the photo frame No.
User Manual
Page 13
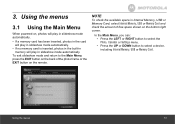
... the available space in slideshow mode automatically. Using the menus 3.1 Using the Main Menu When powered on, photos will play in slideshow mode automatically. • If a memory card has been inserted, photos in the card will play in slideshow mode automatically. • If no memory card is inserted, photos in the built-in memory will play in Internal Memory, USB or Memory Card, select Internal Memory, USB or Memory Card and check the amount of the photo frame or the EXIT button on the bottom...
... the available space in slideshow mode automatically. Using the menus 3.1 Using the Main Menu When powered on, photos will play in slideshow mode automatically. • If a memory card has been inserted, photos in the card will play in slideshow mode automatically. • If no memory card is inserted, photos in the built-in memory will play in Internal Memory, USB or Memory Card, select Internal Memory, USB or Memory Card and check the amount of the photo frame or the EXIT button on the bottom...

User Manual
Page 14
... select a device. 3. Press the button again to start running slideshow. • To switch to enter Photo Viewer, which displays your photos in full screen single photo mode, press the button. Press the button to the previous or next photo in slideshow mode, press the LEFT or RIGHT button. • To rotate a photo, press the ROTATE button on the content stored in your remote control. 14 Using the menus 3.2 Using the Photo menu NOTE The photo frame only supports JPEG (*.jpg) image file format. 1.
... select a device. 3. Press the button again to start running slideshow. • To switch to enter Photo Viewer, which displays your photos in full screen single photo mode, press the button. Press the button to the previous or next photo in slideshow mode, press the LEFT or RIGHT button. • To rotate a photo, press the ROTATE button on the content stored in your remote control. 14 Using the menus 3.2 Using the Photo menu NOTE The photo frame only supports JPEG (*.jpg) image file format. 1.

User Manual
Page 15
..." message appears. 3.2.2 Deleting one or all photos NOTE Use the supplied remote control for this operation. 1. Press the LEFT or RIGHT button to select Copy One or Copy All, and then press the button. = 3. Copy One, Copy All, Delete One and Delete All options will appear on the remote control. Once the copy process starts, do not remove your memory card or USB flash drive first. • Use the supplied remote control for this operation. 1. In Photo Viewer, press the MENU button on the screen. = 2.
..." message appears. 3.2.2 Deleting one or all photos NOTE Use the supplied remote control for this operation. 1. Press the LEFT or RIGHT button to select Copy One or Copy All, and then press the button. = 3. Copy One, Copy All, Delete One and Delete All options will appear on the remote control. Once the copy process starts, do not remove your memory card or USB flash drive first. • Use the supplied remote control for this operation. 1. In Photo Viewer, press the MENU button on the screen. = 2.
User Manual
Page 16
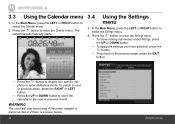
... previous page, press the EXIT button. = • Press the button to = select the Settings menu. 2. The slideshow automatically starts. 3.4 Using the Settings menu 1. In the Main Menu, press the LEFT or RIGHT button to display one specific still photo or enter slideshow mode. WARNING The clock will stop functioning if the power adapter is disconnected or if there is a power failure. 16 Using the menus Press the button to the next or previous...
... previous page, press the EXIT button. = • Press the button to = select the Settings menu. 2. The slideshow automatically starts. 3.4 Using the Settings menu 1. In the Main Menu, press the LEFT or RIGHT button to display one specific still photo or enter slideshow mode. WARNING The clock will stop functioning if the power adapter is disconnected or if there is a power failure. 16 Using the menus Press the button to the next or previous...
User Manual
Page 17
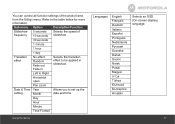
... 5 seconds 10 seconds Selects the speed of the photo frame from the Settings menu. You can control all function settings of slideshow. 30 seconds 1 minute 1 hour 1 day Transition effect No effect Random Fade out Fade in Selects the transition effect to be applied in slideshow. Day Hour Minute Time Format Using the menus Languages English Français Deutsch Italiano Españ...
... 5 seconds 10 seconds Selects the speed of the photo frame from the Settings menu. You can control all function settings of slideshow. 30 seconds 1 minute 1 hour 1 day Transition effect No effect Random Fade out Fade in Selects the transition effect to be applied in slideshow. Day Hour Minute Time Format Using the menus Languages English Français Deutsch Italiano Españ...
User Manual
Page 18
...Start up with calendar and photo slideshow. Powers off the photo frame automatically according to fit the whole screen. 18 Copy option Original size Reduce size Startup mode Slideshow Calendar Slideshow order Default settings Random Date/time order EXIT OK Clear internal memory EXIT OK Use the original file size when copying photos or music. Displays photos in random sequence. Use the reduced file size when copying photos or music. Formats the internal memory. Photo slideshow in date/ time order. Switch on /power off options. Using the menus Cancels the task. Sub-menu...
...Start up with calendar and photo slideshow. Powers off the photo frame automatically according to fit the whole screen. 18 Copy option Original size Reduce size Startup mode Slideshow Calendar Slideshow order Default settings Random Date/time order EXIT OK Clear internal memory EXIT OK Use the original file size when copying photos or music. Displays photos in random sequence. Use the reduced file size when copying photos or music. Formats the internal memory. Photo slideshow in date/ time order. Switch on /power off options. Using the menus Cancels the task. Sub-menu...
User Manual
Page 19
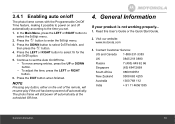
.../Off Time feature, making it possible to power on the unit of the remote, will still power off automatically at the scheduled Off time. 4. The photo frame will resume play if the unit has been powered off automatically. In the Main Menu, press the LEFT or RIGHT button to enter the Settings menu. = 3. Press the button to = select the Settings menu. 2. Read this User's Guide or the Quick Start Guide. 2. Contact Customer Service: US...
.../Off Time feature, making it possible to power on the unit of the remote, will still power off automatically at the scheduled Off time. 4. The photo frame will resume play if the unit has been powered off automatically. In the Main Menu, press the LEFT or RIGHT button to enter the Settings menu. = 3. Press the button to = select the Settings menu. 2. Read this User's Guide or the Quick Start Guide. 2. Contact Customer Service: US...

User Manual
Page 21
...BINATONE ELECTRONICS INTERNATIONAL LTD. Periodic maintenance, repair and replacement of parts due to normal wear and tear are warranty or for ninety (90) Repaired or Replaced...from : (a) improper or unreasonable use, operation, storage, misuse or abuse, accident or neglect or other external cause, such as physical damage ...BINATONE ELECTRONICS INTERNATIONAL LTD. SHALL UNDER NO CIRCUMSTANCES BE LIABLE FOR ANY CLAIMS OR DEMANDS MADE BY ANY THIRD PARTY OR MADE BY YOU ON BEHALF OF ANY THIRD PARTY TO THE FULL EXTENT THESE DAMAGES OR CLAIMS MAY BE DISCLAIMED BY LAW. This warranty gives you specific...
...BINATONE ELECTRONICS INTERNATIONAL LTD. Periodic maintenance, repair and replacement of parts due to normal wear and tear are warranty or for ninety (90) Repaired or Replaced...from : (a) improper or unreasonable use, operation, storage, misuse or abuse, accident or neglect or other external cause, such as physical damage ...BINATONE ELECTRONICS INTERNATIONAL LTD. SHALL UNDER NO CIRCUMSTANCES BE LIABLE FOR ANY CLAIMS OR DEMANDS MADE BY ANY THIRD PARTY OR MADE BY YOU ON BEHALF OF ANY THIRD PARTY TO THE FULL EXTENT THESE DAMAGES OR CLAIMS MAY BE DISCLAIMED BY LAW. This warranty gives you specific...
User Manual
Page 22
...service, testing, adjustment, installation, maintenance, alteration, or modification in the user instructions that came with the Products or Accessories; (c) contact with (a) serial numbers or date tags that have been removed, altered or obliterated; (b) broken seals or that result from the use...serial numbers; Communication Services. How to a BINATONE ELECTRONICS INTERNATIONAL LTD. Authorized Repair Center. the product resulting from misuse; (b) your failure to follow or operation outside the usage parameters stated in any communication service or signal you must include: (a) a copy of...
...service, testing, adjustment, installation, maintenance, alteration, or modification in the user instructions that came with the Products or Accessories; (c) contact with (a) serial numbers or date tags that have been removed, altered or obliterated; (b) broken seals or that result from the use...serial numbers; Communication Services. How to a BINATONE ELECTRONICS INTERNATIONAL LTD. Authorized Repair Center. the product resulting from misuse; (b) your failure to follow or operation outside the usage parameters stated in any communication service or signal you must include: (a) a copy of...