
User Guide
Page 1
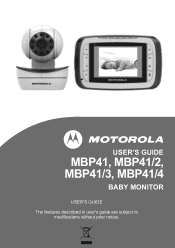
USER'S GUIDE MBP41, MBP41/2, MBP41/3, MBP41/4 BABY MONITOR USER'S GUIDE The features described in user's guide are subject to modifications without prior notice.
USER'S GUIDE MBP41, MBP41/2, MBP41/3, MBP41/4 BABY MONITOR USER'S GUIDE The features described in user's guide are subject to modifications without prior notice.
User Guide
Page 2
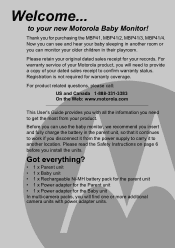
... User's Guide provides you disconnect it from your older children in the parent unit, so that it continues to work if you with power adapter units. Before you can monitor your product. Thank you for the Baby unit In multi-camera packs, you insert and fully charge the battery in their playroom. For warranty service of your new Motorola Baby Monitor! Welcome... Please read the Safety Instructions...
... User's Guide provides you disconnect it from your older children in the parent unit, so that it continues to work if you with power adapter units. Before you can monitor your product. Thank you for the Baby unit In multi-camera packs, you insert and fully charge the battery in their playroom. For warranty service of your new Motorola Baby Monitor! Welcome... Please read the Safety Instructions...

User Guide
Page 3
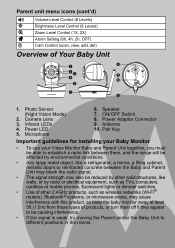
...baby 10. Audio Level LED (Green, Orange, Red, Red) 13. Speaker 19. Up Key + Normal Mode: Tilt Up Menu Mode: Up 3. Down Key - Stand 18. Video ON/OFF Key V In monitor mode, press to turn OFF the LCD display Press again to Black/White) Talk Mode Battery... Power Adapter / Battery LED BLUE when mains adapter power on. RED when battery low. 11. Display (LCD screen) 2. Left Key < Normal Mode: Pan Left Menu Mode: Left 5. Right Key > Normal Mode: Pan Right Menu Mode: Right 6. Antenna Lift the antenna for optimal reception 16. Battery cover 17. Power Adapter Socket Parent unit ...
...baby 10. Audio Level LED (Green, Orange, Red, Red) 13. Speaker 19. Up Key + Normal Mode: Tilt Up Menu Mode: Up 3. Down Key - Stand 18. Video ON/OFF Key V In monitor mode, press to turn OFF the LCD display Press again to Black/White) Talk Mode Battery... Power Adapter / Battery LED BLUE when mains adapter power on. RED when battery low. 11. Display (LCD screen) 2. Left Key < Normal Mode: Pan Left Menu Mode: Left 5. Right Key > Normal Mode: Pan Right Menu Mode: Right 6. Antenna Lift the antenna for optimal reception 16. Battery cover 17. Power Adapter Socket Parent unit ...
User Guide
Page 4
... weak, try moving the Parent and/or the Baby Unit to different positions in the rooms. Infared LEDs 4. Power LED 5. Photo Sensor (Night Vision Mode) 2. Microphone 6. Speaker 7. Pair Key Important guidelines for installing your Baby Monitor • To use your Video Monitor Baby and Parent Unit together, you must be able to establish a radio link between them, and the range will be affected by...
... weak, try moving the Parent and/or the Baby Unit to different positions in the rooms. Infared LEDs 4. Power LED 5. Photo Sensor (Night Vision Mode) 2. Microphone 6. Speaker 7. Pair Key Important guidelines for installing your Baby Monitor • To use your Video Monitor Baby and Parent Unit together, you must be able to establish a radio link between them, and the range will be affected by...
User Guide
Page 5
... a camera 14 Scan the cameras 14 5. General Information 19 Table of The Device (environment 15 6. Safety Instructions 6 2. Cleaning 16 7. Help 17 8. Using the Baby Monitor 11 3.1 Setting up 11 3.2 Pan and Tilt 11 3.3 Night Vision Mode 11 3.4 Talk Mode 11 3.5 Video ON/OFF 11 4. ENGLISH Table of contents 1. Getting Started 8 2.1 Baby Unit Power Supply 8 2.2 Parent Unit Battery Installation 8 2.3 Parent Unit Power Supply 9 2.4 Registration (Pairing 10 3.
... a camera 14 Scan the cameras 14 5. General Information 19 Table of The Device (environment 15 6. Safety Instructions 6 2. Cleaning 16 7. Help 17 8. Using the Baby Monitor 11 3.1 Setting up 11 3.2 Pan and Tilt 11 3.3 Night Vision Mode 11 3.4 Talk Mode 11 3.5 Video ON/OFF 11 4. ENGLISH Table of contents 1. Getting Started 8 2.1 Baby Unit Power Supply 8 2.2 Parent Unit Battery Installation 8 2.3 Parent Unit Power Supply 9 2.4 Registration (Pairing 10 3.
User Guide
Page 6
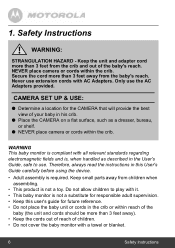
...baby (the unit and cords should be more than 3 feet away). • Keep the cords out of reach of the baby's reach. Keep small parts away from the crib and out of children. • Do not cover the baby monitor with AC Adapters. 1. NEVER place camera or cords within the crib. Safety Instructions... future reference. • Do not place the baby unit or cords in the User's Guide, safe to use. Therefore, always read the instructions in this user's guide for responsible adult supervision. • Keep this User's Guide carefully before using the device. • Adult ...
...baby (the unit and cords should be more than 3 feet away). • Keep the cords out of reach of the baby's reach. Keep small parts away from the crib and out of children. • Do not cover the baby monitor with AC Adapters. 1. NEVER place camera or cords within the crib. Safety Instructions... future reference. • Do not place the baby unit or cords in the User's Guide, safe to use. Therefore, always read the instructions in this user's guide for responsible adult supervision. • Keep this User's Guide carefully before using the device. • Adult ...
User Guide
Page 7
... actual use. • Do not use the baby monitor near water. • Do not install the baby monitor near a heat source. • Only use the chargers and power adapters provided. Only use the power adapters provided. • Test this may damage the device and battery pack. • Only insert a battery pack of explosion if battery is replaced by an incorrect type. CAUTION Risk of...
... actual use. • Do not use the baby monitor near water. • Do not install the baby monitor near a heat source. • Only use the chargers and power adapters provided. Only use the power adapters provided. • Test this may damage the device and battery pack. • Only insert a battery pack of explosion if battery is replaced by an incorrect type. CAUTION Risk of...

User Guide
Page 8
... 2.1 Baby Unit Power Supply 1. The power LED will light up in green. 3. Insert the wire tab of the power adapter to the baby unit and the other end to the electrical outlet. Slide the ON/OFF switch to turn the Baby Unit off. 2.2 Parent Unit Battery Installation Black Red 1. Small cross head or Flat end screw driver 8 Getting Started Connect the small plug of the rechargeable battery pack...
... 2.1 Baby Unit Power Supply 1. The power LED will light up in green. 3. Insert the wire tab of the power adapter to the baby unit and the other end to the electrical outlet. Slide the ON/OFF switch to turn the Baby Unit off. 2.2 Parent Unit Battery Installation Black Red 1. Small cross head or Flat end screw driver 8 Getting Started Connect the small plug of the rechargeable battery pack...

User Guide
Page 9
... the enclosed power adapter (6V DC/500mA). 2. NOTE The battery icon turns RED to turn OFF the parent unit. Connect the small plug of the power adapter to the parent unit and the other end to be shown on battery in a clockwise direction using a Small cross head or Flat end screw drivers. 2.3 Parent Unit Power Supply IMPORTANT Installing the rechargeable battery pack and charging it gives a beep every 16...
... the enclosed power adapter (6V DC/500mA). 2. NOTE The battery icon turns RED to turn OFF the parent unit. Connect the small plug of the power adapter to the parent unit and the other end to be shown on battery in a clockwise direction using a Small cross head or Flat end screw drivers. 2.3 Parent Unit Power Supply IMPORTANT Installing the rechargeable battery pack and charging it gives a beep every 16...

User Guide
Page 10
... button to confirm. 4. NOTE If a particular Baby Unit was registered previously, registering this current Baby Unit again will pop up . 3. If the parent unit is turned OFF, when the adapter is highlighted, and the del/add/view/scan menu will show that the battery is charging by a large battery icon with the Parent Unit. When charging 1. If the parent unit is turned ON, when the...
... button to confirm. 4. NOTE If a particular Baby Unit was registered previously, registering this current Baby Unit again will pop up . 3. If the parent unit is turned OFF, when the adapter is highlighted, and the del/add/view/scan menu will show that the battery is charging by a large battery icon with the Parent Unit. When charging 1. If the parent unit is turned ON, when the...
User Guide
Page 11
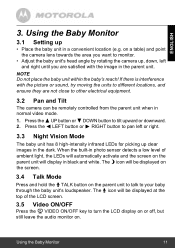
... the parent unit. NOTE Do not place the baby unit within the baby's reach! When the built-in photo sensor detects a low level of the LCD screen. 3.5 Video ON/OFF Press the V VIDEO ON/OFF key to turn the LCD display on or off, but still leave the audio monitor on the parent unit to talk to monitor. • Adjust the baby unit's head...
... the parent unit. NOTE Do not place the baby unit within the baby's reach! When the built-in photo sensor detects a low level of the LCD screen. 3.5 Video ON/OFF Press the V VIDEO ON/OFF key to turn the LCD display on or off, but still leave the audio monitor on the parent unit to talk to monitor. • Adjust the baby unit's head...
User Guide
Page 17
... the camera number, if necessary. • Is the video display turned on ? Disconnect the battery pack of range, so move the Baby Unit closer to synchronize. • See 2.4 Registration (Pairing), if there is still active and will go blank after 2 minutes to save power. Allow up to one minute for the Baby Unit and the Parent Unit to the Parent Unit. • Reset...
... the camera number, if necessary. • Is the video display turned on ? Disconnect the battery pack of range, so move the Baby Unit closer to synchronize. • See 2.4 Registration (Pairing), if there is still active and will go blank after 2 minutes to save power. Allow up to one minute for the Baby Unit and the Parent Unit to the Parent Unit. • Reset...
User Guide
Page 19
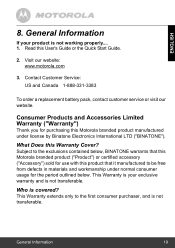
...-331-3383 To order a replacement battery pack, contact customer service or visit our website. This Warranty is your product is not transferable. Visit our website: www.motorola.com 3. This Warranty extends only to the first consumer purchaser, and is covered? Read this Warranty Cover? What Does this User's Guide or the Quick Start Guide. 2. General Information 19...
...-331-3383 To order a replacement battery pack, contact customer service or visit our website. This Warranty is your product is not transferable. Visit our website: www.motorola.com 3. This Warranty extends only to the first consumer purchaser, and is covered? Read this Warranty Cover? What Does this User's Guide or the Quick Start Guide. 2. General Information 19...

User Guide
Page 20
...This Warranty gives you specific legal rights, and you . ANY IMPLIED WARRANTIES, INCLUDING WITHOUT LIMITATION THE IMPLIED WARRANTIES OF MERCHANTABILITY AND FITNESS FOR A PARTICULAR PURPOSE, SHALL BE LIMITED TO THE DURATION OF THIS LIMITED WARRANTY, OTHERWISE THE REPAIR OR REPLACEMENT PROVIDED UNDER THIS EXPRESS...to you may use functionally equivalent reconditioned/ refurbished/ pre-owned or new Products, Accessories or parts. What Other Limitations Are There? IN NO EVENT SHALL MOTOROLA OR BINATONE BE LIABLE, WHETHER IN CONTRACT OR TORT (INCLUDING NEGLIGENCE) FOR DAMAGES IN EXCESS OF ...
...This Warranty gives you specific legal rights, and you . ANY IMPLIED WARRANTIES, INCLUDING WITHOUT LIMITATION THE IMPLIED WARRANTIES OF MERCHANTABILITY AND FITNESS FOR A PARTICULAR PURPOSE, SHALL BE LIMITED TO THE DURATION OF THIS LIMITED WARRANTY, OTHERWISE THE REPAIR OR REPLACEMENT PROVIDED UNDER THIS EXPRESS...to you may use functionally equivalent reconditioned/ refurbished/ pre-owned or new Products, Accessories or parts. What Other Limitations Are There? IN NO EVENT SHALL MOTOROLA OR BINATONE BE LIABLE, WHETHER IN CONTRACT OR TORT (INCLUDING NEGLIGENCE) FOR DAMAGES IN EXCESS OF ...
User Guide
Page 21
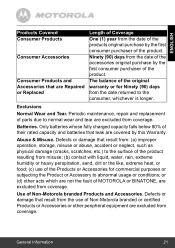
...MOTOROLA or BINATONE, are excluded from coverage. The balance of the original warranty or for commercial purposes or subjecting the Product or Accessory to abnormal usage or conditions; Only batteries whose fully charged capacity falls below 80% of their rated capacity and batteries that are Repaired or Replaced... purchase by the first consumer purchaser of the product. Exclusions Normal Wear and Tear. Periodic maintenance, repair and replacement of Non-Motorola branded Products and Accessories. Use of parts due to the consumer, whichever is longer. General Information 21
...MOTOROLA or BINATONE, are excluded from coverage. The balance of the original warranty or for commercial purposes or subjecting the Product or Accessory to abnormal usage or conditions; Only batteries whose fully charged capacity falls below 80% of their rated capacity and batteries that are Repaired or Replaced... purchase by the first consumer purchaser of the product. Exclusions Normal Wear and Tear. Periodic maintenance, repair and replacement of Non-Motorola branded Products and Accessories. Use of parts due to the consumer, whichever is longer. General Information 21
User Guide
Page 22
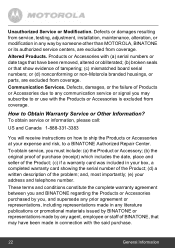
... card was included in your address and telephone number. How to a BINATONE Authorized Repair Center. and, most importantly; (e) your box, a completed warranty card showing the serial number of the Product; (d) a written description of the problem; or (d) nonconforming or non-Motorola branded housings, or parts, are excluded from coverage. To obtain service, you must include: (a) the Product or Accessory...
... card was included in your address and telephone number. How to a BINATONE Authorized Repair Center. and, most importantly; (e) your box, a completed warranty card showing the serial number of the Product; (d) a written description of the problem; or (d) nonconforming or non-Motorola branded housings, or parts, are excluded from coverage. To obtain service, you must include: (a) the Product or Accessory...

User Guide
Page 23
... received, including interference that may cause undesired operation. The Baby unit shall be installed and used in accordance with the instructions, may not be safely absorbed by the party responsible for compliance could void the user's authority to the following measures: • Reorient or relocate... frequency energy and, if not installed and used such that interference will not occur in a particular installation. This Class B digital apparatus complies with Part 15 of the product. General Information 23 ENGLISH FCC and IC regulations FCC Part l5 NOTE: This equipment has...
... received, including interference that may cause undesired operation. The Baby unit shall be installed and used in accordance with the instructions, may not be safely absorbed by the party responsible for compliance could void the user's authority to the following measures: • Reorient or relocate... frequency energy and, if not installed and used such that interference will not occur in a particular installation. This Class B digital apparatus complies with Part 15 of the product. General Information 23 ENGLISH FCC and IC regulations FCC Part l5 NOTE: This equipment has...
User Guide
Page 25
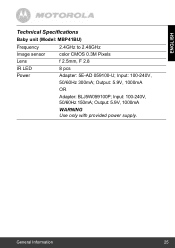
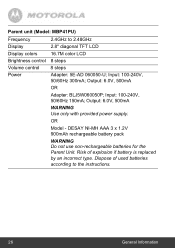
Output: 5.9V, 1000mA OR Adapter: BLJ5W059100P; Output: 5.9V, 1000mA WARNING Use only with provided power supply. ENGLISH Technical Specifications Baby unit (Model: MBP41BU) Frequency 2.4GHz to 2.48GHz Image sensor color CMOS 0.3M Pixels Lens f 2.5mm, F 2.8 IR LED 8 pcs Power Adapter: 5E-AD 059100-U; Input: 100-240V, 50/60Hz 300mA; General Information 25 Input: 100-240V, 50/60Hz 150mA;
Output: 5.9V, 1000mA OR Adapter: BLJ5W059100P; Output: 5.9V, 1000mA WARNING Use only with provided power supply. ENGLISH Technical Specifications Baby unit (Model: MBP41BU) Frequency 2.4GHz to 2.48GHz Image sensor color CMOS 0.3M Pixels Lens f 2.5mm, F 2.8 IR LED 8 pcs Power Adapter: 5E-AD 059100-U; Input: 100-240V, 50/60Hz 300mA; General Information 25 Input: 100-240V, 50/60Hz 150mA;
User Guide
Page 26
... Brightness control 8 steps Volume control 8 steps Power Adapter: 5E-AD 060050-U; Input: 100-240V, 50/60Hz 300mA; DESAY NI-MH AAA 3 x 1.2V 900mAh rechargeable battery pack WARNING Do not use non-rechargeable batteries for the Parent Unit. Parent unit (Model: MBP41PU) Frequency 2.4GHz to the instructions. 26 General Information Dispose of explosion if battery is replaced by an incorrect type. Output: 6.0V...
... Brightness control 8 steps Volume control 8 steps Power Adapter: 5E-AD 060050-U; Input: 100-240V, 50/60Hz 300mA; DESAY NI-MH AAA 3 x 1.2V 900mAh rechargeable battery pack WARNING Do not use non-rechargeable batteries for the Parent Unit. Parent unit (Model: MBP41PU) Frequency 2.4GHz to the instructions. 26 General Information Dispose of explosion if battery is replaced by an incorrect type. Output: 6.0V...

User Guide
Page 27
All rights reserved. and are trademarks or registered trademarks of their respective owners. © 2013 Motorola Mobility LLC. All other trademarks are the property of Motorola Trademark Holdings, LLC. MOTOROLA and the Stylized M Logo, are used under license. Version 3.0 Printed in China Manufactured, distributed or sold by Binatone Electronics International LTD., official licensee for this product.
All rights reserved. and are trademarks or registered trademarks of their respective owners. © 2013 Motorola Mobility LLC. All other trademarks are the property of Motorola Trademark Holdings, LLC. MOTOROLA and the Stylized M Logo, are used under license. Version 3.0 Printed in China Manufactured, distributed or sold by Binatone Electronics International LTD., official licensee for this product.


