
Quick Guide
Page 1
... • Connect the small plug of the rechargeable battery pack into the contact slot as shown above and fit the battery pack into the compartment. MBP36 -
... • Connect the small plug of the rechargeable battery pack into the contact slot as shown above and fit the battery pack into the compartment. MBP36 -

User Manual
Page 1
USER'S GUIDE MBP36 BABY MONITOR USER'S GUIDE The features described in user's guide are subject to modifications without prior notice.
USER'S GUIDE MBP36 BABY MONITOR USER'S GUIDE The features described in user's guide are subject to modifications without prior notice.

User Manual
Page 2
...; 1 x Baby unit • 1 x Rechargeable Ni-MH battery pack for the parent unit • 1 x Power adapter for the Parent unit • 1 x Power adapter for purchasing the MBP36.
...; 1 x Baby unit • 1 x Rechargeable Ni-MH battery pack for the parent unit • 1 x Power adapter for the Parent unit • 1 x Power adapter for purchasing the MBP36.

User Manual
Page 5
Using the Baby Monitor MBP36 11 3.1 Setting up 11 3.2 Pan and Tilt 11 3.3 Night Vision Mode 11 3.4 Talk Mode 11 3.5 Video ON/OFF 11 3.6 Temperature Display (HH ºC / ºF or ... 8 2.2 Parent Unit Battery Installation 8 2.3 Parent Unit Power Supply 9 2.4 Registration (Pairing 10 2.5 View Video Through TV 10 3. General Information 19 Table of The Device (environment 15 6. MBP36 Parent Unit Menu Options 12 4.1 Volume 12 4.2 Brightness 12 4.3 Lullaby 12 4.4 Zoom 12 4.5 Alarm 13 4.6 Camera Control 13 4.6.1 Add (pair) a camera 13 4.6.2 View a camera 13...
Using the Baby Monitor MBP36 11 3.1 Setting up 11 3.2 Pan and Tilt 11 3.3 Night Vision Mode 11 3.4 Talk Mode 11 3.5 Video ON/OFF 11 3.6 Temperature Display (HH ºC / ºF or ... 8 2.2 Parent Unit Battery Installation 8 2.3 Parent Unit Power Supply 9 2.4 Registration (Pairing 10 2.5 View Video Through TV 10 3. General Information 19 Table of The Device (environment 15 6. MBP36 Parent Unit Menu Options 12 4.1 Volume 12 4.2 Brightness 12 4.3 Lullaby 12 4.4 Zoom 12 4.5 Alarm 13 4.6 Camera Control 13 4.6.1 Add (pair) a camera 13 4.6.2 View a camera 13...
User Manual
Page 11
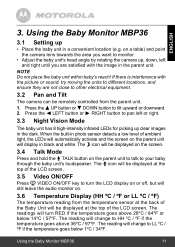
...TALK button on . 3.6 Temperature Display (HH ºC / ºF or LL ºC / ºF) The temperature reading from the parent unit. 1. Using the Baby Monitor MBP36 3.1 Setting up clear images in black and white. If there is interference with the image in the parent unit. DOWN button to other electrical equipment...to your baby through the baby unit's loudspeaker. The T icon will be displayed at the top of the LCD screen. Using the Baby Monitor MBP36 11 Press the + UP button or - The readings will change to turn RED if the temperature goes above 36ºC / 97ºF. ...
...TALK button on . 3.6 Temperature Display (HH ºC / ºF or LL ºC / ºF) The temperature reading from the parent unit. 1. Using the Baby Monitor MBP36 3.1 Setting up clear images in black and white. If there is interference with the image in the parent unit. DOWN button to other electrical equipment...to your baby through the baby unit's loudspeaker. The T icon will be displayed at the top of the LCD screen. Using the Baby Monitor MBP36 11 Press the + UP button or - The readings will change to turn RED if the temperature goes above 36ºC / 97ºF. ...

User Manual
Page 12
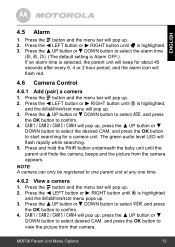
... button or - Press the < LEFT button or > button until & is highlighted. 3. DOWN button to play once and then stop. (The default setting is 1X.) 12 MBP36 Parent Unit Menu Options DOWN button to select the desired song from the 5 lullabies available, or the cycle option to select the desired volume level... individual song is level 4.) 4.3 Lullaby 1. Press the + UP button or - Press the + UP button or - Press the M button and the menu bar will pop up . 2. MBP36 Parent Unit Menu Options 4.1 Volume 1.
... button or - Press the < LEFT button or > button until & is highlighted. 3. DOWN button to play once and then stop. (The default setting is 1X.) 12 MBP36 Parent Unit Menu Options DOWN button to select the desired song from the 5 lullabies available, or the cycle option to select the desired volume level... individual song is level 4.) 4.3 Lullaby 1. Press the + UP button or - Press the + UP button or - Press the M button and the menu bar will pop up . 2. MBP36 Parent Unit Menu Options 4.1 Volume 1.
User Manual
Page 13
... - Press the + UP button or - Press the + UP button or - CAM 1 / CAM 2 / CAM 3 / CAM 4 will pop up . 3. NOTE A camera can only be registered to confirm. 4. MBP36 Parent Unit Menu Options 13 DOWN button to select ADD, and press the OK button to one parent unit at any one time. 4.6.2 View a camera...
... - Press the + UP button or - Press the + UP button or - CAM 1 / CAM 2 / CAM 3 / CAM 4 will pop up . 3. NOTE A camera can only be registered to confirm. 4. MBP36 Parent Unit Menu Options 13 DOWN button to select ADD, and press the OK button to one parent unit at any one time. 4.6.2 View a camera...

User Manual
Page 14
... 2, CAM 3, CAM 4, SCAN. 4.6.3 Delete a camera 1. DOWN button to select CAM 1, CAM 2, CAM 3, CAM 4, SCAN. 4.7 Temperature 1. Directly press OK repeatedly to select ºC or ºF. 14 MBP36 Parent Unit Menu Options Press the < LEFT button or > RIGHT button until C is highlighted, and the del/add/view/scan menu will pop up . 2. TIP...
... 2, CAM 3, CAM 4, SCAN. 4.6.3 Delete a camera 1. DOWN button to select CAM 1, CAM 2, CAM 3, CAM 4, SCAN. 4.7 Temperature 1. Directly press OK repeatedly to select ºC or ºF. 14 MBP36 Parent Unit Menu Options Press the < LEFT button or > RIGHT button until C is highlighted, and the del/add/view/scan menu will pop up . 2. TIP...

User Manual
Page 16
Cleaning Clean the MBP36 with a slightly damp cloth or with thinners or other solvents and chemicals -- However, if something does go wrong, please do not try to ensure high ... with an anti-static cloth. Cleaning and care • Do not clean any part of reliability for assistance. 16 Cleaning contact Customer Service for your MBP36 away from hot, humid areas or strong sunlight, and don't let it get wet. • Every effort has been made to repair it yourself -- 6. this...
Cleaning Clean the MBP36 with a slightly damp cloth or with thinners or other solvents and chemicals -- However, if something does go wrong, please do not try to ensure high ... with an anti-static cloth. Cleaning and care • Do not clean any part of reliability for assistance. 16 Cleaning contact Customer Service for your MBP36 away from hot, humid areas or strong sunlight, and don't let it get wet. • Every effort has been made to repair it yourself -- 6. this...

