
Quick Guide
Page 1
... and instructions, please refer to the electrical outlet. • Only use the enclosed adapter (5.9V DC/ 1000mA). Black Red • Insert the wire tab of the power adapter to the baby unit and the other end to the User's Guide. 1 Setting up your digital baby monitor A Connecting power supply for the Baby unit B Installing the battery pack for the Parent unit • Connect the small plug of the power adapter to the parent unit...
... and instructions, please refer to the electrical outlet. • Only use the enclosed adapter (5.9V DC/ 1000mA). Black Red • Insert the wire tab of the power adapter to the baby unit and the other end to the User's Guide. 1 Setting up your digital baby monitor A Connecting power supply for the Baby unit B Installing the battery pack for the Parent unit • Connect the small plug of the power adapter to the parent unit...

Quick Guide
Page 2
... exit. All rights reserved. Contact Customer Service: US and Canada 1-888-331-3383 UK 0845 218 0890 ROI 08187 62092 Manufactured, distributed or sold by Binatone Electronics International LTD., official licensee for this Quick Start Guide or the User's Guide. 2. Press to switch off the unit. Read this product. Push power switch to the left or right...
... exit. All rights reserved. Contact Customer Service: US and Canada 1-888-331-3383 UK 0845 218 0890 ROI 08187 62092 Manufactured, distributed or sold by Binatone Electronics International LTD., official licensee for this Quick Start Guide or the User's Guide. 2. Press to switch off the unit. Read this product. Push power switch to the left or right...

User Manual
Page 1
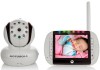
USER'S GUIDE MBP36 BABY MONITOR USER'S GUIDE The features described in user's guide are subject to modifications without prior notice.
USER'S GUIDE MBP36 BABY MONITOR USER'S GUIDE The features described in user's guide are subject to modifications without prior notice.

User Manual
Page 2
... can use the baby monitor, we recommend you insert and fully charge the battery in their playroom. Please retain your Motorola product, you for the Baby unit Registration is not required for your new Motorola Baby Monitor! to another location. Got everything? • 1 x Parent unit • 1 x Baby unit • 1 x Rechargeable Ni-MH battery pack for the parent unit • 1 x Power adapter for the Parent unit • 1 x Power adapter for purchasing the MBP36. Thank you...
... can use the baby monitor, we recommend you insert and fully charge the battery in their playroom. Please retain your Motorola product, you for the Baby unit Registration is not required for your new Motorola Baby Monitor! to another location. Got everything? • 1 x Parent unit • 1 x Baby unit • 1 x Rechargeable Ni-MH battery pack for the parent unit • 1 x Power adapter for the Parent unit • 1 x Power adapter for purchasing the MBP36. Thank you...

User Manual
Page 3
...Down Menu Mode: Down 4. RED when battery low. 11. Power Key P Press and Hold to turn the unit ON/OFF 15. Stand 18. Power Adapter connector Parent unit menu icons 1 Signal Level (5 Levels) N Night Vision Mode (Screen changes to be purchased separately) 20. Down Key - Video ON/OFF Key V Press ...Tilt Down Audio Level LED (Green, Orange, Red, Red) 13. Battery cover 17. Right Key > Normal Mode: Pan Right Menu Mode: Right 6. Menu Key M Press to your baby 10. Talk Key T Press and hold to speak to open the Menu options 7. Overview of the Parent Unit 10 11 12 14 1 15 2 6 ...
...Down Menu Mode: Down 4. RED when battery low. 11. Power Key P Press and Hold to turn the unit ON/OFF 15. Stand 18. Power Adapter connector Parent unit menu icons 1 Signal Level (5 Levels) N Night Vision Mode (Screen changes to be purchased separately) 20. Down Key - Video ON/OFF Key V Press ...Tilt Down Audio Level LED (Green, Orange, Red, Red) 13. Battery cover 17. Right Key > Normal Mode: Pan Right Menu Mode: Right 6. Menu Key M Press to your baby 10. Talk Key T Press and hold to speak to open the Menu options 7. Overview of the Parent Unit 10 11 12 14 1 15 2 6 ...

User Manual
Page 4
.../OFF Switch 8. Power Adapter Connector 9. Power LED 5. Pair Key Important guidelines for installing your Baby Monitor • To use your Video Monitor Baby and Parent Unit together, you must be able to different positions in the rooms. Speaker 7. Temperature Sensor 11. Parent unit menu icons (cont...lights or dimmer switches. • Use of other 2.4GHz products, such as wireless networks (WiFi routers), Bluetooth® systems, or microwave ovens, may cause interference with this product, so keep the baby monitor away at least 5ft (1m) from these types of products, or turn RED...
.../OFF Switch 8. Power Adapter Connector 9. Power LED 5. Pair Key Important guidelines for installing your Baby Monitor • To use your Video Monitor Baby and Parent Unit together, you must be able to different positions in the rooms. Speaker 7. Temperature Sensor 11. Parent unit menu icons (cont...lights or dimmer switches. • Use of other 2.4GHz products, such as wireless networks (WiFi routers), Bluetooth® systems, or microwave ovens, may cause interference with this product, so keep the baby monitor away at least 5ft (1m) from these types of products, or turn RED...

User Manual
Page 5
... 4.6.2 View a camera 13 4.6.3 Delete a camera 14 4.6.4 Scan camera 14 4.7 Temperature 14 5. Getting Started 8 2.1 Baby Unit Power Supply 8 2.2 Parent Unit Battery Installation 8 2.3 Parent Unit Power Supply 9 2.4 Registration (Pairing 10 2.5 View Video Through TV 10 3. Disposal of contents 5 General Information 19 Table of The Device (environment 15 6. Using the Baby Monitor MBP36 11 3.1 Setting up 11 3.2 Pan and Tilt 11 3.3 Night Vision Mode 11 3.4 Talk Mode 11...
... 4.6.2 View a camera 13 4.6.3 Delete a camera 14 4.6.4 Scan camera 14 4.7 Temperature 14 5. Getting Started 8 2.1 Baby Unit Power Supply 8 2.2 Parent Unit Battery Installation 8 2.3 Parent Unit Power Supply 9 2.4 Registration (Pairing 10 2.5 View Video Through TV 10 3. Disposal of contents 5 General Information 19 Table of The Device (environment 15 6. Using the Baby Monitor MBP36 11 3.1 Setting up 11 3.2 Pan and Tilt 11 3.3 Night Vision Mode 11 3.4 Talk Mode 11...

User Manual
Page 6
... AC Adapters provided. Only use extension cords with it. • This baby monitor is not a substitute for responsible adult supervision. • Keep this user's guide for the CAMERA that will provide the best view of baby's reach. Do not allow children to keep cord away from the baby's reach. Safety Instructions WARNING: STRANGULATION HAZARD - Keep small parts away from baby's reach. CAMERA SET...
... AC Adapters provided. Only use extension cords with it. • This baby monitor is not a substitute for responsible adult supervision. • Keep this user's guide for the CAMERA that will provide the best view of baby's reach. Do not allow children to keep cord away from the baby's reach. Safety Instructions WARNING: STRANGULATION HAZARD - Keep small parts away from baby's reach. CAMERA SET...

User Manual
Page 7
... use. • Do not use the baby monitor near water. • Do not install the baby monitor near a heat source. • Only use the chargers and power adapters provided. Safety Instructions 7 Only use the power adapters provided. • Test this may damage the device and battery pack. • Only insert a battery pack of explosion if battery is replaced by an incorrect type. CAUTION Risk of...
... use. • Do not use the baby monitor near water. • Do not install the baby monitor near a heat source. • Only use the chargers and power adapters provided. Safety Instructions 7 Only use the power adapters provided. • Test this may damage the device and battery pack. • Only insert a battery pack of explosion if battery is replaced by an incorrect type. CAUTION Risk of...

User Manual
Page 8
... power adapter to the baby unit and the other end to the electrical outlet. Slide the ON/OFF switch to turn the Baby Unit off. 2.2 Parent Unit Battery Installation Black Red 1. The power LED will light up in a clockwise direction using a Small cross head or Flat end screw drivers. 8 Getting Started Slide the ON/OFF switch to the OFF position to the ON position. Replace...
... power adapter to the baby unit and the other end to the electrical outlet. Slide the ON/OFF switch to turn the Baby Unit off. 2.2 Parent Unit Battery Installation Black Red 1. The power LED will light up in a clockwise direction using a Small cross head or Flat end screw drivers. 8 Getting Started Slide the ON/OFF switch to the OFF position to the ON position. Replace...

User Manual
Page 9
... battery in . 0 Getting Started 9 Press and hold the P POWER ON/OFF button, until the link is plugged in, a adapter logo will display on the parent unit will show the video captured by the baby unit. 4. Press and hold the P POWER ON/OFF button for 45 sec. When charging 1. During power OFF, when adapter is re-established. 5. Connect the small plug of range, the video...
... battery in . 0 Getting Started 9 Press and hold the P POWER ON/OFF button, until the link is plugged in, a adapter logo will display on the parent unit will show the video captured by the baby unit. 4. Press and hold the P POWER ON/OFF button for 45 sec. When charging 1. During power OFF, when adapter is re-established. 5. Connect the small plug of range, the video...

User Manual
Page 10
...light up . 3. NOTE The Monitor's power button must be activated. 10 Getting Started During power ON, when adapter is plugged in, the battery icon on screen's top right corner will pop up indicates adapter is plugged in. 2.4 Registration (Pairing) The Baby monitor is charging. Press the M button of the parent unit...of the Parent Unit and into the AV OUT socket on the TV menu until the parent unit finds the camera, beeps and the video from the camera appears. Press and hold the PAIR button underneath the baby unit until the Baby monitor picture is connected, the Monitor's controls ...
...light up . 3. NOTE The Monitor's power button must be activated. 10 Getting Started During power ON, when adapter is plugged in, the battery icon on screen's top right corner will pop up indicates adapter is plugged in. 2.4 Registration (Pairing) The Baby monitor is charging. Press the M button of the parent unit...of the Parent Unit and into the AV OUT socket on the TV menu until the parent unit finds the camera, beeps and the video from the camera appears. Press and hold the PAIR button underneath the baby unit until the Baby monitor picture is connected, the Monitor's controls ...
User Manual
Page 11
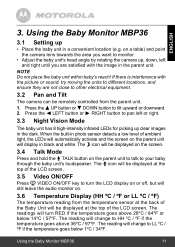
... ambient light, the LEDs will automatically activate and the screen on the parent unit to talk to LL ºC / ºF if the temperature goes below 14ºC / 57ºF. The readings will turn the LCD display on . 3.6 Temperature Display (HH ºC / ºF or LL ºC / ºF) The temperature reading from the parent unit. 1. Using the Baby Monitor MBP36 3.1 Setting...
... ambient light, the LEDs will automatically activate and the screen on the parent unit to talk to LL ºC / ºF if the temperature goes below 14ºC / 57ºF. The readings will turn the LCD display on . 3.6 Temperature Display (HH ºC / ºF or LL ºC / ºF) The temperature reading from the parent unit. 1. Using the Baby Monitor MBP36 3.1 Setting...

User Manual
Page 17
... the parent unit and unplug both the units' electrical power, then plug them from the battery and electrical power. Wait about 15 seconds before reconnecting. ENGLISH 7. Change the camera number, if necessary. • Is the video display turned on ? Disconnect the battery pack of range, so move the Baby Unit closer to turn it on the parent unit to the Parent Unit. • Reset the units by...
... the parent unit and unplug both the units' electrical power, then plug them from the battery and electrical power. Wait about 15 seconds before reconnecting. ENGLISH 7. Change the camera number, if necessary. • Is the video display turned on ? Disconnect the battery pack of range, so move the Baby Unit closer to turn it on the parent unit to the Parent Unit. • Reset the units by...
User Manual
Page 19
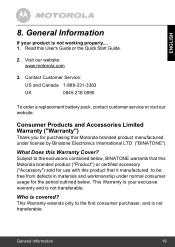
...-331-3383 UK 0845 218 0890 To order a replacement battery pack, contact customer service or visit our website. Consumer Products and Accessories Limited Warranty ("Warranty") Thank you for use with this Motorola branded product manufactured under normal consumer usage for the period outlined below , BINATONE warrants that this Motorola branded product ("Product") or certified accessory ("Accessory...
...-331-3383 UK 0845 218 0890 To order a replacement battery pack, contact customer service or visit our website. Consumer Products and Accessories Limited Warranty ("Warranty") Thank you for use with this Motorola branded product manufactured under normal consumer usage for the period outlined below , BINATONE warrants that this Motorola branded product ("Product") or certified accessory ("Accessory...

User Manual
Page 21
... to the consumer, whichever is longer. Batteries. or (d) other peripheral equipment are excluded from the date returned to abnormal usage or conditions; Defects or damage that result from the use of the Products or Accessories for Ninety (90) days from coverage. Periodic maintenance, repair and replacement of parts due to the surface of the...
... to the consumer, whichever is longer. Batteries. or (d) other peripheral equipment are excluded from the date returned to abnormal usage or conditions; Defects or damage that result from the use of the Products or Accessories for Ninety (90) days from coverage. Periodic maintenance, repair and replacement of parts due to the surface of the...

User Manual
Page 22
... a BINATONE Authorized Repair Center. To obtain service, you and BINATONE. Altered Products. To obtain service or information, please call: US and Canada 1-888-331-3383 UK 0845 218 0890 You will receive instructions on how to Obtain Warranty Service or Other Information? Communication Services. Defects, damages, or the failure of the problem; or (d) nonconforming or non-Motorola branded housings, or parts...
... a BINATONE Authorized Repair Center. To obtain service, you and BINATONE. Altered Products. To obtain service or information, please call: US and Canada 1-888-331-3383 UK 0845 218 0890 You will receive instructions on how to Obtain Warranty Service or Other Information? Communication Services. Defects, damages, or the failure of the problem; or (d) nonconforming or non-Motorola branded housings, or parts...

User Manual
Page 25
Output: 5.9V, 1000mA WARNING Use only with provided power supply. ENGLISH Technical Specifications Baby unit (Model: MBP36BU) Frequency 2.4GHz to 2.48GHz Image sensor colour / color CMOS 30M Pixels Lens f 2.5mm, F 2.8 IR LED 8 pcs Power Adapter: SCE0591000P; Input: 100-240V, 50/60Hz 300mA; FCC ID VLJ - Input: 100-240V, 50/60Hz 150mA; MBP36BU IC ID 4522A- MBP36BU General Information 25 Output: 5.9V, 1000mA OR Adapter: BLJ5W059100P;
Output: 5.9V, 1000mA WARNING Use only with provided power supply. ENGLISH Technical Specifications Baby unit (Model: MBP36BU) Frequency 2.4GHz to 2.48GHz Image sensor colour / color CMOS 30M Pixels Lens f 2.5mm, F 2.8 IR LED 8 pcs Power Adapter: SCE0591000P; Input: 100-240V, 50/60Hz 300mA; FCC ID VLJ - Input: 100-240V, 50/60Hz 150mA; MBP36BU IC ID 4522A- MBP36BU General Information 25 Output: 5.9V, 1000mA OR Adapter: BLJ5W059100P;
User Manual
Page 26
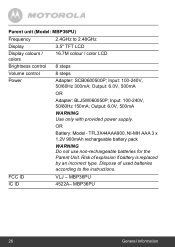
... if battery is replaced by an incorrect type. TFL3X44AAA900, NI-MH AAA 3 x 1.2V 900mAh rechargeable battery pack WARNING Do not use non-rechargeable batteries for the Parent Unit. Input: 100-240V, 50/60Hz 150mA; MBP36PU 26 General Information Output: 6.0V, 500mA OR Adapter: BLJ5W060050P; Parent unit (Model: MBP36PU) Frequency Display Display colours / colors Brightness control Volume control Power 2.4GHz to the instructions...
... if battery is replaced by an incorrect type. TFL3X44AAA900, NI-MH AAA 3 x 1.2V 900mAh rechargeable battery pack WARNING Do not use non-rechargeable batteries for the Parent Unit. Input: 100-240V, 50/60Hz 150mA; MBP36PU 26 General Information Output: 6.0V, 500mA OR Adapter: BLJ5W060050P; Parent unit (Model: MBP36PU) Frequency Display Display colours / colors Brightness control Volume control Power 2.4GHz to the instructions...

User Manual
Page 27
... Product Operation Director) London, 10 Apr 11 Place & Date Manufacturer / Importer (Signature of the product voids this Declaration. BINATONE TELECOM PLC 1 Apsley Way London NW2 7HF,United Kingdom. Assessment of compliance of the product with the requirements relating to the essential requirements according to Article 3 R&TTE was ...Council Directive 2004/108/EC on Annex III of the Directive 1999/5/EC and the following product Type of equipment: Model Name: Digital Baby Monitor MBP 36 Country of Origin: Brand: China Motorola complies with the European Approval Marking CE as show.
... Product Operation Director) London, 10 Apr 11 Place & Date Manufacturer / Importer (Signature of the product voids this Declaration. BINATONE TELECOM PLC 1 Apsley Way London NW2 7HF,United Kingdom. Assessment of compliance of the product with the requirements relating to the essential requirements according to Article 3 R&TTE was ...Council Directive 2004/108/EC on Annex III of the Directive 1999/5/EC and the following product Type of equipment: Model Name: Digital Baby Monitor MBP 36 Country of Origin: Brand: China Motorola complies with the European Approval Marking CE as show.


