Quick Guide
Page 1
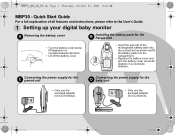
MBP30_QSG_EN_PE.fm Page 1 Thursday, October 22, 2009 9:42 AM MBP30 - Quick Start Guide For a full explanation of all features and instructions, please refer to the User's Guide. 1 Setting up your digital baby monitor A Removing the battery cover B Installing the battery pack for the baby unit • ...
MBP30_QSG_EN_PE.fm Page 1 Thursday, October 22, 2009 9:42 AM MBP30 - Quick Start Guide For a full explanation of all features and instructions, please refer to the User's Guide. 1 Setting up your digital baby monitor A Removing the battery cover B Installing the battery pack for the baby unit • ...

User Manual
Page 2
...the battery in the Parent unit, so that it continues to work if you disconnect it to confirm warranty status. Please read the Safety Instructions on page 6 before you will need to get the most from the mains power to carry it from your dated sales receipt to another... warranty coverage. to provide a copy of your product. Thank you need to your records. Please retain your original dated sales receipt for purchasing the MBP30. For product related questions, please call: +44(0) 845 218 0890 in the UK +65(0) 68412668 in their playroom. For warranty service of your...
...the battery in the Parent unit, so that it continues to work if you disconnect it to confirm warranty status. Please read the Safety Instructions on page 6 before you will need to get the most from the mains power to carry it from your dated sales receipt to another... warranty coverage. to provide a copy of your product. Thank you need to your records. Please retain your original dated sales receipt for purchasing the MBP30. For product related questions, please call: +44(0) 845 218 0890 in the UK +65(0) 68412668 in their playroom. For warranty service of your...
User Manual
Page 5
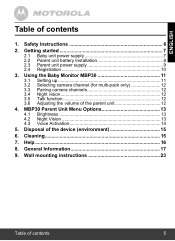
Using the Baby Monitor MBP30 11 3.1 Setting up 11 3.2 Selecting camera channel (for multi-pack only 12 3.3 Pairing camera channels 12 3.4 Night vision 12 3.5 Talk function 12 ...unit power supply 7 2.2 Parent unit battery Installation 8 2.3 Parent unit power supply 9 2.4 Registration 10 3. General Information 17 9. MBP30 Parent Unit Menu Options 13 4.1 Brightness 13 4.2 Night Vision 13 4.3 Voice Activation 14 5. Safety Instructions 6 2. Wall mounting instructions 23 Table of the parent unit 12 4. Disposal of contents 1. ENGLISH Table of the device (environment 15...
Using the Baby Monitor MBP30 11 3.1 Setting up 11 3.2 Selecting camera channel (for multi-pack only 12 3.3 Pairing camera channels 12 3.4 Night vision 12 3.5 Talk function 12 ...unit power supply 7 2.2 Parent unit battery Installation 8 2.3 Parent unit power supply 9 2.4 Registration 10 3. General Information 17 9. MBP30 Parent Unit Menu Options 13 4.1 Brightness 13 4.2 Night Vision 13 4.3 Voice Activation 14 5. Safety Instructions 6 2. Wall mounting instructions 23 Table of the parent unit 12 4. Disposal of contents 1. ENGLISH Table of the device (environment 15...

User Manual
Page 6
... battery is , when handled as this User's Guide carefully before use the chargers and power adapters provided. Therefore, always read the instructions in the User's Guide, safe to the instructions. 6 Safety Instructions Do not use . CAUTION Risk of the same type. • Do not touch the plug contacts with all relevant standards regarding... is replaced by an incorrect type. Keep small parts away from children when assembling. • This product is compliant with sharp or metal objects. Safety Instructions WARNING This baby monitor is not a toy.
... battery is , when handled as this User's Guide carefully before use the chargers and power adapters provided. Therefore, always read the instructions in the User's Guide, safe to the instructions. 6 Safety Instructions Do not use . CAUTION Risk of the same type. • Do not touch the plug contacts with all relevant standards regarding... is replaced by an incorrect type. Keep small parts away from children when assembling. • This product is compliant with sharp or metal objects. Safety Instructions WARNING This baby monitor is not a toy.

User Manual
Page 11
... towards the area you are not close to monitor. • Adjust the baby unit until you want to other electrical equipment. Using the Baby Monitor MBP30 3.1 Setting up • Place the baby unit in the parent unit. • To wall mount your baby unit, see section "9. on the picture or sound... locations, and ensure they are satisfied with the image in a convenient location (e.g. NOTE Do not place the baby unit within baby's reach! ENGLISH 3. Wall mounting instructions" for more details. Using the Baby Monitor MBP30 11
... towards the area you are not close to monitor. • Adjust the baby unit until you want to other electrical equipment. Using the Baby Monitor MBP30 3.1 Setting up • Place the baby unit in the parent unit. • To wall mount your baby unit, see section "9. on the picture or sound... locations, and ensure they are satisfied with the image in a convenient location (e.g. NOTE Do not place the baby unit within baby's reach! ENGLISH 3. Wall mounting instructions" for more details. Using the Baby Monitor MBP30 11
User Manual
Page 20
... use with the Products or Accessories is excluded from service, testing, adjustment, installation, maintenance, alteration, or modification in the user instructions that came with the Products or Accessories; (c) contact with liquid, water, rain, extreme humidity or heavy perspiration, sand, dirt... (d) nonconforming or non-Motorola branded housings, or parts, are excluded from misuse; (b) your failure to or use of Motorola or Binatone Electronics International LTD., are excluded from coverage. or (e) other external cause, such as physical damage (cracks, scratches, etc.) to abnormal...
... use with the Products or Accessories is excluded from service, testing, adjustment, installation, maintenance, alteration, or modification in the user instructions that came with the Products or Accessories; (c) contact with liquid, water, rain, extreme humidity or heavy perspiration, sand, dirt... (d) nonconforming or non-Motorola branded housings, or parts, are excluded from misuse; (b) your failure to or use of Motorola or Binatone Electronics International LTD., are excluded from coverage. or (e) other external cause, such as physical damage (cracks, scratches, etc.) to abnormal...
User Manual
Page 21
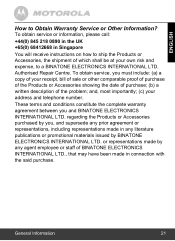
...of sale or other comparable proof of purchase of the Products or Accessories showing the date of purchase; (b) a written description of BINATONE ELECTRONICS INTERNATIONAL LTD., that may have been made in connection with the said purchase. Authorised Repair Centre. regarding the Products or Accessories...ENGLISH How to a BINATONE ELECTRONICS INTERNATIONAL LTD. To obtain service, you must include: (a) a copy of which shall be at your own risk and expense, to Obtain Warranty Service or Other Information? or representations made in Singapore You will receive instructions on how to ship...
...of sale or other comparable proof of purchase of the Products or Accessories showing the date of purchase; (b) a written description of BINATONE ELECTRONICS INTERNATIONAL LTD., that may have been made in connection with the said purchase. Authorised Repair Centre. regarding the Products or Accessories...ENGLISH How to a BINATONE ELECTRONICS INTERNATIONAL LTD. To obtain service, you must include: (a) a copy of which shall be at your own risk and expense, to Obtain Warranty Service or Other Information? or representations made in Singapore You will receive instructions on how to ship...
User Manual
Page 22
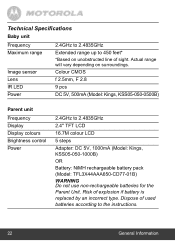
... type. Colour CMOS f 2.5mm, F 2.8 9 pcs DC 5V, 500mA (Model: Kings, KSS05-050-0500B) Parent unit Frequency Display Display colours Brightness control Power 2.4GHz to the instructions. 22 General Information
... type. Colour CMOS f 2.5mm, F 2.8 9 pcs DC 5V, 500mA (Model: Kings, KSS05-050-0500B) Parent unit Frequency Display Display colours Brightness control Power 2.4GHz to the instructions. 22 General Information
User Manual
Page 23
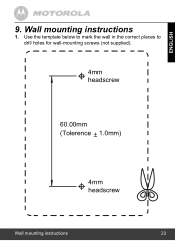
Use the template below to mark the wall in the correct places to drill holes for wall-mounting screws (not supplied). 4h8hemmeamadmdscsrcerwew 60.00mm (Tolerence 1.0mm) 4h9hem.e5aammddsmcsrcerwew Wall mounting instructions 23 ENGLISH 9. Wall mounting instructions 1.
Use the template below to mark the wall in the correct places to drill holes for wall-mounting screws (not supplied). 4h8hemmeamadmdscsrcerwew 60.00mm (Tolerence 1.0mm) 4h9hem.e5aammddsmcsrcerwew Wall mounting instructions 23 ENGLISH 9. Wall mounting instructions 1.

User Manual
Page 25
Adjust the baby unit until you want to monitor. Then, align your baby unit with the image in the parent unit. Insert 4mm head screws (not supplied) into the holes and tighten the screws. Point the camera lens towards the area you are satisfied with the screws and push it down. 3. Wall mounting instructions 25 ENGLISH 2.
Adjust the baby unit until you want to monitor. Then, align your baby unit with the image in the parent unit. Insert 4mm head screws (not supplied) into the holes and tighten the screws. Point the camera lens towards the area you are satisfied with the screws and push it down. 3. Wall mounting instructions 25 ENGLISH 2.