Quick Guide
Page 1
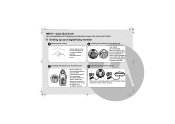
C Installing the batteries for at least 15 hours. Charge the parent unit for the Parent unit • Do not install non- rechargeable batteries! Use only AAA rechargeable batteries of all features and instructions, please refer to the User's Guide. 1 Setting up your digital baby monitor A Removing the covers B Installing the batteries for the Baby unit 90° MAX • Turn the battery cover screws 90 degrees in a counterclockwise direction. • Lift off the...
C Installing the batteries for at least 15 hours. Charge the parent unit for the Parent unit • Do not install non- rechargeable batteries! Use only AAA rechargeable batteries of all features and instructions, please refer to the User's Guide. 1 Setting up your digital baby monitor A Removing the covers B Installing the batteries for the Baby unit 90° MAX • Turn the battery cover screws 90 degrees in a counterclockwise direction. • Lift off the...
Quick Guide
Page 2
.... Press and hold for this Quick Start Guide or the User's Guide. 2. MOTOROLA and the Stylized M Logo, and other product or service names are owned by Binatone Electronics International LTD., official licensee for 2 seconds to play or pause a lullaby. LULLABY button Press to switch on the unit. Contact Customer Service at 0845 218 0890 in the US Patent...
.... Press and hold for this Quick Start Guide or the User's Guide. 2. MOTOROLA and the Stylized M Logo, and other product or service names are owned by Binatone Electronics International LTD., official licensee for 2 seconds to play or pause a lullaby. LULLABY button Press to switch on the unit. Contact Customer Service at 0845 218 0890 in the US Patent...
User Manual
Page 1
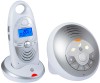
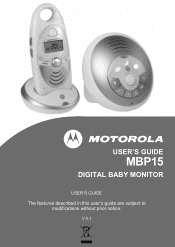
USER'S GUIDE MBP15 DIGITAL BABY MONITOR USER'S GUIDE The features described in this user's guide are subject to modifications without prior notice. V 0.1
USER'S GUIDE MBP15 DIGITAL BABY MONITOR USER'S GUIDE The features described in this user's guide are subject to modifications without prior notice. V 0.1
User Manual
Page 2
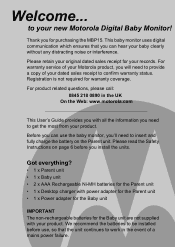
... product. to insert and fully charge the battery on page 6 before use the baby monitor, you will need to provide a copy of your Motorola product, you 'll need to work in the UK On the Web: www.motorola.com This User's Guide provides you with your new Motorola Digital Baby Monitor! Please read the Safety Instructions on the Parent unit. For product related questions, please...
... product. to insert and fully charge the battery on page 6 before use the baby monitor, you will need to provide a copy of your Motorola product, you 'll need to work in the UK On the Web: www.motorola.com This User's Guide provides you with your new Motorola Digital Baby Monitor! Please read the Safety Instructions on the Parent unit. For product related questions, please...

User Manual
Page 4
... 29 23 28 22 D 27. Thermo sensor 28. Alarm function on F D. Battery cover screw 29. Battery level indication B. Baby Unit sensitivity E adjusting C. Date/Time & Information Temperature reading E. Battery cover 30. Lullaby is playing G. Power adapter connector LCD Display D C B A 30 27 A. Night light on G F. MVVNooiigclluuhrommt pLeehigoudhnpotewbbnuuttbttoounntto(1n ) 26. Power LED PLulallya/bPyabuusettobnut2 ton 4 22. 23. 24. 25. On/Off Paging button...
... 29 23 28 22 D 27. Thermo sensor 28. Alarm function on F D. Battery cover screw 29. Battery level indication B. Baby Unit sensitivity E adjusting C. Date/Time & Information Temperature reading E. Battery cover 30. Lullaby is playing G. Power adapter connector LCD Display D C B A 30 27 A. Night light on G F. MVVNooiigclluuhrommt pLeehigoudhnpotewbbnuuttbttoounntto(1n ) 26. Power LED PLulallya/bPyabuusettobnut2 ton 4 22. 23. 24. 25. On/Off Paging button...

User Manual
Page 5
... 8 2.3 Parent unit battery Installation 8 2.4 Parent unit power supply 9 2.5 Link 10 2.6 Registration 11 2.7 Paging 11 3. Disposal of contents 5 Safety Instructions 6 2. Using the MBP15 12 3.1 Volume adjustment 12 3.1.1 Parent unit 12 3.1.2 Baby unit 12 3.2 Talk to your baby 12 3.3 Menu operation 12 3.4 Night Light 14 3.4.1 Remote activation 14 3.4.2 Local activation 14 3.5 Lullaby 14 3.5.1 Remote activation 14 3.5.2 Local activation 15 3.6 Voice Activation 15 3.7 Sound alert 15 3.7.1 Sound alert volume 16...
... 8 2.3 Parent unit battery Installation 8 2.4 Parent unit power supply 9 2.5 Link 10 2.6 Registration 11 2.7 Paging 11 3. Disposal of contents 5 Safety Instructions 6 2. Using the MBP15 12 3.1 Volume adjustment 12 3.1.1 Parent unit 12 3.1.2 Baby unit 12 3.2 Talk to your baby 12 3.3 Menu operation 12 3.4 Night Light 14 3.4.1 Remote activation 14 3.4.2 Local activation 14 3.5 Lullaby 14 3.5.1 Remote activation 14 3.5.2 Local activation 15 3.6 Voice Activation 15 3.7 Sound alert 15 3.7.1 Sound alert volume 16...
User Manual
Page 6
... instructions in the parent unit. Only use the chargers and power adapters provided. CAUTION Risk of children. • Do not cover the baby monitor with a towel or blanket. • Never use extension cords with it. • This baby monitor is , when handled as this User's Guide carefully before use ordinary, nonrechargeable batteries in this may damage the device and batteries. • Only insert batteries of used batteries...
... instructions in the parent unit. Only use the chargers and power adapters provided. CAUTION Risk of children. • Do not cover the baby monitor with a towel or blanket. • Never use extension cords with it. • This baby monitor is , when handled as this User's Guide carefully before use ordinary, nonrechargeable batteries in this may damage the device and batteries. • Only insert batteries of used batteries...

User Manual
Page 9
...charger pod to the instructions. 4. NOTE Only use non-rechargeable batteries for the Parent Unit. Remove the battery cover. Risk of used batteries according to the mains socket (230V/50Hz). ENGLISH 2. NOTE When the battery level is replaced by an incorrect type. Close the battery...display and the parent unit emits a short warning tone once every minute. 2.4 Parent unit power supply 1. NOTE Do not try to switch off the parent unit. Install the enclosed 2 AAA rechargeable batteries following the polarity as shown. WARNING Do not use the enclosed adapter (6V DC ...
...charger pod to the instructions. 4. NOTE Only use non-rechargeable batteries for the Parent Unit. Remove the battery cover. Risk of used batteries according to the mains socket (230V/50Hz). ENGLISH 2. NOTE When the battery level is replaced by an incorrect type. Close the battery...display and the parent unit emits a short warning tone once every minute. 2.4 Parent unit power supply 1. NOTE Do not try to switch off the parent unit. Install the enclosed 2 AAA rechargeable batteries following the polarity as shown. WARNING Do not use the enclosed adapter (6V DC ...
User Manual
Page 10
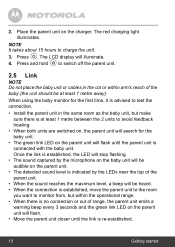
... baby monitor for the baby unit. • The green link LED on the parent unit will flash. • Move the parent unit closer until the parent unit is re-established. 10 Getting started Press P. The red charging light illuminates. The LCD display will flash until the link is connected with the baby unit. Once the link is established, the LED will stop flashing. • The sound...
... baby monitor for the baby unit. • The green link LED on the parent unit will flash. • Move the parent unit closer until the parent unit is re-established. 10 Getting started Press P. The red charging light illuminates. The LCD display will flash until the link is connected with the baby unit. Once the link is established, the LED will stop flashing. • The sound...
User Manual
Page 11
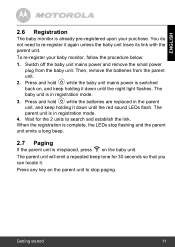
... night light flashes. When the registration is complete, the LEDs stop flashing and the parent unit emits a long beep. 2.7 Paging If the parent unit is misplaced, press 3 on the parent unit to search and establish the link. Press any key on the baby unit. Press and hold P while the batteries are replaced in the parent unit, and keep holding it down until the red sound LEDs...
... night light flashes. When the registration is complete, the LEDs stop flashing and the parent unit emits a long beep. 2.7 Paging If the parent unit is misplaced, press 3 on the parent unit to search and establish the link. Press any key on the baby unit. Press and hold P while the batteries are replaced in the parent unit, and keep holding it down until the red sound LEDs...
User Manual
Page 12
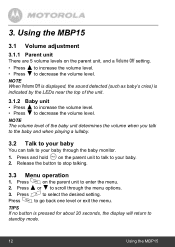
...MBP15 Using the MBP15 3.1 Volume adjustment 3.1.1 Parent unit There are 5 volume levels on the parent unit to talk to increase the volume level. decrease the volume level. Press O to stop talking. 3.3 Menu operation 1. 2. Press M to scroll through the baby monitor. 1. 3. Press and hold T on the parent unit, and a Volume Off setting... level. NOTE When Volume Off is displayed, the sound detected (such as baby's cries) is pressed for about 20 seconds, the display will return to your baby. 2. Press Press M ( or o)n the parent unit to enter the to go back one level or ...
...MBP15 Using the MBP15 3.1 Volume adjustment 3.1.1 Parent unit There are 5 volume levels on the parent unit to talk to increase the volume level. decrease the volume level. Press O to stop talking. 3.3 Menu operation 1. 2. Press M to scroll through the baby monitor. 1. 3. Press and hold T on the parent unit, and a Volume Off setting... level. NOTE When Volume Off is displayed, the sound detected (such as baby's cries) is pressed for about 20 seconds, the display will return to your baby. 2. Press Press M ( or o)n the parent unit to enter the to go back one level or ...

User Manual
Page 13
... range Alert On? / Alert Off? Set Time Set Interval Alarm Hour / Minute Hour/Minute On? / Off? Volume Degree F? / Degree C? ENGLISH Menu map Main Menu Night Light Lullaby Sensitivity Sound Alert Temperature Clock Feed Time Language Sub menu 1 Sub menu 2 On? / Off? Select New Twinkle Silent Night Minuet in G Danny Boy Blue Danube Play All Adjust Baby unit...
... range Alert On? / Alert Off? Set Time Set Interval Alarm Hour / Minute Hour/Minute On? / Off? Volume Degree F? / Degree C? ENGLISH Menu map Main Menu Night Light Lullaby Sensitivity Sound Alert Temperature Clock Feed Time Language Sub menu 1 Sub menu 2 On? / Off? Select New Twinkle Silent Night Minuet in G Danny Boy Blue Danube Play All Adjust Baby unit...
User Manual
Page 15
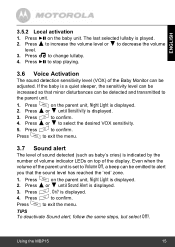
... activation 1. 2. level. If the baby is indicated by the number of volume indicator LEDs on top of the parent unit is displayed. 3. 4. TIPS To deactivate Sound alert, follow the same steps, but select Off?. Press Press (4toonintchreeabsaebtyheunviot.luTmhee llaesvtesl eolre)ctedtoludlelacbreyaissepltahyeevdo.lume 3. 4. Press Press M ( or o)n the parent unit, Night Light is until Sound unit, Alert Night Light is displayed. displayed. 3. 4. Press...
... activation 1. 2. level. If the baby is indicated by the number of volume indicator LEDs on top of the parent unit is displayed. 3. 4. TIPS To deactivate Sound alert, follow the same steps, but select Off?. Press Press (4toonintchreeabsaebtyheunviot.luTmhee llaesvtesl eolre)ctedtoludlelacbreyaissepltahyeevdo.lume 3. 4. Press Press M ( or o)n the parent unit, Night Light is until Sound unit, Alert Night Light is displayed. displayed. 3. 4. Press...

User Manual
Page 16
... exit the menu. 3.8 Temperature In standby mode, the room temperature where the baby unit is placed is displayed on the parent unit. 3.8.1 Temperature range When the room temperature has exceeded the upper or lower limit, it will be indicated on , you have set the alert tone to select the desired lower limit (min 17ºC). 8. NOTE...
... exit the menu. 3.8 Temperature In standby mode, the room temperature where the baby unit is placed is displayed on the parent unit. 3.8.1 Temperature range When the room temperature has exceeded the upper or lower limit, it will be indicated on , you have set the alert tone to select the desired lower limit (min 17ºC). 8. NOTE...
User Manual
Page 19
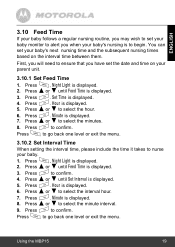
.... 7. 8. You can set your baby monitor to alert you when your baby's nursing is to begin. Press Press O ( or.)Minutotesiseldeicstptlhaeyemdi.nute interval. 9. Using the MBP15 19 Time is displayed. ...5. 6. Press Press O ( or t)o cuonntfiilrmSe.t Interval is displayed. 3. 4. 5. Press ( or ) until Feed Time is displayed. 2. Press O to confirm. ENGLISH 3.10 Feed Time If your baby follows a regular nursing routine, you may wish to set your baby's next nursing time and the subsequent nursing times based on your parent unit. 3.10.1 Set...
.... 7. 8. You can set your baby monitor to alert you when your baby's nursing is to begin. Press Press O ( or.)Minutotesiseldeicstptlhaeyemdi.nute interval. 9. Using the MBP15 19 Time is displayed. ...5. 6. Press Press O ( or t)o cuonntfiilrmSe.t Interval is displayed. 3. 4. 5. Press ( or ) until Feed Time is displayed. 2. Press O to confirm. ENGLISH 3.10 Feed Time If your baby follows a regular nursing routine, you may wish to set your baby's next nursing time and the subsequent nursing times based on your parent unit. 3.10.1 Set...

User Manual
Page 23
... to charge. • Make sure the charger pod is correctly plugged in to a 230VAC, 50Hz mains power socket and that the socket is too far away it may be going out of the parent unit to the parent unit. • Reset the units. Registration If the baby unit has lost its link with the parent unit • Try recharging or replacing the batteries. •...
... to charge. • Make sure the charger pod is correctly plugged in to a 230VAC, 50Hz mains power socket and that the socket is too far away it may be going out of the parent unit to the parent unit. • Reset the units. Registration If the baby unit has lost its link with the parent unit • Try recharging or replacing the batteries. •...
User Manual
Page 25
...: Who is a consumer's exclusive remedy, and only applies as follows to new Motorola branded Products and Accessories manufactured by Binatone Electronics International LTD., and purchased by this User's Guide or the Quick Start Guide. 2. Contact Customer Service at 0845 218 0890 in the United Kingdom, which are accompanied by consumers in the UK. Consumer Products and Accessories...
...: Who is a consumer's exclusive remedy, and only applies as follows to new Motorola branded Products and Accessories manufactured by Binatone Electronics International LTD., and purchased by this User's Guide or the Quick Start Guide. 2. Contact Customer Service at 0845 218 0890 in the United Kingdom, which are accompanied by consumers in the UK. Consumer Products and Accessories...
User Manual
Page 28
... abnormal usage or conditions; How to Obtain Warranty Service or Other Information? Altered Products. or (e) other than Motorola, Binatone Electronics International LTD. scratches, etc.) to the surface of the product resulting from misuse; (b) your failure to follow or operate outside the usage parameters stated in the user instructions that came with the Products or Accessories...
... abnormal usage or conditions; How to Obtain Warranty Service or Other Information? Altered Products. or (e) other than Motorola, Binatone Electronics International LTD. scratches, etc.) to the surface of the product resulting from misuse; (b) your failure to follow or operate outside the usage parameters stated in the user instructions that came with the Products or Accessories...

User Manual
Page 29
... will receive instructions on how to a BINATONE ELECTRONICS INTERNATIONAL LTD. regarding the Products or Accessories purchased by you and BINATONE ELECTRONICS INTERNATIONAL LTD. To obtain service, you must...your address and telephone number. and, most importantly; (c) your own risk and expense, to ship the Products or Accessories, the shipment of the problem; General Information 29 ...BINATONE ELECTRONICS INTERNATIONAL LTD., that may have been made in any prior agreement or representations, including representations made in connection with the said purchase. Authorised Repair...
... will receive instructions on how to a BINATONE ELECTRONICS INTERNATIONAL LTD. regarding the Products or Accessories purchased by you and BINATONE ELECTRONICS INTERNATIONAL LTD. To obtain service, you must...your address and telephone number. and, most importantly; (c) your own risk and expense, to ship the Products or Accessories, the shipment of the problem; General Information 29 ...BINATONE ELECTRONICS INTERNATIONAL LTD., that may have been made in any prior agreement or representations, including representations made in connection with the said purchase. Authorised Repair...

User Manual
Page 30
BYD battery = H-AAA600) Baby unit: 3 AA non-rechargeable batteries (Note: Batteries are not included) Input - 100-240VAC, 50/60Hz Output - DC6V, 300 mA (Model: Kings, KSS05-060-0300B) Charger pod: Input - 100-240VAC, 50/60Hz Output - Actual range will vary depending on unobstructed line of sight. Parent unit: 2 AAA 600mAh NiMH rechargeable batteries (Model: GPI battery = 60AAAHC; Technical Specifications Frequency range Operating range Electrical power 1.88GHz to 1.9GHz...
BYD battery = H-AAA600) Baby unit: 3 AA non-rechargeable batteries (Note: Batteries are not included) Input - 100-240VAC, 50/60Hz Output - DC6V, 300 mA (Model: Kings, KSS05-060-0300B) Charger pod: Input - 100-240VAC, 50/60Hz Output - Actual range will vary depending on unobstructed line of sight. Parent unit: 2 AAA 600mAh NiMH rechargeable batteries (Model: GPI battery = 60AAAHC; Technical Specifications Frequency range Operating range Electrical power 1.88GHz to 1.9GHz...


