
User Guide
Page 2
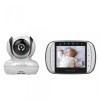
...your records. For warranty service of your product. Got everything? • 1 x Parent unit • 1 x Baby unit • 1 x Rechargeable Ni-MH battery pack for the parent unit • 1 x Power adapter for the Parent unit • 1 x Power adapter for warranty coverage. Please read the Safety Instructions ... the baby monitor, we recommend you disconnect it from your dated sales receipt to work if you insert and fully charge the battery in their playroom. Welcome... Please retain your original dated sales receipt for purchasing the MBP36. Now you can see and hear...
...your records. For warranty service of your product. Got everything? • 1 x Parent unit • 1 x Baby unit • 1 x Rechargeable Ni-MH battery pack for the parent unit • 1 x Power adapter for the Parent unit • 1 x Power adapter for warranty coverage. Please read the Safety Instructions ... the baby monitor, we recommend you disconnect it from your dated sales receipt to work if you insert and fully charge the battery in their playroom. Welcome... Please retain your original dated sales receipt for purchasing the MBP36. Now you can see and hear...
User Guide
Page 3
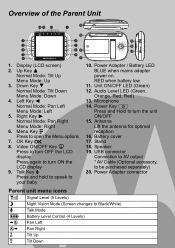
Normal Mode: Tilt Down Menu Mode: Down 4. RED when battery low. 11. Power Key P Press and Hold to your baby 10. Battery cover 17. Stand 18. Talk Key T Press and hold to speak to turn the unit ON/OFF 15. Audio Level LED (Green, Orange, Red, Red...) 13. Left Key < Normal Mode: Pan Left Menu Mode: Left 5. Menu Key M Press to Black/White) T Talk Mode B H J K Battery Level Control (4 Levels) Pan Left Pan Right Tilt Up L Tilt Down Power Adapter connector Parent unit menu icons 1 Signal Level (5 Levels) N Night Vision Mode (Screen...
Normal Mode: Tilt Down Menu Mode: Down 4. RED when battery low. 11. Power Key P Press and Hold to your baby 10. Battery cover 17. Stand 18. Talk Key T Press and hold to speak to turn the unit ON/OFF 15. Audio Level LED (Green, Orange, Red, Red...) 13. Left Key < Normal Mode: Pan Left Menu Mode: Left 5. Menu Key M Press to Black/White) T Talk Mode B H J K Battery Level Control (4 Levels) Pan Left Pan Right Tilt Up L Tilt Down Power Adapter connector Parent unit menu icons 1 Signal Level (5 Levels) N Night Vision Mode (Screen...
User Guide
Page 5
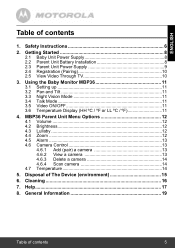
... 4.6.2 View a camera 13 4.6.3 Delete a camera 14 4.6.4 Scan camera 14 4.7 Temperature 14 5. General Information 19 Table of contents 1. Getting Started 8 2.1 Baby Unit Power Supply 8 2.2 Parent Unit Battery Installation 8 2.3 Parent Unit Power Supply 9 2.4 Registration (Pairing 10 2.5 View Video Through TV 10 3. Safety Instructions 6 2. ENGLISH Table of contents 5 Disposal of The Device (environment 15 6.
... 4.6.2 View a camera 13 4.6.3 Delete a camera 14 4.6.4 Scan camera 14 4.7 Temperature 14 5. General Information 19 Table of contents 1. Getting Started 8 2.1 Baby Unit Power Supply 8 2.2 Parent Unit Battery Installation 8 2.3 Parent Unit Power Supply 9 2.4 Registration (Pairing 10 2.5 View Video Through TV 10 3. Safety Instructions 6 2. ENGLISH Table of contents 5 Disposal of The Device (environment 15 6.
User Guide
Page 7
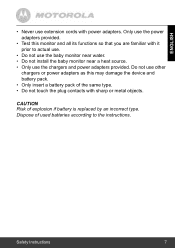
... near water. • Do not install the baby monitor near a heat source. • Only use the chargers and power adapters provided. Dispose of explosion if battery is replaced by an incorrect type. ENGLISH • Never use other chargers or power adapters as this monitor and all its functions so that you... Instructions 7 Do not use extension cords with sharp or metal objects. Only use the power adapters provided. • Test this may damage the device and battery pack. • Only insert a battery pack of the same type. • Do not touch the plug contacts with power adapters.
... near water. • Do not install the baby monitor near a heat source. • Only use the chargers and power adapters provided. Dispose of explosion if battery is replaced by an incorrect type. ENGLISH • Never use other chargers or power adapters as this monitor and all its functions so that you... Instructions 7 Do not use extension cords with sharp or metal objects. Only use the power adapters provided. • Test this may damage the device and battery pack. • Only insert a battery pack of the same type. • Do not touch the plug contacts with power adapters.

User Guide
Page 8
... DC / 1000mA). 2. Small cross head or Flat end screw driver 2. Slide the ON/OFF switch to turn the Baby Unit off. 2.2 Parent Unit Battery Installation Black Red 1. Slide the ON/OFF switch to the OFF position to the ON position. Getting Started 2.1 Baby Unit Power Supply 1. Insert the wire... over the compartment and gently tighten the screw in green. 3. Connect the small plug of the rechargeable battery pack into the contact slot as shown above and fit the battery pack into the compartment. The power LED will light up in a clockwise direction using a Small cross head or Flat ...
... DC / 1000mA). 2. Small cross head or Flat end screw driver 2. Slide the ON/OFF switch to turn the Baby Unit off. 2.2 Parent Unit Battery Installation Black Red 1. Slide the ON/OFF switch to the OFF position to the ON position. Getting Started 2.1 Baby Unit Power Supply 1. Insert the wire... over the compartment and gently tighten the screw in green. 3. Connect the small plug of the rechargeable battery pack into the contact slot as shown above and fit the battery pack into the compartment. The power LED will light up in a clockwise direction using a Small cross head or Flat ...

User Guide
Page 9
... gives a beep every 16 seconds. Connect the small plug of the power adapter to the parent unit and the other end to indicate that the battery is re-established. 5. Once the baby and parent units are out of a power failure. 1. The Blue LED at top left corner light up indicates adapter... will be recharged. Press and hold the P POWER ON/OFF button for 45 sec. Move the parent unit closer to operate on battery in , a adapter logo will display on the parent unit will beep every 5 seconds. This will allow the unit to the baby unit until the progress ...
... gives a beep every 16 seconds. Connect the small plug of the power adapter to the parent unit and the other end to indicate that the battery is re-established. 5. Once the baby and parent units are out of a power failure. 1. The Blue LED at top left corner light up indicates adapter... will be recharged. Press and hold the P POWER ON/OFF button for 45 sec. Move the parent unit closer to operate on battery in , a adapter logo will display on the parent unit will beep every 5 seconds. This will allow the unit to the baby unit until the progress ...
User Guide
Page 10
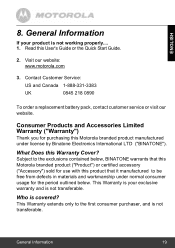
... button to confirm. 6. The green audio level LED will pop up indicates adapter is plugged in , the battery icon on the side of the parent unit and the menu bar will show that the battery is to your Baby Unit, or register a new Baby Unit, follow the procedure below: 1. Scroll through the...
... button to confirm. 6. The green audio level LED will pop up indicates adapter is plugged in , the battery icon on the side of the parent unit and the menu bar will show that the battery is to your Baby Unit, or register a new Baby Unit, follow the procedure below: 1. Scroll through the...

User Guide
Page 15
... materials from used products you need more information on the product, user's guide and/or box indicates this product to your area. Dispose of the battery pack in your local regulations.
... materials from used products you need more information on the product, user's guide and/or box indicates this product to your area. Dispose of the battery pack in your local regulations.

User Guide
Page 17
... is too far away it may be going out of the parent unit and unplug both the units' electrical power, then plug them from the battery and electrical power. Press and hold the ON/OFF key P on the parent unit to turn it ON. • Is the correct camera selected? The... back in. • Is the unit turned on ? Help Display No display • Try recharging or replacing the battery pack. • Reset the units. Help 17 Wait about 15 seconds before reconnecting. Disconnect the battery pack of range, so move the Baby Unit closer to turn it on. • When operating using...
... is too far away it may be going out of the parent unit and unplug both the units' electrical power, then plug them from the battery and electrical power. Press and hold the ON/OFF key P on the parent unit to turn it ON. • Is the correct camera selected? The... back in. • Is the unit turned on ? Help Display No display • Try recharging or replacing the battery pack. • Reset the units. Help 17 Wait about 15 seconds before reconnecting. Disconnect the battery pack of range, so move the Baby Unit closer to turn it on. • When operating using...
User Guide
Page 19
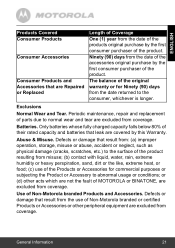
... www.motorola.com 3. Contact Customer Service: US and Canada 1-888-331-3383 UK 0845 218 0890 To order a replacement battery pack, contact customer service or visit our website. Subject to the exclusions contained below . General Information 19 What Does this ...only to be free from defects in materials and workmanship under license by Binatone Electronics International LTD ("BINATONE"). Consumer Products and Accessories Limited Warranty ("Warranty") Thank you for the period outlined below , BINATONE warrants that it manufactured to the first consumer purchaser, and is not...
... www.motorola.com 3. Contact Customer Service: US and Canada 1-888-331-3383 UK 0845 218 0890 To order a replacement battery pack, contact customer service or visit our website. Subject to the exclusions contained below . General Information 19 What Does this ...only to be free from defects in materials and workmanship under license by Binatone Electronics International LTD ("BINATONE"). Consumer Products and Accessories Limited Warranty ("Warranty") Thank you for the period outlined below , BINATONE warrants that it manufactured to the first consumer purchaser, and is not...
User Guide
Page 21
...the consumer, whichever is longer. Abuse & Misuse. Defects or damage that result from the use of their rated capacity and batteries that leak are covered by this Warranty. Periodic maintenance, repair and replacement of Non-Motorola branded or certified Products or Accessories ...or other acts which are not the fault of Non-Motorola branded Products and Accessories. Use of MOTOROLA or BINATONE, are excluded from coverage. or (d) other peripheral equipment are excluded from coverage. ENGLISH Products Covered Consumer Products Consumer Accessories Consumer...
...the consumer, whichever is longer. Abuse & Misuse. Defects or damage that result from the use of their rated capacity and batteries that leak are covered by this Warranty. Periodic maintenance, repair and replacement of Non-Motorola branded or certified Products or Accessories ...or other acts which are not the fault of Non-Motorola branded Products and Accessories. Use of MOTOROLA or BINATONE, are excluded from coverage. or (d) other peripheral equipment are excluded from coverage. ENGLISH Products Covered Consumer Products Consumer Accessories Consumer...

User Guide
Page 26
Input: 100-240V, 50/60Hz 300mA; MBP36PU IC ID 4522A- OR Battery: Model - Dispose of explosion if battery is replaced by an incorrect type. Output: 6.0V, 500mA WARNING Use only with provided power supply. Parent unit (Model: MBP36PU) ...to the instructions. Input: 100-240V, 50/60Hz 150mA; TFL3X44AAA900, NI-MH AAA 3 x 1.2V 900mAh rechargeable battery pack WARNING Do not use non-rechargeable batteries for the Parent Unit. Risk of used batteries according to 2.48GHz Display 3.5" diagonal TFT LCD Display colours / colors 16.7M colour / color LCD Brightness control...
Input: 100-240V, 50/60Hz 300mA; MBP36PU IC ID 4522A- OR Battery: Model - Dispose of explosion if battery is replaced by an incorrect type. Output: 6.0V, 500mA WARNING Use only with provided power supply. Parent unit (Model: MBP36PU) ...to the instructions. Input: 100-240V, 50/60Hz 150mA; TFL3X44AAA900, NI-MH AAA 3 x 1.2V 900mAh rechargeable battery pack WARNING Do not use non-rechargeable batteries for the Parent Unit. Risk of used batteries according to 2.48GHz Display 3.5" diagonal TFT LCD Display colours / colors 16.7M colour / color LCD Brightness control...