

User Guide
Page 1
User's Guide For LS420 4.2" Dual Digital Photo Frames with Slideshow Warning Use only the power adapter supplied with your product.
User's Guide For LS420 4.2" Dual Digital Photo Frames with Slideshow Warning Use only the power adapter supplied with your product.
User Guide
Page 2
...; Only use the power adapter supplied. Follow the simple instructions in India On the Web: www.motorola.com This User's Guide provides you with all the information you will need to set up your new Motorola Digital Photo Frame! to confirm warranty status. Got everything? • 1 x Digital Photo Frame • 1 x Power adapter • 1 x Stand • 1 x User's Guide • 1 x Quick Start Guide Key features • 3 view modes: Clock/Calendar mode, dual slideshow mode and thumbnail mode • 5 slideshow transition effects • Date and Time settings •...
...; Only use the power adapter supplied. Follow the simple instructions in India On the Web: www.motorola.com This User's Guide provides you with all the information you will need to set up your new Motorola Digital Photo Frame! to confirm warranty status. Got everything? • 1 x Digital Photo Frame • 1 x Power adapter • 1 x Stand • 1 x User's Guide • 1 x Quick Start Guide Key features • 3 view modes: Clock/Calendar mode, dual slideshow mode and thumbnail mode • 5 slideshow transition effects • Date and Time settings •...

User Guide
Page 3
LCD screen 2. USB connector n 3. Previous button c 6. Up/Rotate button a 7. OK/Play/Pause button o 8. Stand Face plate Frame overview 1 12 3456 B 1. Power/Exit/Mode button f 2 10 5. Next button d 9. Down/Swap screen button b 11 10. Memory card slot m 4. A 1. Power supply jack q 7 8 9 2. Wall mount hangers 11.
LCD screen 2. USB connector n 3. Previous button c 6. Up/Rotate button a 7. OK/Play/Pause button o 8. Stand Face plate Frame overview 1 12 3456 B 1. Power/Exit/Mode button f 2 10 5. Next button d 9. Down/Swap screen button b 11 10. Memory card slot m 4. A 1. Power supply jack q 7 8 9 2. Wall mount hangers 11.
User Guide
Page 4
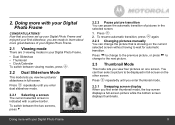
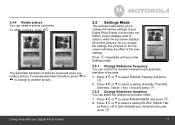
... more with your Digital Photo Frame..9 2.1 Viewing mode 9 2.2 Dual Slideshow Mode 9 2.2.1 Selecting a screen 9 2.2.2 Pause picture transition 9 2.2.3 Changing pictures manually 9 2.3 Thumbnail Mode 9 2.3.1 Swapping screen display 9 2.3.2 Selecting a thumbnail 10 2.4 Clock/Calendar Mode 10 2.4.1 Swapping screen display 10 2.4.2 Pause picture transition 10 2.4.3 Changing pictures manually 10 2.4.4 Rotate picture 11 2.5 Settings Mode 11 2.5.1 Change Slideshow frequency 11 2.5.2 Change Slideshow transition 11 2.5.3 Change Time and Date 12 2.5.4 Languages 12 2.5.5 Auto On/Off 12...
... more with your Digital Photo Frame..9 2.1 Viewing mode 9 2.2 Dual Slideshow Mode 9 2.2.1 Selecting a screen 9 2.2.2 Pause picture transition 9 2.2.3 Changing pictures manually 9 2.3 Thumbnail Mode 9 2.3.1 Swapping screen display 9 2.3.2 Selecting a thumbnail 10 2.4 Clock/Calendar Mode 10 2.4.1 Swapping screen display 10 2.4.2 Pause picture transition 10 2.4.3 Changing pictures manually 10 2.4.4 Rotate picture 11 2.5 Settings Mode 11 2.5.1 Change Slideshow frequency 11 2.5.2 Change Slideshow transition 11 2.5.3 Change Time and Date 12 2.5.4 Languages 12 2.5.5 Auto On/Off 12...
User Guide
Page 5
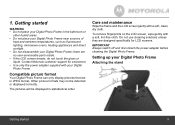
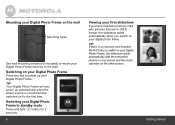
... Digital Photo Frame; Other picture formats may not be displayed in alphabetical order. To remove fingerprints on the LCD screen, wipe gently with a soft, lint-free cloth. IMPORTANT Always switch off and disconnect the power adapter before cleaning the Digital Photo Frame. Getting started WARNING • Do not place your Digital Photo Frame Attaching the stand Getting started 5 there are designed specifically for assistance. • Use only the power adapter supplied with a soft, clean, dry cloth. Setting...
... Digital Photo Frame; Other picture formats may not be displayed in alphabetical order. To remove fingerprints on the LCD screen, wipe gently with a soft, lint-free cloth. IMPORTANT Always switch off and disconnect the power adapter before cleaning the Digital Photo Frame. Getting started WARNING • Do not place your Digital Photo Frame Attaching the stand Getting started 5 there are designed specifically for assistance. • Use only the power adapter supplied with a soft, clean, dry cloth. Setting...
User Guide
Page 6
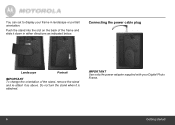
Push the stand into the slot on the back of the stand, remove the stand and re-attach it is attached. Connecting the power cable plug Landscape Portrait IMPORTANT To change the orientation of the frame and slide it down in landscape or portrait orientation. IMPORTANT Use only the power adapter supplied with your frame in either directions as above. Do not turn the stand when it as indicated below. You can set to display your Digital Photo Frame. 6 Getting started
Push the stand into the slot on the back of the stand, remove the stand and re-attach it is attached. Connecting the power cable plug Landscape Portrait IMPORTANT To change the orientation of the frame and slide it down in landscape or portrait orientation. IMPORTANT Use only the power adapter supplied with your frame in either directions as above. Do not turn the stand when it as indicated below. You can set to display your Digital Photo Frame. 6 Getting started
User Guide
Page 7
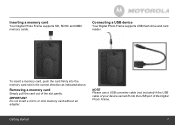
... a memory card, push the card firmly into the USB port of the Digital Photo Frame. Getting started 7 IMPORTANT Do not insert a micro or mini memory card without an adapter. NOTE Please use a USB converter cable (not included) if the USB cable of the slot gently. Connecting a USB device Your Digital Photo Frame supports USB flash drive and card reader. Removing a memory card Simply pull the card out of your device cannot fit into the memory card slot in the correct direction as indicated above. Inserting a memory card Your Digital Photo Frame supports...
... a memory card, push the card firmly into the USB port of the Digital Photo Frame. Getting started 7 IMPORTANT Do not insert a micro or mini memory card without an adapter. NOTE Please use a USB converter cable (not included) if the USB cable of the slot gently. Connecting a USB device Your Digital Photo Frame supports USB flash drive and card reader. Removing a memory card Simply pull the card out of your device cannot fit into the memory card slot in the correct direction as indicated above. Inserting a memory card Your Digital Photo Frame supports...
User Guide
Page 8
... your Digital Photo Frame, the slideshow starts automatically with pictures that are in JPEG format, the slideshow starts automatically when you have inserted a memory card with the preloaded photos on one screen and the clock/ calendar on the other screen. Switching your Digital Photo Frame to standby mode Press and hold f button for the first time. TIP Your Digital Photo Frame will also power up your digital photo frame. TIP If there is connected and switched on for 2 seconds. 8 Viewing your first slideshow...
... your Digital Photo Frame, the slideshow starts automatically with pictures that are in JPEG format, the slideshow starts automatically when you have inserted a memory card with the preloaded photos on one screen and the clock/ calendar on the other screen. Switching your Digital Photo Frame to standby mode Press and hold f button for the first time. TIP Your Digital Photo Frame will also power up your digital photo frame. TIP If there is connected and switched on for 2 seconds. 8 Viewing your first slideshow...
User Guide
Page 9
... thumbnail mode, the top screen displays a full-screen picture while the bottom screen displays thumbnails. 9 Press c to change to the previous picture, or press d to the next picture. 2.3 Thumbnail Mode This mode lets you view two pictures/ slideshows in full-screen on the other screen. Now that is indicated with your Digital Photo Frame CONGRATULATIONS! To resume automatic transition, press o again. 2.2.3 Changing pictures manually You can change to change the picture that you have set up your Digital Photo Frame...
... thumbnail mode, the top screen displays a full-screen picture while the bottom screen displays thumbnails. 9 Press c to change to the previous picture, or press d to the next picture. 2.3 Thumbnail Mode This mode lets you view two pictures/ slideshows in full-screen on the other screen. Now that is indicated with your Digital Photo Frame CONGRATULATIONS! To resume automatic transition, press o again. 2.2.3 Changing pictures manually You can change to change the picture that you have set up your Digital Photo Frame...
User Guide
Page 10
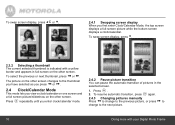
... screen. The you view a clock/calendar on one screen and a full screen picture/slideshow on the other screen. To swap screen display, press a or b. 2.4.1 Swapping screen display When you press cchanogreds to the next picture. 10 Doing more with a yellow border and appears in the selected screen. 1. 2. To swap screen display, press b. 2.3.2 Selecting a thumbnail The current selected thumbnail is indicated with your Digital Photo Frame Press f repeatedly until you enter clock/calendar mode. 2.4.2 Pause picture...
... screen. The you view a clock/calendar on one screen and a full screen picture/slideshow on the other screen. To swap screen display, press a or b. 2.4.1 Swapping screen display When you press cchanogreds to the next picture. 10 Doing more with a yellow border and appears in the selected screen. 1. 2. To swap screen display, press b. 2.3.2 Selecting a thumbnail The current selected thumbnail is indicated with your Digital Photo Frame Press f repeatedly until you enter clock/calendar mode. 2.4.2 Pause picture...
User Guide
Page 11
... to right, Horizontal open, Horizontal close) and Doing more with your Digital Photo Frame. In this mode, the bottom screen displays a list of the new settings. Fade opuret Fsasdeoin,.Left to 30 seconds, 1 minute, select Slideshow select a setting 1 hour, 1 day) and frequency and press (p5rseescsonods, .10 seconds, 2.5.2 Change Slideshow transition You can control the duration between each automatic transition of your Digital Photo Frame 11 Trdohtaettoeauacthopamicnatguteircet.torTaaonnsroeittsihouenmr...
... to right, Horizontal open, Horizontal close) and Doing more with your Digital Photo Frame. In this mode, the bottom screen displays a list of the new settings. Fade opuret Fsasdeoin,.Left to 30 seconds, 1 minute, select Slideshow select a setting 1 hour, 1 day) and frequency and press (p5rseescsonods, .10 seconds, 2.5.2 Change Slideshow transition You can control the duration between each automatic transition of your Digital Photo Frame 11 Trdohtaettoeauacthopamicnatguteircet.torTaaonnsroeittsihouenmr...
User Guide
Page 12
... of your Digital Photo Frame Press Press a a screen) and oporrrebbssttooossee.lleecctt Photo view a setting options and (Original or press Fit to o. 2.5.8 Default settings This option resets all settings to select Default settings and press o. 2. Press a or b to the default. 1. or OFF). Press Pdrestos Pdrestos a a or or saet thoer set the time, date and time format to be displayed on /off time 1. 2. 3. Auto Auto Auto Oofnf/hOoffuraannddppreressssoc. Contrast) 2.5.7 Photo view options You can change the display brightness and...
... of your Digital Photo Frame Press Press a a screen) and oporrrebbssttooossee.lleecctt Photo view a setting options and (Original or press Fit to o. 2.5.8 Default settings This option resets all settings to select Default settings and press o. 2. Press a or b to the default. 1. or OFF). Press Pdrestos Pdrestos a a or or saet thoer set the time, date and time format to be displayed on /off time 1. 2. 3. Auto Auto Auto Oofnf/hOoffuraannddppreressssoc. Contrast) 2.5.7 Photo view options You can change the display brightness and...
User Guide
Page 13
... frame is turned on the LCD screen. 4. Help My Digital Photo Frame does not turn on. • Make sure the power adapter is not working properly.... 1. My Digital Photo Frame does not recognize the memory card. • Make sure you have inserted a certified memory card. • Make sure you are in India Help 13 Read this User's Guide. 2. General Information If your pictures are using the power adapter that a large picture file may take some time to my Digital Photo Frame. • Make sure the USB cable is securely connected...
... frame is turned on the LCD screen. 4. Help My Digital Photo Frame does not turn on. • Make sure the power adapter is not working properly.... 1. My Digital Photo Frame does not recognize the memory card. • Make sure you have inserted a certified memory card. • Make sure you are in India Help 13 Read this User's Guide. 2. General Information If your pictures are using the power adapter that a large picture file may take some time to my Digital Photo Frame. • Make sure the USB cable is securely connected...

User Guide
Page 14
... or certified accessories sold for the period(s) outlined below , Binatone Electronics International LTD. What will at no charge repair, replace or refund the purchase price of Binatone Electronics International LTD. IN NO EVENT SHALL MOTOROLA OR BINATONE ELECTRONICS INTERNATIONAL LTD. MAKES NO OTHER WARRANTIES OR CONDITIONS, EXPRESS OF IMPLIED. This limited warranty is not transferable. This warranty covers only the first consumer purchaser, and...
... or certified accessories sold for the period(s) outlined below , Binatone Electronics International LTD. What will at no charge repair, replace or refund the purchase price of Binatone Electronics International LTD. IN NO EVENT SHALL MOTOROLA OR BINATONE ELECTRONICS INTERNATIONAL LTD. MAKES NO OTHER WARRANTIES OR CONDITIONS, EXPRESS OF IMPLIED. This limited warranty is not transferable. This warranty covers only the first consumer purchaser, and...

User Guide
Page 15
... purchaser of parts due to ...Repaired or Replaced Length of Coverage One (1) year from misuse; (b) your failure to state or from coverage. This warranty gives you specific legal rights, and you in the user instructions that result from: (a) improper or unreasonable use, operation, storage...SAVINGS OR PROFITS, LOSS OF BUSINESS, LOSS OF PROGRAMS DATA INFORMATION (WHETHER CONFIDENTIAL PROPRIETARY OR PERSONAL IN NATURE OR OTHERWISE) OR OTHER FINANCIAL LOSS ARISING OUT OF OR IN CONNECTION WITH THE ABILITY OR INABILITY TO USE THE PRODUCTS OR ACCESSORIES AND BINATONE ELECTRONICS INTERNATIONAL...
... purchaser of parts due to ...Repaired or Replaced Length of Coverage One (1) year from misuse; (b) your failure to state or from coverage. This warranty gives you specific legal rights, and you in the user instructions that result from: (a) improper or unreasonable use, operation, storage...SAVINGS OR PROFITS, LOSS OF BUSINESS, LOSS OF PROGRAMS DATA INFORMATION (WHETHER CONFIDENTIAL PROPRIETARY OR PERSONAL IN NATURE OR OTHERWISE) OR OTHER FINANCIAL LOSS ARISING OUT OF OR IN CONNECTION WITH THE ABILITY OR INABILITY TO USE THE PRODUCTS OR ACCESSORIES AND BINATONE ELECTRONICS INTERNATIONAL...
User Guide
Page 16
..., installation, maintenance, alteration, or modification in India You will receive instructions on how to abnormal usage or conditions; Defects or damages resulting from coverage. To obtain service, you and BINATONE ELECTRONICS INTERNATIONAL LTD. or representations 16 General Information perspiration, sand, dirt or the like, extreme heat, or food; (d) use with (a) serial numbers or date tags that have been removed...
..., installation, maintenance, alteration, or modification in India You will receive instructions on how to abnormal usage or conditions; Defects or damages resulting from coverage. To obtain service, you and BINATONE ELECTRONICS INTERNATIONAL LTD. or representations 16 General Information perspiration, sand, dirt or the like, extreme heat, or food; (d) use with (a) serial numbers or date tags that have been removed...
User Guide
Page 17
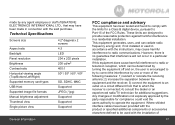
... can radiate radio frequency energy and, if not installed or used with the limits for compliance could void the users authority to radio communications. Technical Specifications Screens size Aspect ratio Backlight Panel resolution Brightness Contrast ratio Horizontal viewing angle (Top/Bottom/Left/Right) Supported memory card types USB Host Supported image file formats Manual brightness adjustment Thumbnail view Single picture view 4.2" diagonal x 2 screens 4:3 LED 234 x 202 pixels 200 cd/m2...
... can radiate radio frequency energy and, if not installed or used with the limits for compliance could void the users authority to radio communications. Technical Specifications Screens size Aspect ratio Backlight Panel resolution Brightness Contrast ratio Horizontal viewing angle (Top/Bottom/Left/Right) Supported memory card types USB Host Supported image file formats Manual brightness adjustment Thumbnail view Single picture view 4.2" diagonal x 2 screens 4:3 LED 234 x 202 pixels 200 cd/m2...
User Guide
Page 18
... should not be used in compliance with the essential requirements and other relevant provisions of with household waste. declares that this device must be disposed of Directive 1999/5/EC. Observation des normes - the product, they must accept any interference received, including interference that may not cause harmful interference, and (2) this Digital Photo Frame is subject to...
... should not be used in compliance with the essential requirements and other relevant provisions of with household waste. declares that this device must be disposed of Directive 1999/5/EC. Observation des normes - the product, they must accept any interference received, including interference that may not cause harmful interference, and (2) this Digital Photo Frame is subject to...

User Guide
Page 19
All other Motorola trademarks and trade dress are registered in China MOTOROLA and the Stylized M Logo are owned by Binatone Electronics International LTD., official licensee for this product. Manufactured, distributed or sold by Motorola, Inc. and are the property of their respective owners. © Motorola, Inc. 2009. MOTOROLA and the Stylized M Logo, and other product or service names are used under license from Motorola, Inc. Version 2.0 Printed in the US Patent & Trademark Office. All rights reserved.
All other Motorola trademarks and trade dress are registered in China MOTOROLA and the Stylized M Logo are owned by Binatone Electronics International LTD., official licensee for this product. Manufactured, distributed or sold by Motorola, Inc. and are the property of their respective owners. © Motorola, Inc. 2009. MOTOROLA and the Stylized M Logo, and other product or service names are used under license from Motorola, Inc. Version 2.0 Printed in the US Patent & Trademark Office. All rights reserved.