User Guide
Page 1
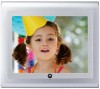
User's Guide For LS1000W 10.4" (26.4 cm) Digital Photo Frame Wi-Fi® Enabled Warning Use only the power adapter supplied with your product.
User's Guide For LS1000W 10.4" (26.4 cm) Digital Photo Frame Wi-Fi® Enabled Warning Use only the power adapter supplied with your product.

User Guide
Page 2
For warranty service of your dated sales receipt to set up your digital photo frame. Welcome... IMPORTANT z Only use the supplied power adapter. Please retain your original dated sales receipt for warranty coverage. For product-related ... you start using, you will need to your Motorola product, you need to provide a copy of your new Motorola Digital Photo Frame! z 1 x Digital Photo Frame z 1 x Stand z 1 x Power adapter z 1 x Remote control z 1 x Quick Start Guide z 1 x User's Guide Key features z 3 view modes: Clock/Calendar mode, slideshow mode and thumbnail mode z ...
For warranty service of your dated sales receipt to set up your digital photo frame. Welcome... IMPORTANT z Only use the supplied power adapter. Please retain your original dated sales receipt for warranty coverage. For product-related ... you start using, you will need to your Motorola product, you need to provide a copy of your new Motorola Digital Photo Frame! z 1 x Digital Photo Frame z 1 x Stand z 1 x Power adapter z 1 x Remote control z 1 x Quick Start Guide z 1 x User's Guide Key features z 3 view modes: Clock/Calendar mode, slideshow mode and thumbnail mode z ...
User Guide
Page 4
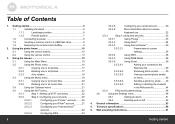
...photo frame 10 2.1 Using the control buttons 10 2.2 Using the remote control 13 3. Technical specifications 60 6. Using the menus 15 3.1 Using the Main Menu 15 3.2 Using the Photo menu 16 3.2.1 Copying one or all photos 17 3.2.2 Deleting one or all photos...Landscape position 6 1.1.2 Portrait position 7 1.2 Connecting to the Welcome list 39 3.5.3.6.2 Receiving photo emails...........40 3.5.3.6.3 Viewing received photo emails on inbox 42 3.5.3.6.4 Sending a photo by email........43 3.5.3.6.5 Editing or deleting the contacts in the Welcome list 44 3.5.4 ...
...photo frame 10 2.1 Using the control buttons 10 2.2 Using the remote control 13 3. Technical specifications 60 6. Using the menus 15 3.1 Using the Main Menu 15 3.2 Using the Photo menu 16 3.2.1 Copying one or all photos 17 3.2.2 Deleting one or all photos...Landscape position 6 1.1.2 Portrait position 7 1.2 Connecting to the Welcome list 39 3.5.3.6.2 Receiving photo emails...........40 3.5.3.6.3 Viewing received photo emails on inbox 42 3.5.3.6.4 Sending a photo by email........43 3.5.3.6.5 Editing or deleting the contacts in the Welcome list 44 3.5.4 ...

User Guide
Page 5
...the LCD screen, wipe gently with your digital photo frame in JPEG format. IMPORTANT Always switch off and disconnect the power adapter before cleaning the digital photo frame. Compatible photo format Your digital photo frame can only display photos that are in the bathroom or other humid... areas. Getting started WARNING z Do not place your digital photo frame. z If the LCD screen breaks, do ...
...the LCD screen, wipe gently with your digital photo frame in JPEG format. IMPORTANT Always switch off and disconnect the power adapter before cleaning the digital photo frame. Compatible photo format Your digital photo frame can only display photos that are in the bathroom or other humid... areas. Getting started WARNING z Do not place your digital photo frame. z If the LCD screen breaks, do ...

User Guide
Page 6
... started WARNING z Do not rotate the stand during the installation. 1.1 Installing the stand 3. z Once the installation is secured to the photo frame. 1.1.1 Landscape position To place the photo frame in landscape position. 2. Otherwise, the photo frame will be damaged. Insert the stand into the stand locking slot as illustrated, until the stand is complete, place the...
... started WARNING z Do not rotate the stand during the installation. 1.1 Installing the stand 3. z Once the installation is secured to the photo frame. 1.1.1 Landscape position To place the photo frame in landscape position. 2. Otherwise, the photo frame will be damaged. Insert the stand into the stand locking slot as illustrated, until the stand is complete, place the...

User Guide
Page 7
... steps below to install the stand. 1. Insert the stand into the stand locking slot as illustrated, until the stand is complete, place the photo frame on the back of the photo frame. 3. z Once the installation is secured to avoid any possible movement. 7 Getting started WARNING z Do not rotate the stand during the installation. 1.1.2 Portrait...
... steps below to install the stand. 1. Insert the stand into the stand locking slot as illustrated, until the stand is complete, place the photo frame on the back of the photo frame. 3. z Once the installation is secured to avoid any possible movement. 7 Getting started WARNING z Do not rotate the stand during the installation. 1.1.2 Portrait...

User Guide
Page 8
Plug the other end into a power outlet. NOTE z After you insert a photo-loaded memory card or USB flash drive and connect the photo frame to power, the photo frame will be turned on the back of the photo frame. 2. z You can also insert a memory card or a USB flash drive ...memory cards: SD, SDHC, MMC. z The memory card slot accepts these types of the photo frame, you purchased this photo frame. 1.3 Inserting a memory card or a USB flash drive The photo frame is preloaded with some photos in landscape or portrait position on the power. 1. The supported audio file format is JPEG ...
Plug the other end into a power outlet. NOTE z After you insert a photo-loaded memory card or USB flash drive and connect the photo frame to power, the photo frame will be turned on the back of the photo frame. 2. z You can also insert a memory card or a USB flash drive ...memory cards: SD, SDHC, MMC. z The memory card slot accepts these types of the photo frame, you purchased this photo frame. 1.3 Inserting a memory card or a USB flash drive The photo frame is preloaded with some photos in landscape or portrait position on the power. 1. The supported audio file format is JPEG ...

User Guide
Page 10
.../VOL+: moves up/increases the volume. d. z Stops the playback. 3 ON/OFF button z Turns on the back of the photo frame Or z Use the supplied remote control 2.1 Using the control buttons 10 No. RIGHT: moves right. LEFT: moves left. z Turns off the screen backlight to the ... the playback. 2 EXIT button z Returns to enter Standby mode. c. z Goes back to the previous page. b. DOWN/VOL-: moves down/decreases the volume. 2. Using the photo frame To operate the photo frame, you can: z Use the control buttons on the screen backlight.
.../VOL+: moves up/increases the volume. d. z Stops the playback. 3 ON/OFF button z Turns on the back of the photo frame Or z Use the supplied remote control 2.1 Using the control buttons 10 No. RIGHT: moves right. LEFT: moves left. z Turns off the screen backlight to the ... the playback. 2 EXIT button z Returns to enter Standby mode. c. z Goes back to the previous page. b. DOWN/VOL-: moves down/decreases the volume. 2. Using the photo frame To operate the photo frame, you can: z Use the control buttons on the screen backlight.

User Guide
Page 11
...paused Button UP/VOL+ DOWN/VOL- Function Selects the previous track. Enters sub-pages of Photo, Music, Calendar, Wi-Fi or Settings menu. When browsing photos in Single Photo view. Goes back to the previous page. EXIT Goes back to the previous page. Moves left. .... DOWN/VOL- Decreases the volume. RIGHT Selects the next track. Using the photo frame 11 Selects Internal Memory, USB or Memory Card. RIGHT EXIT Moves right. Displays the currently selected photo in thumbnail view Button Function UP/VOL+ DOWN/VOL- LEFT Moves up....
...paused Button UP/VOL+ DOWN/VOL- Function Selects the previous track. Enters sub-pages of Photo, Music, Calendar, Wi-Fi or Settings menu. When browsing photos in Single Photo view. Goes back to the previous page. EXIT Goes back to the previous page. Moves left. .... DOWN/VOL- Decreases the volume. RIGHT Selects the next track. Using the photo frame 11 Selects Internal Memory, USB or Memory Card. RIGHT EXIT Moves right. Displays the currently selected photo in thumbnail view Button Function UP/VOL+ DOWN/VOL- LEFT Moves up....

User Guide
Page 12
... up to the previous page. Selects Photo, Music, Calendar, Wi-Fi or Settings menu. When using the Calendar menu Button Function LEFT Selects Photo, Music, Calendar, Wi-Fi or Settings menu. z Enters sub-menus in Settings. Using the photo frame Goes back to select an item. ...Moves down to select an item. Selects Photo, Music, Calendar, Wi-Fi or Settings menu. z...
... up to the previous page. Selects Photo, Music, Calendar, Wi-Fi or Settings menu. When using the Calendar menu Button Function LEFT Selects Photo, Music, Calendar, Wi-Fi or Settings menu. z Enters sub-menus in Settings. Using the photo frame Goes back to select an item. ...Moves down to select an item. Selects Photo, Music, Calendar, Wi-Fi or Settings menu. z...
User Guide
Page 13
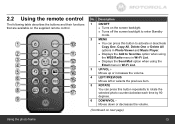
... backlight to enter Standby mode. 2 MENU z You can press this button to rotate the selected photo counterclockwise each time by 90 degrees. 6 DOWN/VOL- Moves down or decreases the volume. (Continued on next page) Using the photo frame 13 Description 1 ON/OFF z Turns on the supplied remote control. z Displays the Send Mail...
... backlight to enter Standby mode. 2 MENU z You can press this button to rotate the selected photo counterclockwise each time by 90 degrees. 6 DOWN/VOL- Moves down or decreases the volume. (Continued on next page) Using the photo frame 13 Description 1 ON/OFF z Turns on the supplied remote control. z Displays the Send Mail...
User Guide
Page 14
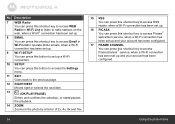
... been set up. 8 EMAIL You can press this shortcut key to access Email in Wi-Fi List to operate photo emails, when a Wi-Fi connection has been set up. 9 Wi-Fi SETUP You can press this button to...(OK/PLAY/PAUSE) Enters and confirms the selection, or starts/pauses the playback. 14 ZOOM Zooms in the photo by a factor of 2x, 4x, 8x and 16x. 15 RSS You can press this shortcut key to access... album service, when a Wi-Fi connection has been set up and your account has been configured. 17 FRAME CHANNEL You can press this shortcut key to access Framechannel™ service, when a Wi-Fi connection has ...
... been set up. 8 EMAIL You can press this shortcut key to access Email in Wi-Fi List to operate photo emails, when a Wi-Fi connection has been set up. 9 Wi-Fi SETUP You can press this button to...(OK/PLAY/PAUSE) Enters and confirms the selection, or starts/pauses the playback. 14 ZOOM Zooms in the photo by a factor of 2x, 4x, 8x and 16x. 15 RSS You can press this shortcut key to access... album service, when a Wi-Fi connection has been set up and your account has been configured. 17 FRAME CHANNEL You can press this shortcut key to access Framechannel™ service, when a Wi-Fi connection has ...

User Guide
Page 15
... Memory, USB or Memory Card, select Internal Memory, USB or Memory Card and check the amount of free space shown on the power of the photo frame. 3.1 Using the Main Menu After turning on the bottom right corner. In the Main Menu, you can: z Press the LEFT or RIGHT button to select... Card. 15 z Press the UP/VOL+ or DOWN/VOL- button to select the Photo, Music, Calendar, Wi-Fi or Settings menu. 3. Using the menus To exit slideshow mode and return to the Main Menu, press the EXIT button on the back of the photo frame, photos will play in slideshow mode automatically.
... Memory, USB or Memory Card, select Internal Memory, USB or Memory Card and check the amount of free space shown on the power of the photo frame. 3.1 Using the Main Menu After turning on the bottom right corner. In the Main Menu, you can: z Press the LEFT or RIGHT button to select... Card. 15 z Press the UP/VOL+ or DOWN/VOL- button to select the Photo, Music, Calendar, Wi-Fi or Settings menu. 3. Using the menus To exit slideshow mode and return to the Main Menu, press the EXIT button on the back of the photo frame, photos will play in slideshow mode automatically.

User Guide
Page 16
... the UP/VOL+, DOWN/VOL-, LEFT and RIGHT buttons. z To make photos play photos in thumbnail view. Press the UP/VOL+ or DOWN/VOL- button to enter Photo Viewer, which displays your device. In Photo Viewer, both photos and folders may display, depending on your remote control. Press the button to... the button again to start running slideshow. z To control the slideshow music volume, press the UP/VOL+ or DOWN/VOL- button. 3.2 Using the Photo menu NOTE The photo frame only supports JPEG (*.jpg) image file format. 1.
... the UP/VOL+, DOWN/VOL-, LEFT and RIGHT buttons. z To make photos play photos in thumbnail view. Press the UP/VOL+ or DOWN/VOL- button to enter Photo Viewer, which displays your device. In Photo Viewer, both photos and folders may display, depending on your remote control. Press the button to... the button again to start running slideshow. z To control the slideshow music volume, press the UP/VOL+ or DOWN/VOL- button. 3.2 Using the Photo menu NOTE The photo frame only supports JPEG (*.jpg) image file format. 1.

User Guide
Page 17
...; or DOWN/VOL- button to select the destination (USB, Memory Card or Internal Memory), and then press the button to confirm. In Photo Viewer, press the MENU button on the remote control. Copy One, Copy All, Delete One and Delete All options will appear on the screen....memory card or USB to select Yes, and then press the button. 4. 3.2.1 Copying one or all photos NOTE z To copy photos from the photo frame before the "Complete" message appears. 3.2.2 Deleting one or all photos NOTE Use the supplied remote control for this operation. 1. Copy One, Copy All, Delete One and Delete...
...; or DOWN/VOL- button to select the destination (USB, Memory Card or Internal Memory), and then press the button to confirm. In Photo Viewer, press the MENU button on the remote control. Copy One, Copy All, Delete One and Delete All options will appear on the screen....memory card or USB to select Yes, and then press the button. 4. 3.2.1 Copying one or all photos NOTE z To copy photos from the photo frame before the "Complete" message appears. 3.2.2 Deleting one or all photos NOTE Use the supplied remote control for this operation. 1. Copy One, Copy All, Delete One and Delete...

User Guide
Page 18
Follow the instructions below to enable auto rotation. • When the photo frame is placed in landscape position, rotate the photo frame 90 degrees counterclockwise to enable auto rotation. 18 Using the menus 3.2.3 Auto rotation The photo frame has a built-in portrait position, rotate the photo frame 90 degrees clockwise to enable auto rotation. • When the photo frame is placed in tilt sensor that allows auto rotation of photos.
Follow the instructions below to enable auto rotation. • When the photo frame is placed in landscape position, rotate the photo frame 90 degrees counterclockwise to enable auto rotation. 18 Using the menus 3.2.3 Auto rotation The photo frame has a built-in portrait position, rotate the photo frame 90 degrees clockwise to enable auto rotation. • When the photo frame is placed in tilt sensor that allows auto rotation of photos.

User Guide
Page 19
... DOWN/VOL- button. In the Main Menu, press the LEFT or RIGHT button to select the Music menu. 2. 3.3 Using the Music menu NOTE The photo frame only supports MP3 (*.mp3) audio file format. 1.
... DOWN/VOL- button. In the Main Menu, press the LEFT or RIGHT button to select the Music menu. 2. 3.3 Using the Music menu NOTE The photo frame only supports MP3 (*.mp3) audio file format. 1.

User Guide
Page 20
... files NOTE z To copy music files from your memory card or USB to the internal memory, please insert your USB or memory card from the photo frame before the "Complete" message appears. 20 Using the menus Copy One, Copy All, Delete One and Delete All options will appear on the remote control...
... files NOTE z To copy music files from your memory card or USB to the internal memory, please insert your USB or memory card from the photo frame before the "Complete" message appears. 20 Using the menus Copy One, Copy All, Delete One and Delete All options will appear on the remote control...

User Guide
Page 22
... automatic IP network: a. 3.5 Using the Wi-Fi menu To enjoy the provided web services, such as Picasa™, Flickr® and Framechannel™ from the photo frame, you need to sign up for a new account for automatic connection in the Wi-Fi Setup menu. 22 Using the menus Then, follow the steps...
... automatic IP network: a. 3.5 Using the Wi-Fi menu To enjoy the provided web services, such as Picasa™, Flickr® and Framechannel™ from the photo frame, you need to sign up for a new account for automatic connection in the Wi-Fi Setup menu. 22 Using the menus Then, follow the steps...

User Guide
Page 24
... and press the button, and then select OK and press the button. NOTE z When you have set up Wi-Fi® connection using DHCP, the photo frame will also clear all the settings in the middle and the icon on the remote control.
... and press the button, and then select OK and press the button. NOTE z When you have set up Wi-Fi® connection using DHCP, the photo frame will also clear all the settings in the middle and the icon on the remote control.