
User Guide
Page 2
...? z 1 x Digital Photo Frame z 1 x Stand z 1 x Power adapter z 1 x Remote control z 1 x Quick Start Guide z 1 x User's Guide Key features z 3 view modes: Clock/Calendar mode, slideshow mode and thumbnail mode z 5 slideshow transition effects z Date and Time settings z Programmable On/Off Time z Supports flash drive, SD, SDHC and MMC memory cards. Please retain your records. IMPORTANT z Only use the supplied power adapter. For warranty service of your Motorola product, you will need to set up your dated sales receipt to get the most from your new Motorola Digital Photo Frame! Follow the...
...? z 1 x Digital Photo Frame z 1 x Stand z 1 x Power adapter z 1 x Remote control z 1 x Quick Start Guide z 1 x User's Guide Key features z 3 view modes: Clock/Calendar mode, slideshow mode and thumbnail mode z 5 slideshow transition effects z Date and Time settings z Programmable On/Off Time z Supports flash drive, SD, SDHC and MMC memory cards. Please retain your records. IMPORTANT z Only use the supplied power adapter. For warranty service of your Motorola product, you will need to set up your dated sales receipt to get the most from your new Motorola Digital Photo Frame! Follow the...
User Guide
Page 4
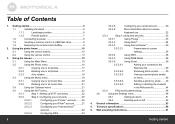
... /off 52 4. Getting started Technical specifications 60 6. Using the photo frame 10 2.1 Using the control buttons 10 2.2 Using the remote control 13 3. Using the menus 15 3.1 Using the Main Menu 15 3.2 Using the Photo menu 16 3.2.1 Copying one or all photos 17 3.2.2 Deleting one or all photos 17 3.2.3 Auto rotation 18 3.3 Using the Music menu 19 3.3.1 Copying one or all music files 20 3.3.2 Deleting one or all music files 21 3.4 Using the Calendar menu 21 3.5 Using the Wi-Fi menu 22 3.5.1 Step 1: Setting up Wi-Fi connection 22 3.5.2 Step...
... /off 52 4. Getting started Technical specifications 60 6. Using the photo frame 10 2.1 Using the control buttons 10 2.2 Using the remote control 13 3. Using the menus 15 3.1 Using the Main Menu 15 3.2 Using the Photo menu 16 3.2.1 Copying one or all photos 17 3.2.2 Deleting one or all photos 17 3.2.3 Auto rotation 18 3.3 Using the Music menu 19 3.3.1 Copying one or all music files 20 3.3.2 Deleting one or all music files 21 3.4 Using the Calendar menu 21 3.5 Using the Wi-Fi menu 22 3.5.1 Step 1: Setting up Wi-Fi connection 22 3.5.2 Step...

User Guide
Page 5
... or displayed correctly. Compatible photo format Your digital photo frame can only display photos that are designed specifically for assistance. z Use only the power adapter supplied with a soft, lint-free cloth. 1. Care and maintenance Wipe the frame and the LCD screen gently with a soft, clean, dry cloth. IMPORTANT Always switch off and disconnect the power adapter before cleaning the digital photo frame. there are no user-serviceable parts inside. Getting started WARNING z Do not place your digital photo frame. Getting started...
... or displayed correctly. Compatible photo format Your digital photo frame can only display photos that are designed specifically for assistance. z Use only the power adapter supplied with a soft, lint-free cloth. 1. Care and maintenance Wipe the frame and the LCD screen gently with a soft, clean, dry cloth. IMPORTANT Always switch off and disconnect the power adapter before cleaning the digital photo frame. there are no user-serviceable parts inside. Getting started WARNING z Do not place your digital photo frame. Getting started...

User Guide
Page 8
... photo frame. 2. z Video files are not supported on . 3. Plug one end of the AC power adapter to the power jack on the back of the photo frame, you can play audio and image files on a stable surface. Plug the other end into a power outlet. The power of memory cards: SD, SDHC, MMC. z The memory card slot and USB port both support hot-swap function. The supported audio file format is preloaded with some photos in the internal memory. z The memory card...
... photo frame. 2. z Video files are not supported on . 3. Plug one end of the AC power adapter to the power jack on the back of the photo frame, you can play audio and image files on a stable surface. Plug the other end into a power outlet. The power of memory cards: SD, SDHC, MMC. z The memory card slot and USB port both support hot-swap function. The supported audio file format is preloaded with some photos in the internal memory. z The memory card...

User Guide
Page 9
.... 1.4 Replacing the remote control battery The supplied remote control comes installed with the positive pole facing upwards in the illustrated position. 2. Slide the battery holder into fire. This may result in damage to local guidelines and regulations. WARNING z Protect the battery from overheating or excessive moisture. z Properly recycle or dispose of used batteries according to the battery. z Do not throw batteries into the remote control. Getting started...
.... 1.4 Replacing the remote control battery The supplied remote control comes installed with the positive pole facing upwards in the illustrated position. 2. Slide the battery holder into fire. This may result in damage to local guidelines and regulations. WARNING z Protect the battery from overheating or excessive moisture. z Properly recycle or dispose of used batteries according to the battery. z Do not throw batteries into the remote control. Getting started...

User Guide
Page 10
Using the photo frame To operate the photo frame, you can: z Use the control buttons on the screen backlight. Description 1 Navigation and buttons a. c. d. e. : Enters/confirms the selection, or starts/pauses the playback. 2 EXIT button z Returns to the previous page. z Goes back to the Main Menu. Using the photo frame b. RIGHT: moves right. z Stops the playback. 3 ON/OFF button z Turns on the back of the photo frame Or z Use the supplied remote control 2.1 Using the control buttons 10 No. UP/VOL...
Using the photo frame To operate the photo frame, you can: z Use the control buttons on the screen backlight. Description 1 Navigation and buttons a. c. d. e. : Enters/confirms the selection, or starts/pauses the playback. 2 EXIT button z Returns to the previous page. z Goes back to the Main Menu. Using the photo frame b. RIGHT: moves right. z Stops the playback. 3 ON/OFF button z Turns on the back of the photo frame Or z Use the supplied remote control 2.1 Using the control buttons 10 No. UP/VOL...

User Guide
Page 11
Selects Photo, Music, Calendar, Wi-Fi or Settings menu. Moves down. When playing a slideshow Button Function Starts/pauses the playback. Selects the next track. Selects the next track. Using the photo frame 11 When browsing photos in Single Photo view. RIGHT EXIT Moves right. RIGHT Selects the next track. LEFT RIGHT Selects Photo, Music, Calendar, Wi-Fi or Settings menu. Goes back to the previous page. DOWN/VOL- Decreases the...
Selects Photo, Music, Calendar, Wi-Fi or Settings menu. Moves down. When playing a slideshow Button Function Starts/pauses the playback. Selects the next track. Selects the next track. Using the photo frame 11 When browsing photos in Single Photo view. RIGHT EXIT Moves right. RIGHT Selects the next track. LEFT RIGHT Selects Photo, Music, Calendar, Wi-Fi or Settings menu. Goes back to the previous page. DOWN/VOL- Decreases the...
User Guide
Page 13
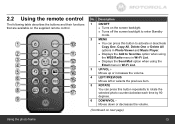
... z Turns on the supplied remote control. z Displays the Send Mail option when using the WEB Radio menu in Photo Viewer and Music Player. z Displays the Add to favorites option when using the Email menu in Wi-Fi List. 3 UP/VOL+ Moves up or increases the volume. 4 LEFT/PREVIOUS Moves left or selects the previous item. 5 ROTATE You can press this button repeatedly to activate or deactivate Copy One, Copy All, Delete...
... z Turns on the supplied remote control. z Displays the Send Mail option when using the WEB Radio menu in Photo Viewer and Music Player. z Displays the Add to favorites option when using the Email menu in Wi-Fi List. 3 UP/VOL+ Moves up or increases the volume. 4 LEFT/PREVIOUS Moves left or selects the previous item. 5 ROTATE You can press this button repeatedly to activate or deactivate Copy One, Copy All, Delete...

User Guide
Page 15
... the power of free space shown on the bottom right corner. In the Main Menu, you can: z Press the LEFT or RIGHT button to select a device, including Internal Memory, USB or Memory Card. 15 3. z If no memory card is inserted, photos in the built-in memory will play in slideshow mode automatically. z Press the UP/VOL+ or DOWN/VOL- button to select the Photo, Music, Calendar, Wi-Fi or Settings menu. Using...
... the power of free space shown on the bottom right corner. In the Main Menu, you can: z Press the LEFT or RIGHT button to select a device, including Internal Memory, USB or Memory Card. 15 3. z If no memory card is inserted, photos in the built-in memory will play in slideshow mode automatically. z Press the UP/VOL+ or DOWN/VOL- button to select the Photo, Music, Calendar, Wi-Fi or Settings menu. Using...

User Guide
Page 16
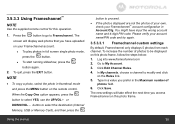
... Settings menu to set Music slideshow to On. (This function is only available when you have music files in the internal memory or inserted memory card/USB flash drive.) z To switch to the previous or next photo in slideshow mode, press the LEFT or RIGHT button. z To rotate a photo, press the ROTATE button on your device. 3.2 Using the Photo menu NOTE The photo frame only supports JPEG (*.jpg) image file format. 1. z To make photos play photos in a photo, press the ZOOM button on the content stored in thumbnail view...
... Settings menu to set Music slideshow to On. (This function is only available when you have music files in the internal memory or inserted memory card/USB flash drive.) z To switch to the previous or next photo in slideshow mode, press the LEFT or RIGHT button. z To rotate a photo, press the ROTATE button on your device. 3.2 Using the Photo menu NOTE The photo frame only supports JPEG (*.jpg) image file format. 1. z To make photos play photos in a photo, press the ZOOM button on the content stored in thumbnail view...

User Guide
Page 17
... copy process starts, do not remove your USB or memory card from your memory card or USB flash drive first. In Photo Viewer, press the MENU button on the remote control. Press the LEFT or RIGHT button to select Yes, and then press the button. 4. Press the UP/VOL+ or DOWN/VOL- button to select Copy One or Copy All, and then press the button. 3. Using the menus 17 z Use the supplied remote control for this operation...
... copy process starts, do not remove your USB or memory card from your memory card or USB flash drive first. In Photo Viewer, press the MENU button on the remote control. Press the LEFT or RIGHT button to select Yes, and then press the button. 4. Press the UP/VOL+ or DOWN/VOL- button to select Copy One or Copy All, and then press the button. 3. Using the menus 17 z Use the supplied remote control for this operation...

User Guide
Page 18
3.2.3 Auto rotation The photo frame has a built-in portrait position, rotate the photo frame 90 degrees clockwise to enable auto rotation. 18 Using the menus Follow the instructions below to enable auto rotation. • When the photo frame is placed in landscape position, rotate the photo frame 90 degrees counterclockwise to enable auto rotation. • When the photo frame is placed in tilt sensor that allows auto rotation of photos.
3.2.3 Auto rotation The photo frame has a built-in portrait position, rotate the photo frame 90 degrees clockwise to enable auto rotation. 18 Using the menus Follow the instructions below to enable auto rotation. • When the photo frame is placed in landscape position, rotate the photo frame 90 degrees counterclockwise to enable auto rotation. • When the photo frame is placed in tilt sensor that allows auto rotation of photos.

User Guide
Page 19
... RIGHT button to select a device. 3. z To select the next track, press the DOWN/VOL- or RIGHT button. 3.3 Using the Music menu NOTE The photo frame only supports MP3 (*.mp3) audio file format. 1. Press the UP/VOL+ or DOWN/VOL- button to select the Music menu. 2. Using the menus 19 z To select the previous track, press the UP/VOL+ or LEFT button. z During music playing, volume...
... RIGHT button to select a device. 3. z To select the next track, press the DOWN/VOL- or RIGHT button. 3.3 Using the Music menu NOTE The photo frame only supports MP3 (*.mp3) audio file format. 1. Press the UP/VOL+ or DOWN/VOL- button to select the Music menu. 2. Using the menus 19 z To select the previous track, press the UP/VOL+ or LEFT button. z During music playing, volume...

User Guide
Page 26
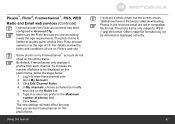
...then press the button. Press the EXIT button to return to www.picasa.google.com 1. NOTE When you have an existing account. d. and then press the button. Go to the Wi-Fi menu. Once the connection is powered on, you need to the Wi-...time the photo frame is established, the screen shows the "Your connection was successful" message in the middle and the icon on the Internet first if you have entered in the Choose AP page and press the button repeatedly to manually connect to sign up Wi-Fi® connection using Static IP Address, the photo frame will save the settings...
...then press the button. Press the EXIT button to return to www.picasa.google.com 1. NOTE When you have an existing account. d. and then press the button. Go to the Wi-Fi menu. Once the connection is powered on, you need to the Wi-...time the photo frame is established, the screen shows the "Your connection was successful" message in the middle and the icon on the Internet first if you have entered in the Choose AP page and press the button repeatedly to manually connect to sign up Wi-Fi® connection using Static IP Address, the photo frame will save the settings...
User Guide
Page 35
... try again. 3.5.3.3.1 Framechannel custom settings By default, Framechannel only displays 5 photos from each channel. z To start running slideshow, press the button again. 2. NOTE • To copy a photo, select the photo in full screen single photo mode, press the button. Click Save. You might have uploaded on this photo frame. The screen will take effect the next time you have input the wrong account name and 4-digit PIN code. Using the menus 35 Go...
... try again. 3.5.3.3.1 Framechannel custom settings By default, Framechannel only displays 5 photos from each channel. z To start running slideshow, press the button again. 2. NOTE • To copy a photo, select the photo in full screen single photo mode, press the button. Click Save. You might have uploaded on this photo frame. The screen will take effect the next time you have input the wrong account name and 4-digit PIN code. Using the menus 35 Go...

User Guide
Page 45
... Wi-Fi menu, but still cannot access my Flickr account in Wi-Fi List. • Make sure you have entered the correct email address in the "Email Adr:" field. For the "Account" field, you are connecting to is active and working properly. • The photo frame only supports 802.11b/g....com or others. • Make sure there is no extra space in the fields. Using the menus 45 3.5.4 FAQ and troubleshooting System There is no response from the photo frame and the system cannot restart automatically. • Press the button on the remote control to power off and press it again to...
... Wi-Fi menu, but still cannot access my Flickr account in Wi-Fi List. • Make sure you have entered the correct email address in the "Email Adr:" field. For the "Account" field, you are connecting to is active and working properly. • The photo frame only supports 802.11b/g....com or others. • Make sure there is no extra space in the fields. Using the menus 45 3.5.4 FAQ and troubleshooting System There is no response from the photo frame and the system cannot restart automatically. • Press the button on the remote control to power off and press it again to...
User Guide
Page 46
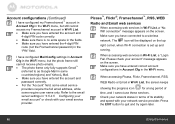
... icon will be displayed on the screen. Make sure you have entered the account and 4-digit PIN code correctly. • Make sure there is set up and running. Account configurations (Continued) I have configured my Framechannel™ account in Account Cfg in the Wi-Fi menu, but the photo frame still cannot receive photo emails. • The photo frame only fully supports Gmail™ (referred...
... icon will be displayed on the screen. Make sure you have entered the account and 4-digit PIN code correctly. • Make sure there is set up and running. Account configurations (Continued) I have configured my Framechannel™ account in Account Cfg in the Wi-Fi menu, but the photo frame still cannot receive photo emails. • The photo frame only fully supports Gmail™ (referred...
User Guide
Page 47
... web services (Continued) I received a photo email, but the screen shows "Slideshow these 0 Picture(s)" after downloading. Photos in the received email are accessing meets the age requirements. The photo frame is limited to My Account. 3. Click Save. Using the menus I cannot access the Flickr account that has been configured in compatible file format. By default, Framechannel only displays 5 photos from Flickr account owners over the age of photos field. 6. The new settings...
... web services (Continued) I received a photo email, but the screen shows "Slideshow these 0 Picture(s)" after downloading. Photos in the received email are accessing meets the age requirements. The photo frame is limited to My Account. 3. Click Save. Using the menus I cannot access the Flickr account that has been configured in compatible file format. By default, Framechannel only displays 5 photos from Flickr account owners over the age of photos field. 6. The new settings...
User Guide
Page 51
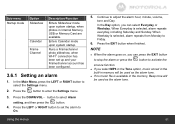
... the Settings menu. 2. When Weekday is available in the memory, Beep tone will be used as the alarm tone. Sub-menu Startup mode Option Slideshow Calendar Frame Channel Description/Function Enters Slideshow mode upon system startup. In the Main Menu, press the LEFT or RIGHT button to adjust the alarm hour, minute, volume, tone and Day. Press the EXIT button when finished. z If no music file is selected, alarm repeats...
... the Settings menu. 2. When Weekday is available in the memory, Beep tone will be used as the alarm tone. Sub-menu Startup mode Option Slideshow Calendar Frame Channel Description/Function Enters Slideshow mode upon system startup. In the Main Menu, press the LEFT or RIGHT button to adjust the alarm hour, minute, volume, tone and Day. Press the EXIT button when finished. z If no music file is selected, alarm repeats...
User Guide
Page 55
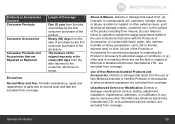
... consumer purchaser of the accessory. Periodic maintenance, repair and replacement of parts due to the consumer, whichever is longer. Abuse & Misuse. Use of Motorola or Binatone Electronics International LTD., are excluded from coverage. Defects or damage that result from the use , operation, storage, misuse or abuse, accident or neglect or other than Motorola, Binatone Electronics International LTD. Defects or damages resulting from the...
... consumer purchaser of the accessory. Periodic maintenance, repair and replacement of parts due to the consumer, whichever is longer. Abuse & Misuse. Use of Motorola or Binatone Electronics International LTD., are excluded from coverage. Defects or damage that result from the use , operation, storage, misuse or abuse, accident or neglect or other than Motorola, Binatone Electronics International LTD. Defects or damages resulting from the...