

Manual
Page 4
...zig-zag 5 64 14 60.62 12 50 88 BO 72, 74 6. 8 20 14. 16 86 28 14 Tension - upper thread 34 Tension , lower thread.. 26 Threading - upper thread 32 Three-slep zig-zag 54 Triple straight stitchatzag 60.62 Trouble shooting gild., 92 Twin needle (Model 740E only 44 Zips sewing... needle stop (Model 740E only) Athematic needle threader IM0001 7406 only' Band hemlingene stitch Bobbin - tension Bobbin - winding Bringing up the lower thread Bulb - lowenng Fool control Hemmer loot Inserting the needle Inserting the seam guide LED display Light MthntenanCe 10 20 36 78 26 26 24 38...
...zig-zag 5 64 14 60.62 12 50 88 BO 72, 74 6. 8 20 14. 16 86 28 14 Tension - upper thread 34 Tension , lower thread.. 26 Threading - upper thread 32 Three-slep zig-zag 54 Triple straight stitchatzag 60.62 Trouble shooting gild., 92 Twin needle (Model 740E only 44 Zips sewing... needle stop (Model 740E only) Athematic needle threader IM0001 7406 only' Band hemlingene stitch Bobbin - tension Bobbin - winding Bringing up the lower thread Bulb - lowenng Fool control Hemmer loot Inserting the needle Inserting the seam guide LED display Light MthntenanCe 10 20 36 78 26 26 24 38...
Manual
Page 5
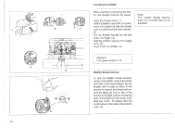
.... Do not unplug by qualified service per. Replace bulb with any adjustments in this manual. 3. Special care is being used by the manufacturer as threading needle, changing needle. threading bobbin, or changing presser foot. merits recommended by or near children, 2. electrical or mechanical adjustment. 4. IMPORTANT SAFETY INSTRUCTIONS When using this sewing machine...
.... Do not unplug by qualified service per. Replace bulb with any adjustments in this manual. 3. Special care is being used by the manufacturer as threading needle, changing needle. threading bobbin, or changing presser foot. merits recommended by or near children, 2. electrical or mechanical adjustment. 4. IMPORTANT SAFETY INSTRUCTIONS When using this sewing machine...
Manual
Page 7
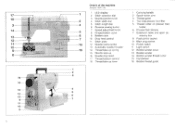
... I I 0 Power switch It Light switch 12 Bobbin winder Cover 13 Bobbin winder 14 Bobbin winder thread cutter 15 Handwheel 16 Bobbin thread guide 4 5 6 7 Thread take-up lever I Carrying handle 2 Spool holder pins 3 Thread guide 4 Two-step presser foot lifter 5 Thread cutter on presser toot holder 6 Presser toot release 7 Extension table and open accessory box 8 Foot...
... I I 0 Power switch It Light switch 12 Bobbin winder Cover 13 Bobbin winder 14 Bobbin winder thread cutter 15 Handwheel 16 Bobbin thread guide 4 5 6 7 Thread take-up lever I Carrying handle 2 Spool holder pins 3 Thread guide 4 Two-step presser foot lifter 5 Thread cutter on presser toot holder 6 Presser toot release 7 Extension table and open accessory box 8 Foot...
Manual
Page 8
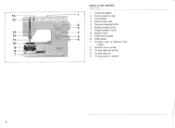
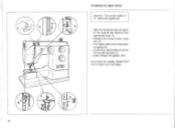
15 14 13-- 1 12 11 10 9 8 7 I . -..: I Details of the machine 1.10001 r1}) 1 1 Carrying handle 2 Stitch selection dial 3 Handwheel 4 Stitch length dial 2 5 Reverse sowing button 3 6 Bobbin winder cover 7 Hinged bobbin cover 4 8 Bobbin case 5 9 Drop feed control 6 10 Stich plate II Thread cutter on presser fool holder 12 Needle clamp screw 13 Thread take-up spring 14 Thread take.up 15 Thread tension control 8
15 14 13-- 1 12 11 10 9 8 7 I . -..: I Details of the machine 1.10001 r1}) 1 1 Carrying handle 2 Stitch selection dial 3 Handwheel 4 Stitch length dial 2 5 Reverse sowing button 3 6 Bobbin winder cover 7 Hinged bobbin cover 4 8 Bobbin case 5 9 Drop feed control 6 10 Stich plate II Thread cutter on presser fool holder 12 Needle clamp screw 13 Thread take-up spring 14 Thread take.up 15 Thread tension control 8
Manual
Page 16
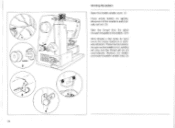
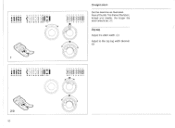
1 0 2 4 5 0 2 Winding the bobbin Open the bobbin winder cover. (1) Place empty bobbin on spindle. 3 Movement of the needle is automati- wincing will stop and the thread will be cut out. (2) Take the thread from the spool through the guide to the bobbin. (3/4) Wind thread a few times by hand round the empty bobbin in a clockwise direction. Press the foot control. Remove the bobbin aneciose thebobbin winder case. (5) 0 • 5 4 24 As soon as the bobbinishill. cally cut automatically.
1 0 2 4 5 0 2 Winding the bobbin Open the bobbin winder cover. (1) Place empty bobbin on spindle. 3 Movement of the needle is automati- wincing will stop and the thread will be cut out. (2) Take the thread from the spool through the guide to the bobbin. (3/4) Wind thread a few times by hand round the empty bobbin in a clockwise direction. Press the foot control. Remove the bobbin aneciose thebobbin winder case. (5) 0 • 5 4 24 As soon as the bobbinishill. cally cut automatically.
Manual
Page 17
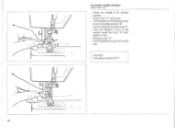
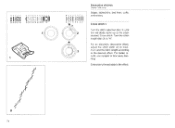
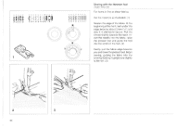
...Turn power switch to be fully raised. •" i 2 • 5 coo Inserting the bobbin When inserting or removing the bob- II the tension Is correct, the thread will drop too much. adjusted. remove the bobbin case and bobbin and hold it by suspending it will unwind by the...of the bobbin case. (6) 26 the needle must be Hold the bobbin case with one hand. Insert the bobbin so that the thread 3 runs in a clockwise direction (arrow). (2) Pull the thread through the slit and under the finger. (3) Hold the bobbin case by the hinged latch. (4) Insert it once or twice. ...
...Turn power switch to be fully raised. •" i 2 • 5 coo Inserting the bobbin When inserting or removing the bob- II the tension Is correct, the thread will drop too much. adjusted. remove the bobbin case and bobbin and hold it by suspending it will unwind by the...of the bobbin case. (6) 26 the needle must be Hold the bobbin case with one hand. Insert the bobbin so that the thread 3 runs in a clockwise direction (arrow). (2) Pull the thread through the slit and under the finger. (3) Hold the bobbin case by the hinged latch. (4) Insert it once or twice. ...
Manual
Page 19
...Stretch fabrics, e.g. knits For all types of thread type d'atoHe Travaux de couture Fine fabric. polyester thread Polyester thread Embroidery and darning thread cotton thread Cotton thread Embroidery thread Cotton thread Polyester thread Polyester thread Etoffes epaisses coutures p. rapecago, surrilage, boutonnieres.... Pintucks Decorative seams Double needle BO Leather, imitation leather All work Leather needle 80-100 Cotton thread polyester thread Jeans thread. coton. corduroy, tweed Seams Topstitching Universal needle 90-110 Hard, firm fabrics. similicuir tous ...
...Stretch fabrics, e.g. knits For all types of thread type d'atoHe Travaux de couture Fine fabric. polyester thread Polyester thread Embroidery and darning thread cotton thread Cotton thread Embroidery thread Cotton thread Polyester thread Polyester thread Etoffes epaisses coutures p. rapecago, surrilage, boutonnieres.... Pintucks Decorative seams Double needle BO Leather, imitation leather All work Leather needle 80-100 Cotton thread polyester thread Jeans thread. coton. corduroy, tweed Seams Topstitching Universal needle 90-110 Hard, firm fabrics. similicuir tous ...
Manual
Page 20
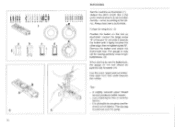
Take the thread through the guides (5/6) and thread the needle, always from front to back (see next page). 5 6 4 32 down through the guide on the back of the machine from right to leflthrough the thread take-up lever (4) - from nght to *T. between the thread tension dismi and (2) - upandfromright to left , then (1) - Raise the needle bar. - 2 3 p O O I Threading the upper thread Attention:Tum power switch to left in the thread takeup spring (3) -
Take the thread through the guides (5/6) and thread the needle, always from front to back (see next page). 5 6 4 32 down through the guide on the back of the machine from right to leflthrough the thread take-up lever (4) - from nght to *T. between the thread tension dismi and (2) - upandfromright to left , then (1) - Raise the needle bar. - 2 3 p O O I Threading the upper thread Attention:Tum power switch to left in the thread takeup spring (3) -

Manual
Page 21
A Normal thread tension B Thread tension too loose C Thread tension too tight 34 To reduce the tension, turn the dial to the next number down. f6 \ Upper thread tension Basic thread tension setting: 4 To increase the tension, turn the dial to the next number up.
A Normal thread tension B Thread tension too loose C Thread tension too tight 34 To reduce the tension, turn the dial to the next number down. f6 \ Upper thread tension Basic thread tension setting: 4 To increase the tension, turn the dial to the next number up.
Manual
Page 22
Thethreader automatically swings to its highest position - Release lever W - Pull the thread through the needle eye. Take the thread roundthehook t" - Raise the needle to the threading position "Ur - Press lever' right down - Attention: Tulin power switch to top - Automatic needle threader osce.,0 I 740h Cflly! - Take the thread in front of the needle found the hook V from bottom to T el 36
Thethreader automatically swings to its highest position - Release lever W - Pull the thread through the needle eye. Take the thread roundthehook t" - Raise the needle to the threading position "Ur - Press lever' right down - Attention: Tulin power switch to top - Automatic needle threader osce.,0 I 740h Cflly! - Take the thread in front of the needle found the hook V from bottom to T el 36
Manual
Page 23
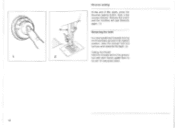
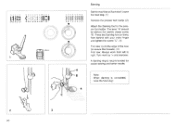
... until the needle is raised and pull on the upper thread to the back under the presser foot. The lowerthread can be brought up the lower thread. El • 11 A B 38 di Bringing up the lower thread 1'104:101 140E o-h1 The lower thread can also be brought up by using the needle slop... function or by using the handwheel: Hold the upper thread in your left hand. Lay both threads to bring up by lapping the foot control. 1 Hold the upper...
... until the needle is raised and pull on the upper thread to the back under the presser foot. The lowerthread can be brought up the lower thread. El • 11 A B 38 di Bringing up the lower thread 1'104:101 140E o-h1 The lower thread can also be brought up by using the needle slop... function or by using the handwheel: Hold the upper thread in your left hand. Lay both threads to bring up by lapping the foot control. 1 Hold the upper...
Manual
Page 24
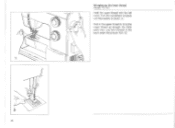
Lay both threads to bring the lower thread up the lower thread (Mule% 715. 730) Hold the upper thread with the left hand. Bringing up through the stitch plate hole. Turn the handvaieel forwards until the needle is raised. (1) Pull on the upper thread to the back under the presser foot. (2) .\\.'"•'" 40
Lay both threads to bring the lower thread up the lower thread (Mule% 715. 730) Hold the upper thread with the left hand. Bringing up through the stitch plate hole. Turn the handvaieel forwards until the needle is raised. (1) Pull on the upper thread to the back under the presser foot. (2) .\\.'"•'" 40
Manual
Page 25
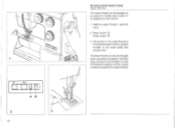
Release the button and the machine will sew forwards again. (1) Removing the work Turn the handwheel fontrardsto bring the thread take-up lever to its highest position, raise the presser foot and remove work towards the back (2) Cutting the thread: Hold the threads behind the presser foot with both hands, guide them to the slit 'A' and press down. 42 I 41 1 2 Reverse sewing At the end of the seam, press the Reverse sewing button. Sew a few reverse stitches.
Release the button and the machine will sew forwards again. (1) Removing the work Turn the handwheel fontrardsto bring the thread take-up lever to its highest position, raise the presser foot and remove work towards the back (2) Cutting the thread: Hold the threads behind the presser foot with both hands, guide them to the slit 'A' and press down. 42 I 41 1 2 Reverse sewing At the end of the seam, press the Reverse sewing button. Sew a few reverse stitches.
Manual
Page 26
... straight stitch. (1) The needle position can be obtained in jerseys, decorative work, pintucks. (2) Attention: Turn power switch to "01 Insert the Twin needle, thread both threads, see Illustration Page 30, thread needle eyes separately. For normal work ) C Needle position: L (edge stitching, etc.) D Needle position: R (top stitching, etc.) Attention: Use needle position -Centre" only...
... straight stitch. (1) The needle position can be obtained in jerseys, decorative work, pintucks. (2) Attention: Turn power switch to "01 Insert the Twin needle, thread both threads, see Illustration Page 30, thread needle eyes separately. For normal work ) C Needle position: L (edge stitching, etc.) D Needle position: R (top stitching, etc.) Attention: Use needle position -Centre" only...
Manual
Page 29
" 0000000 0 s 11 4 1 4 321 a Straight stitch Set the machine as illustrated. the longer the stitch should be. (I) Zigzag Adjust the stitch width. (2) Adjust to the zig-zag width desired. (3) 00000 Si3ii 24 22222120 0000.200•000 57 $ 13100 O assiscon•-o- , 'RO0 )%1 a 2/3 Sc Ruktofthumb:Thethickerthefabric, thread and needle. 00000 t:It: Nunn» 60660000000 455181101 iimusammull.-C-A 7.
" 0000000 0 s 11 4 1 4 321 a Straight stitch Set the machine as illustrated. the longer the stitch should be. (I) Zigzag Adjust the stitch width. (2) Adjust to the zig-zag width desired. (3) 00000 Si3ii 24 22222120 0000.200•000 57 $ 13100 O assiscon•-o- , 'RO0 )%1 a 2/3 Sc Ruktofthumb:Thethickerthefabric, thread and needle. 00000 t:It: Nunn» 60660000000 455181101 iimusammull.-C-A 7.

Manual
Page 40
use a paper or tearaway backing. Embroidery thread adds to the desired effect. adjust the stash width (2) to maximum and the stitch length °coming to the effect 19 20 21 22 23 ...
use a paper or tearaway backing. Embroidery thread adds to the desired effect. adjust the stash width (2) to maximum and the stitch length °coming to the effect 19 20 21 22 23 ...
Manual
Page 41
cuffs. decorative effect. Embroidery thread adds to 'V For an attraclive. bed linen. Cross stitch: Turn the stitch length dial (3) to the effect. 74 use a paper or tear-away backing. 000 0 0 0 0 0 ...
cuffs. decorative effect. Embroidery thread adds to 'V For an attraclive. bed linen. Cross stitch: Turn the stitch length dial (3) to the effect. 74 use a paper or tear-away backing. 000 0 0 0 0 0 ...
Manual
Page 42
A slightly reduced upper thread tension produces beget results. - It is advisable to sew the buttonhole. Always lest sew a buttonhole. Follow the sequence. 42) Position the button on the fool ...
A slightly reduced upper thread tension produces beget results. - It is advisable to sew the buttonhole. Always lest sew a buttonhole. Follow the sequence. 42) Position the button on the fool ...
Manual
Page 44
The lever 'K should be behind with your index finger and tighten the screw C. (3) First sew round the edge of the hole (to secure the threads). (4) First row: Always work by 'I' and oversew. Note: When darning is recommended for easier sewing and better results. Turn work from left to the presser ...
The lever 'K should be behind with your index finger and tighten the screw C. (3) First sew round the edge of the hole (to secure the threads). (4) First row: Always work by 'I' and oversew. Note: When darning is recommended for easier sewing and better results. Turn work from left to the presser ...
Manual
Page 47
...;0 0 6 II 1111 M6M OW% "71-t \., 1 00 a a co: f I 7 r f 4 32 1 Sewing with the Hemmer foot mate 704E onfi For hems in fine or sheer fabrics. Pell the thread slightly towards you and rower thepresser fool.Begin sewing, guiding the fabric into the scroll on the loot. (2) Gently pull the labrit edge towards the...
...;0 0 6 II 1111 M6M OW% "71-t \., 1 00 a a co: f I 7 r f 4 32 1 Sewing with the Hemmer foot mate 704E onfi For hems in fine or sheer fabrics. Pell the thread slightly towards you and rower thepresser fool.Begin sewing, guiding the fabric into the scroll on the loot. (2) Gently pull the labrit edge towards the...


