

Manual
Page 4
... 14 Tension - List of contents Accessories Automatic needle stop (Model 740E only) Athematic needle threader IM0001 7406 only' Band hemlingene stitch Bobbin - removing Presser loot - upper thread 34 Tension , lower thread.. 26 Threading - tension Bobbin - inserting Needle positrons Wadies/bread table Overlock stitches Practical stitChes PreSSOr lOOt - lowenng Fool control Hemmer loot Inserting the needle Inserting the seam guide LED display Light MthntenanCe 10 20 36 78 26 26 24 38,40 18 Neatening edges whole . changing Buttons sewing on (Model 740E onlyl Buttonholes Colour code...
... 14 Tension - List of contents Accessories Automatic needle stop (Model 740E only) Athematic needle threader IM0001 7406 only' Band hemlingene stitch Bobbin - removing Presser loot - upper thread 34 Tension , lower thread.. 26 Threading - tension Bobbin - inserting Needle positrons Wadies/bread table Overlock stitches Practical stitChes PreSSOr lOOt - lowenng Fool control Hemmer loot Inserting the needle Inserting the seam guide LED display Light MthntenanCe 10 20 36 78 26 26 24 38,40 18 Neatening edges whole . changing Buttons sewing on (Model 740E onlyl Buttonholes Colour code...
Manual
Page 5
... operate this appliance it it to the nearest authorized dealer or service center for Servicing of Double-Insulated Appliances (except USA/Canada) Servicing of the sewing machine and foot controller free fromaccumulationollint,dust.andloose cloth. 5. Always use as threading needle, changing needle. Donot pull or push fabric while stitching. such as described in this manual. 3. threading bobbin, or changing presser foot. Always unplug sewing machine from outlet. 15. To unplug. See instructions for examination, repair. IMPORTANT SAFETY INSTRUCTIONS...
... operate this appliance it it to the nearest authorized dealer or service center for Servicing of Double-Insulated Appliances (except USA/Canada) Servicing of the sewing machine and foot controller free fromaccumulationollint,dust.andloose cloth. 5. Always use as threading needle, changing needle. Donot pull or push fabric while stitching. such as described in this manual. 3. threading bobbin, or changing presser foot. Always unplug sewing machine from outlet. 15. To unplug. See instructions for examination, repair. IMPORTANT SAFETY INSTRUCTIONS...
Manual
Page 7
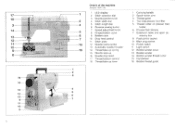
... dial 3 Needle position knob 4 Stitch width dial 5 Stitch length dial 6 Reverse sewing button 7 Speed adjustment knob 8 Hinged bobbin cover 9 Bobbin case I0 Drop feed control I I Stitch plate 12 Needle clamp screw 13 Automatic needle threader 14 Thread take -up 16 Needle stop up lever I Carrying handle 2 Spool holder pins 3 Thread guide 4 Two-step presser foot lifter 5 Thread cutter on presser toot holder 6 Presser toot release 7 Extension table and open accessory box 8 Foot control socket 9 Main plug socket I 0 Power switch It Light switch 12 Bobbin winder Cover 13 Bobbin winder 14 Bobbin...
... dial 3 Needle position knob 4 Stitch width dial 5 Stitch length dial 6 Reverse sewing button 7 Speed adjustment knob 8 Hinged bobbin cover 9 Bobbin case I0 Drop feed control I I Stitch plate 12 Needle clamp screw 13 Automatic needle threader 14 Thread take -up 16 Needle stop up lever I Carrying handle 2 Spool holder pins 3 Thread guide 4 Two-step presser foot lifter 5 Thread cutter on presser toot holder 6 Presser toot release 7 Extension table and open accessory box 8 Foot control socket 9 Main plug socket I 0 Power switch It Light switch 12 Bobbin winder Cover 13 Bobbin winder 14 Bobbin...
Manual
Page 8
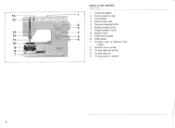
15 14 13-- 1 12 11 10 9 8 7 I . -..: I Details of the machine 1.10001 r1}) 1 1 Carrying handle 2 Stitch selection dial 3 Handwheel 4 Stitch length dial 2 5 Reverse sowing button 3 6 Bobbin winder cover 7 Hinged bobbin cover 4 8 Bobbin case 5 9 Drop feed control 6 10 Stich plate II Thread cutter on presser fool holder 12 Needle clamp screw 13 Thread take-up spring 14 Thread take.up 15 Thread tension control 8
15 14 13-- 1 12 11 10 9 8 7 I . -..: I Details of the machine 1.10001 r1}) 1 1 Carrying handle 2 Stitch selection dial 3 Handwheel 4 Stitch length dial 2 5 Reverse sowing button 3 6 Bobbin winder cover 7 Hinged bobbin cover 4 8 Bobbin case 5 9 Drop feed control 6 10 Stich plate II Thread cutter on presser fool holder 12 Needle clamp screw 13 Thread take-up spring 14 Thread take.up 15 Thread tension control 8
Manual
Page 9
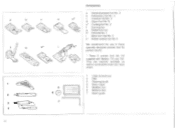
... Button sewing foot No. 6 We recommend the use of these specially designed presser feet for period results. ' Those 3 presser leet am not supplied with Models 715 and 730. They are however available as special accessories from your local dealer 5 0 7 Large screwdriver 2 Oiler 3 Cleaning brush 4 Seam ripper 5 Needles (3x) 6 Bobbins (3x) 7 Seam guide a 9 cal' 2 3 IMO iQ 4 C tiCZO 10 Accessories a General purpose fool No. 3 b Embroidery toot No. 4 e" c Overlock foot No 8 d Zipper foot No. N et' Cording foot No. 2 f Darning foot g Buttonhole...
... Button sewing foot No. 6 We recommend the use of these specially designed presser feet for period results. ' Those 3 presser leet am not supplied with Models 715 and 730. They are however available as special accessories from your local dealer 5 0 7 Large screwdriver 2 Oiler 3 Cleaning brush 4 Seam ripper 5 Needles (3x) 6 Bobbins (3x) 7 Seam guide a 9 cal' 2 3 IMO iQ 4 C tiCZO 10 Accessories a General purpose fool No. 3 b Embroidery toot No. 4 e" c Overlock foot No 8 d Zipper foot No. N et' Cording foot No. 2 f Darning foot g Buttonhole...
Manual
Page 13
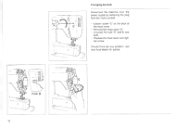
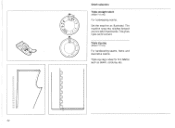
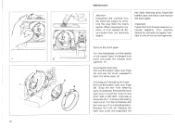
Remove the head cover "Cr. • - Replace the head cover and tigh- Should there be any problem, ask your local dealer for advice. Changing the bulb Disconnect the machine from the power supply by removing the plug from the mains socket! - ten screw. t to Unscrew the bulb "E" arid fit new bulb. - Loosen screw "C" on the back of the head cover. -
Remove the head cover "Cr. • - Replace the head cover and tigh- Should there be any problem, ask your local dealer for advice. Changing the bulb Disconnect the machine from the power supply by removing the plug from the mains socket! - ten screw. t to Unscrew the bulb "E" arid fit new bulb. - Loosen screw "C" on the back of the head cover. -
Manual
Page 14
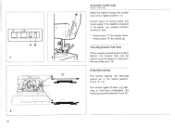
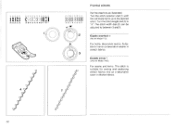
... types of work . (2) Drop teed control For normal sewing. sewing corners. starting to sew. - darning or free-hand embroidery. e.g. Press button 13" for needle up Two-step presser toot lever When sewing several layers or thick fabrics, the presser loot can be in the fabric. the feed-dog should be raised a second stage for needle down - the feeddogmust belowered. Press13". r • • A B 1 • a 3 20 Automatic needle stop (WOW 740E orgy) When the machine stops. e.g. the needle...
... types of work . (2) Drop teed control For normal sewing. sewing corners. starting to sew. - darning or free-hand embroidery. e.g. Press button 13" for needle up Two-step presser toot lever When sewing several layers or thick fabrics, the presser loot can be in the fabric. the feed-dog should be raised a second stage for needle down - the feeddogmust belowered. Press13". r • • A B 1 • a 3 20 Automatic needle stop (WOW 740E orgy) When the machine stops. e.g. the needle...
Manual
Page 26
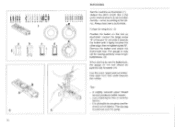
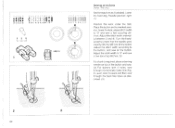
... power switch to check that the needle does not go Into the stitch plate. Always sew on the type of the fabric with a Thin needle (Model 740E only) For visible seams in jersey can be sewn and neatened inoneoperation.Attractive effects can be altered with the lever A. B Needle position: C narnal work , the needle position is Centre. Sewing with a Twin needle. For safety's sake, turn the handwheel to "01 Insert the Twin needle, thread...
... power switch to check that the needle does not go Into the stitch plate. Always sew on the type of the fabric with a Thin needle (Model 740E only) For visible seams in jersey can be sewn and neatened inoneoperation.Attractive effects can be altered with the lever A. B Needle position: C narnal work , the needle position is Centre. Sewing with a Twin needle. For safety's sake, turn the handwheel to "01 Insert the Twin needle, thread...
Manual
Page 29
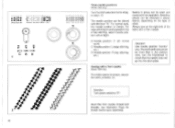
" 0000000 0 s 11 4 1 4 321 a Straight stitch Set the machine as illustrated. Ruktofthumb:Thethickerthefabric, thread and needle. 00000 t:It: Nunn» 60660000000 455181101 iimusammull.-C-A 7. the longer the stitch should be. (I) Zigzag Adjust the stitch width. (2) Adjust to the zig-zag width desired. (3) 00000 Si3ii 24 22222120 0000.200•000 57 $ 13100 O assiscon•-o- , 'RO0 )%1 a 2/3 Sc
" 0000000 0 s 11 4 1 4 321 a Straight stitch Set the machine as illustrated. Ruktofthumb:Thethickerthefabric, thread and needle. 00000 t:It: Nunn» 60660000000 455181101 iimusammull.-C-A 7. the longer the stitch should be. (I) Zigzag Adjust the stitch width. (2) Adjust to the zig-zag width desired. (3) 00000 Si3ii 24 22222120 0000.200•000 57 $ 13100 O assiscon•-o- , 'RO0 )%1 a 2/3 Sc
Manual
Page 30
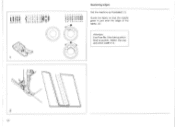
Ct. 52 0000 00000600000 tilt: S I`.-‹111 2473221110 IIIII7111011000 ,-10a • 1 00000000 MUM 31 Neatening edges Set the machine as illustrated. (I) Guide the fabric so that the needle goes in just over the edge of the labia (2) Attention: UseFoot No. 8 for fabrics which tend to pucker. Select La-tag and stitch width 4-5.
Ct. 52 0000 00000600000 tilt: S I`.-‹111 2473221110 IIIII7111011000 ,-10a • 1 00000000 MUM 31 Neatening edges Set the machine as illustrated. (I) Guide the fabric so that the needle goes in just over the edge of the labia (2) Attention: UseFoot No. 8 for fabrics which tend to pucker. Select La-tag and stitch width 4-5.
Manual
Page 32
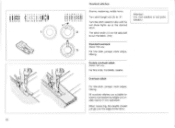
... Seams, neatening, visible hems. Turn stitch length dial (3) to suit the fabric. (4-5) Attention: Use new needles or ball point I needles' • Standard overlook (Woe 740E only) For fine knits, jerseys. seams. Overlock stitch For fine knits, jerseys. When neatening, the needle should just go over the edge of the fabric. Double overlook stitch (Mozlel 740E (ray) For line knits, handknits. ribbing. neck edges. All overlock stitches are suitable for sewing...
... Seams, neatening, visible hems. Turn stitch length dial (3) to suit the fabric. (4-5) Attention: Use new needles or ball point I needles' • Standard overlook (Woe 740E only) For fine knits, jerseys. seams. Overlock stitch For fine knits, jerseys. When neatening, the needle should just go over the edge of the fabric. Double overlook stitch (Mozlel 740E (ray) For line knits, handknits. ribbing. neck edges. All overlock stitches are suitable for sewing...
Manual
Page 33
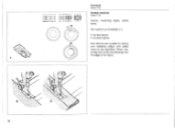
cs 540,AM:: 58 t0 E for fine fabrics C for thick fabrics Both stitches aro suitable for sewing and neatening edges and visible • hems in ono operation. tening, the needle should just go over 1 the edge of the fabric. 0 0 0 0 0 0 0 9 1 t 0 0 00* OIM I1till UD 11111012 II • r 7 1 1 41 2 1-1 Overlock (IOUS 230) Stretch warlock (Model 2301 Seams, neatening edges, visible hems. 0 Set machine as illustrated. When nea-
cs 540,AM:: 58 t0 E for fine fabrics C for thick fabrics Both stitches aro suitable for sewing and neatening edges and visible • hems in ono operation. tening, the needle should just go over 1 the edge of the fabric. 0 0 0 0 0 0 0 9 1 t 0 0 00* OIM I1till UD 11111012 II • r 7 1 1 41 2 1-1 Overlock (IOUS 230) Stretch warlock (Model 2301 Seams, neatening edges, visible hems. 0 Set machine as illustrated. When nea-
Manual
Page 34
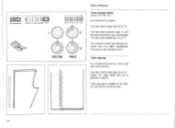
... the stitch length dial (3) to '0'. etc. 60 Turn the stitch width dial (2) to W. This given triple reinforcement. Triple zlisag For hardwearing seams, hems and decorators seams. Turn the stitch length dial (3) to between 3 and 5. Adjust the stitch width dial (2) to ' . Triple zig-zag is Suitable for firm fabrics like denim, corduroy. Turn the sfitch selection dial (1) until the red diode lights up as illustrated. 0 00 0 0 00000000000 II!!! The machine sews two stitches...
... the stitch length dial (3) to '0'. etc. 60 Turn the stitch width dial (2) to W. This given triple reinforcement. Triple zlisag For hardwearing seams, hems and decorators seams. Turn the stitch length dial (3) to between 3 and 5. Adjust the stitch width dial (2) to ' . Triple zig-zag is Suitable for firm fabrics like denim, corduroy. Turn the sfitch selection dial (1) until the red diode lights up as illustrated. 0 00 0 0 00000000000 II!!! The machine sews two stitches...
Manual
Page 35
The machine sews two stitches forward and one stitch backwards. Triple zig-zag tiloded ris only) For hardwearing seams. hems and decorative seams. Triple zig-zag is ideal for firm fabrics such as illustrated. This gives triple reinforcement. I rr to • o Stitch selection Triple straight stitch llkdel 715 only) For hardwearing seams. Set the machine as denim, corduroy. etc. 62
The machine sews two stitches forward and one stitch backwards. Triple zig-zag tiloded ris only) For hardwearing seams. hems and decorative seams. Triple zig-zag is ideal for firm fabrics such as illustrated. This gives triple reinforcement. I rr to • o Stitch selection Triple straight stitch llkdel 715 only) For hardwearing seams. Set the machine as denim, corduroy. etc. 62
Manual
Page 38
... stitches Set the machine as a decorative seam in thicker fabrics. 68 The stitch width dial (2) can be adjusted to between 3 and 5. Turn the stitch selection dial (1) until the red diode lights up at the desired stitch. Turn the stitchlength dial(31to A. Elastic overlock 4 eau for lAodel 715) For hems. decorative seams. Suitable for hems or decorative seams in StralCh fabrics. • Double arrow 7 lorty for Model 740E) For seams and hems. Tins stitch is suitable for sewing...
... stitches Set the machine as a decorative seam in thicker fabrics. 68 The stitch width dial (2) can be adjusted to between 3 and 5. Turn the stitch selection dial (1) until the red diode lights up at the desired stitch. Turn the stitchlength dial(31to A. Elastic overlock 4 eau for lAodel 715) For hems. decorative seams. Suitable for hems or decorative seams in StralCh fabrics. • Double arrow 7 lorty for Model 740E) For seams and hems. Tins stitch is suitable for sewing...
Manual
Page 42
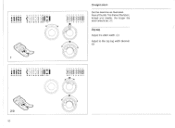
... illustrated. (I) (Adjust the stitch length dial in the greenmarkedmotor aoorrect stitch density - 00000 nits 1413210 ao 00000000•0• of the pail lc and slide it lightly touches the other edge. Tips' - Use a backing for line or stretchy fabrics. - A slightly reduced upper thread tension produces beget results. - Remove the button and attach the Buttonhole toot. Follow the sequence. 42) Position the button on the fool should sew over...
... illustrated. (I) (Adjust the stitch length dial in the greenmarkedmotor aoorrect stitch density - 00000 nits 1413210 ao 00000000•0• of the pail lc and slide it lightly touches the other edge. Tips' - Use a backing for line or stretchy fabrics. - A slightly reduced upper thread tension produces beget results. - Remove the button and attach the Buttonhole toot. Follow the sequence. 42) Position the button on the fool should sew over...
Manual
Page 43
...: It takes practice to sew blind hems. Always make a sewing test first. skids. Turn the speed control to the left. 0 o 0 0 0 oineoe•nocioci 0 00 0 000 00 Milan 11 • Blind hem lingerie stitch For hems. curtains. etc. 14 Blind hem for stretch fabrics. 15 Blind hemflingene for firm nab• rics. Turn thehandwheel forwardsbyhanduntil the needle swings fully to Minimum! 76 trousers. Set the machine as illustrated with the...
...: It takes practice to sew blind hems. Always make a sewing test first. skids. Turn the speed control to the left. 0 o 0 0 0 oineoe•nocioci 0 00 0 000 00 Milan 11 • Blind hem lingerie stitch For hems. curtains. etc. 14 Blind hem for stretch fabrics. 15 Blind hemflingene for firm nab• rics. Turn thehandwheel forwardsbyhanduntil the needle swings fully to Minimum! 76 trousers. Set the machine as illustrated with the...
Manual
Page 46
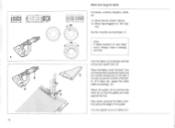
... stitch width to and sew a few securing slit• ches. push work under the foot. adjuststtch width to the button). and sew on buttons Imoce 140E ont, Set the machine as described. (3) 2 3 84 Turn the hand • wheel to check that the needle goes cleanly into the lett hole of the button and sew. (3) For buttons with d holes, sew through the back two holes as illustrated.Lower the teed dog...
... stitch width to and sew a few securing slit• ches. push work under the foot. adjuststtch width to the button). and sew on buttons Imoce 140E ont, Set the machine as described. (3) 2 3 84 Turn the hand • wheel to check that the needle goes cleanly into the lett hole of the button and sew. (3) For buttons with d holes, sew through the back two holes as illustrated.Lower the teed dog...
Manual
Page 49
... machine. Important Fabric fluff and threads must always be removed regularly. Snap the two hook retaining arms (31outwards. Replace the hook race cover and snap back the Remove the stitch plate: Turn the handwheel until thehook race(7)is hilly raised. Remove the hook race cover (4) and the hook (5) and clean with sewing machine oil. Lubricate at one of our service agencies. Open the hinged front cover and push the release lever upwards. (I) Cleaning the feed dog: Remove the bobbin case...
... machine. Important Fabric fluff and threads must always be removed regularly. Snap the two hook retaining arms (31outwards. Replace the hook race cover and snap back the Remove the stitch plate: Turn the handwheel until thehook race(7)is hilly raised. Remove the hook race cover (4) and the hook (5) and clean with sewing machine oil. Lubricate at one of our service agencies. Open the hinged front cover and push the release lever upwards. (I) Cleaning the feed dog: Remove the bobbin case...
Manual
Page 50
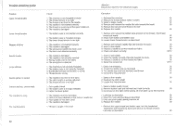
... lover thread tension as deserted 26 1. Mom a needle to semi The ch!ea0 and falar4 4 Check ard =lath conectly 28 30 30 2210 1 Insert a new need* 2 Men me upper thread and bobbin case, turn the nardwheel backwards and forwards by the mettle. Trouble shooting guide Problem uppoi ;Mead beaks sower tread breaks $kppod addles Neode breaks LOOSO 040-06 Seams gather or Outlier Unevon stitches. Rethread des machine 32...
... lover thread tension as deserted 26 1. Mom a needle to semi The ch!ea0 and falar4 4 Check ard =lath conectly 28 30 30 2210 1 Insert a new need* 2 Men me upper thread and bobbin case, turn the nardwheel backwards and forwards by the mettle. Trouble shooting guide Problem uppoi ;Mead beaks sower tread breaks $kppod addles Neode breaks LOOSO 040-06 Seams gather or Outlier Unevon stitches. Rethread des machine 32...


