User Guide
Page 1
...; it has been dropped or damaged, • it is required around the sewing needle. 6. Turn power switch to the nearest authorized BERNINA dealer or service center for any possible damage as threading or changing the needle, threading the bobbin or changing the presser foot etc. 10... examination, repair, electrical or mechanical adjustment. 4. Always use bent needles. 8. Do not use the BERNINA original stitch plate. Do not use , it to those parts in this manual. Do not operate where aerosol (spray) products are provided instead of the sewing computer. 17. Do not unplug by ...
...; it has been dropped or damaged, • it is required around the sewing needle. 6. Turn power switch to the nearest authorized BERNINA dealer or service center for any possible damage as threading or changing the needle, threading the bobbin or changing the presser foot etc. 10... examination, repair, electrical or mechanical adjustment. 4. Always use bent needles. 8. Do not use the BERNINA original stitch plate. Do not use , it to those parts in this manual. Do not operate where aerosol (spray) products are provided instead of the sewing computer. 17. Do not unplug by ...
User Guide
Page 4
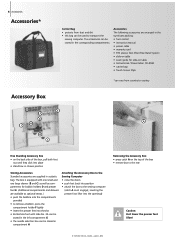
... feet back into place • stand box in chosen position Storing Accessories Standard accessories are supplied in the styrofoam packing: • foot control • instruction manual • power cable • warranty card • FHS presser foot lifter (Free Hand System) • slide-on table • seam guide for bobbin holders D and...
... feet back into place • stand box in chosen position Storing Accessories Standard accessories are supplied in the styrofoam packing: • foot control • instruction manual • power cable • warranty card • FHS presser foot lifter (Free Hand System) • slide-on table • seam guide for bobbin holders D and...

User Guide
Page 31
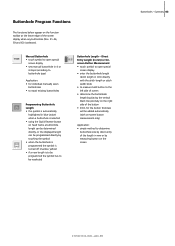
The symbol is inactive (gray) Applications: • sewing individual motifs • combine with 2 is blue) Manual 4 or 6 Step Buttonholes • touch symbol • a special screen appears • sew manual buttonhole in 4 or 6 steps (according to approx. 6mm (field with practical and decorative stitches Direct Entry Length (in mm) or On-screen Button Measurement...
The symbol is inactive (gray) Applications: • sewing individual motifs • combine with 2 is blue) Manual 4 or 6 Step Buttonholes • touch symbol • a special screen appears • sew manual buttonhole in 4 or 6 steps (according to approx. 6mm (field with practical and decorative stitches Direct Entry Length (in mm) or On-screen Button Measurement...
User Guide
Page 37
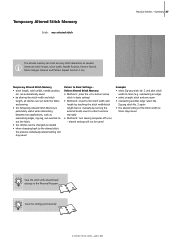
... Practical Stitches - Summary 37 The altered memory can be saved Example: • select Zig-zag stitch No. 2 and alter stitch width to other functions manually • Method 3: turn sewing computer off («0») - Delete Altered Stitch Memory • Method 1: press the «clr» button (active...settings in basic setting) • Method 2: revert to the stitch width and length by touching the stitch width/stitch length bar (or manually by altering the stitch width and stitch length, all stitches can suit both the fabric and sewing • the Temporary Altered Stitch Memory...
... Practical Stitches - Summary 37 The altered memory can be saved Example: • select Zig-zag stitch No. 2 and alter stitch width to other functions manually • Method 3: turn sewing computer off («0») - Delete Altered Stitch Memory • Method 1: press the «clr» button (active...settings in basic setting) • Method 2: revert to the stitch width and length by touching the stitch width/stitch length bar (or manually by altering the stitch width and stitch length, all stitches can suit both the fabric and sewing • the Temporary Altered Stitch Memory...

User Guide
Page 38
manual darning • suitable for all fabrics Triple Straight Stitch Seam Stitch: Needle: Thread: Feed dog: Presser foot: Triple straight stitch No. 6 Jeans or 80-90 ...
manual darning • suitable for all fabrics Triple Straight Stitch Seam Stitch: Needle: Thread: Feed dog: Presser foot: Triple straight stitch No. 6 Jeans or 80-90 ...

User Guide
Page 43
... too close , sewing beyond the worn area) • work the rows in all fabrics. Cover the First Rows • sew over the fabric Practical Stitches - Manual Darning Stitch: Needle: Thread: Feed dog: Presser foot: Straight stitch No. 1 size and type suitable for a soft finish • turn work by a half turn - 90...
... too close , sewing beyond the worn area) • work the rows in all fabrics. Cover the First Rows • sew over the fabric Practical Stitches - Manual Darning Stitch: Needle: Thread: Feed dog: Presser foot: Straight stitch No. 1 size and type suitable for a soft finish • turn work by a half turn - 90...
User Guide
Page 63
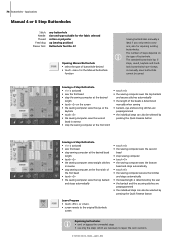
...) or Onscreen Button Measurement • touch symbol to open special screen display • sew manual buttonhole in 4 or 6 steps (according to buttonhole type) Application: • for individual manually sewn buttonholes • to repair existing buttonholes Programming Buttonhole Length • the symbol is automatically... hold button to the left side of screen • determine the buttonhole length by measuring button on the screen Buttonholes - Manual Buttonhole • touch symbol to open special screen display • enter the buttonhole length (stitch length in mm) directly ...
...) or Onscreen Button Measurement • touch symbol to open special screen display • sew manual buttonhole in 4 or 6 steps (according to buttonhole type) Application: • for individual manually sewn buttonholes • to repair existing buttonholes Programming Buttonhole Length • the symbol is automatically... hold button to the left side of screen • determine the buttonhole length by measuring button on the screen Buttonholes - Manual Buttonhole • touch symbol to open special screen display • enter the buttonhole length (stitch length in mm) directly ...
User Guide
Page 64
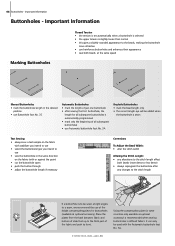
... you intend to use • select the buttonhole type you intend to use of the fabric and push to be sewn at the same speed Manual Buttonholes • mark the buttonhole length in some countries only available as optional accessory). Place the plates from the back between fabric and bottom of...
... you intend to use • select the buttonhole type you intend to use of the fabric and push to be sewn at the same speed Manual Buttonholes • mark the buttonhole length in some countries only available as optional accessory). Place the plates from the back between fabric and bottom of...
User Guide
Page 68
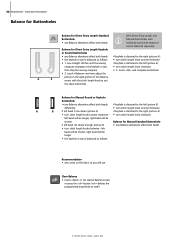
... Buttonholes Balance for Direct Entry Length Standard With Direct Entry Length and Buttonhole Manual buttonholes each • any Balance alterations affect both beads individual buttonhole sequence can be shorter Balance for Manual Round or Keyhole Buttonhole • any Balance alterations affect both beads if...«Reset» in the right portion of the Balance screen with the stitch length knob to suit the sewn buttonhole Balance for Manual Standard Buttonhole if left bead is too dense (picture A) if keyhole is distorted to the right (picture A): • the keyhole...
... Buttonholes Balance for Direct Entry Length Standard With Direct Entry Length and Buttonhole Manual buttonholes each • any Balance alterations affect both beads individual buttonhole sequence can be shorter Balance for Manual Round or Keyhole Buttonhole • any Balance alterations affect both beads if...«Reset» in the right portion of the Balance screen with the stitch length knob to suit the sewn buttonhole Balance for Manual Standard Buttonhole if left bead is too dense (picture A) if keyhole is distorted to the right (picture A): • the keyhole...
User Guide
Page 74
... sews the second bead • stop the sewing computer at the desired length • touch «2» on the type of buttonhole. A manually sewn buttonhole cannot be selected by pressing the Quick Reverse button Leave Program • touch «ESC» or «man» •...also be selected by the user • the bartack and the securing stitches are necessary to sew one; also for the Manual buttonhole function Sewing buttonholes manually is ideal if you only need to repair the worn sections The standard buttonhole has 6 steps, round, keyhole and handlook buttonholes...
... sews the second bead • stop the sewing computer at the desired length • touch «2» on the type of buttonhole. A manually sewn buttonhole cannot be selected by pressing the Quick Reverse button Leave Program • touch «ESC» or «man» •...also be selected by the user • the bartack and the securing stitches are necessary to sew one; also for the Manual buttonhole function Sewing buttonholes manually is ideal if you only need to repair the worn sections The standard buttonhole has 6 steps, round, keyhole and handlook buttonholes...
User Guide
Page 106
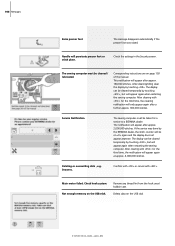
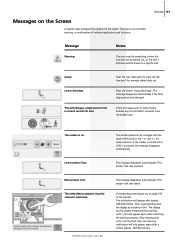
...stitch counter will appear again when restarting the sewing computer. Service Notification The sewing computer must be taken for a service to a BERNINA dealer. Main motor failed. Remove any thread lint from the hook area / bobbin case. The sewing computer must be cleaned /... The display can be on the USB stick Deleting or overwriting data , e.g. Drawers. Not enough memory on page 103 of the manual. Check hook system. This notification will only appear again after approx. 2,000,000 stitches. 106 Messages Raise presser foot The message ...
...stitch counter will appear again when restarting the sewing computer. Service Notification The sewing computer must be taken for a service to a BERNINA dealer. Main motor failed. Remove any thread lint from the hook area / bobbin case. The sewing computer must be cleaned /... The display can be on the USB stick Deleting or overwriting data , e.g. Drawers. Not enough memory on page 103 of the manual. Check hook system. This notification will only appear again after approx. 2,000,000 stitches. 106 Messages Raise presser foot The message ...
User Guide
Page 109
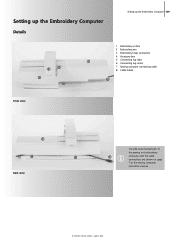
Setting up the Embroidery Computer Details Setting up the Embroidery Computer 109 2 4 3 6 1 Embroidery surface 2 Embroidery arm 3 Embroidery hoop connection 4 Accessory box 1 5 Connecting lug right 6 Connecting lug center 7 Sewing computer connecting cable 8 Cable holder 5 Front view 1 8 8 Back view The side view (handwheel) of the sewing and embroidery 7 computer with the cable connections are shown on page 7 of the sewing computer instruction manual.
Setting up the Embroidery Computer Details Setting up the Embroidery Computer 109 2 4 3 6 1 Embroidery surface 2 Embroidery arm 3 Embroidery hoop connection 4 Accessory box 1 5 Connecting lug right 6 Connecting lug center 7 Sewing computer connecting cable 8 Cable holder 5 Front view 1 8 8 Back view The side view (handwheel) of the sewing and embroidery 7 computer with the cable connections are shown on page 7 of the sewing computer instruction manual.

User Guide
Page 142
... of a word or each word of a word combination in one color, touch the Single/Multi Color Motif symbol now visible Embroidering Individual Color Sections and Manual Adjustment of color)
... of a word or each word of a word combination in one color, touch the Single/Multi Color Motif symbol now visible Embroidering Individual Color Sections and Manual Adjustment of color)
User Guide
Page 151
.... The message disappears automatically if the presser foot was lowered. The display can be cleaned / lubricated. They serve as a reminder, warning, or confirmation of the manual. Remove any lint and fabric remnants from the bobbin case. The winder speed can be carried out, or the user's attention will only appear again...
.... The message disappears automatically if the presser foot was lowered. The display can be cleaned / lubricated. They serve as a reminder, warning, or confirmation of the manual. Remove any lint and fabric remnants from the bobbin case. The winder speed can be carried out, or the user's attention will only appear again...
User Guide
Page 157
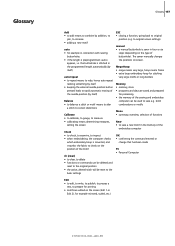
...stitch combinations or motifs Menu • summary, overview, selection of functions New • to save e.g. to original screen settings) manual • a manual buttonhole is preprogrammed «auto» appears, i.e. Glossary Glossary 157 Add • to add means to combine by itself) ...; functions or commands can be reset to the basic settings ESC • closing a function, going back to original position (e.g. The sewer manually changes the positions on the type of buttonhole). Mega-Hoop • mega means very large, hoop means frame • extra large embroidery...
...stitch combinations or motifs Menu • summary, overview, selection of functions New • to save e.g. to original screen settings) manual • a manual buttonhole is preprogrammed «auto» appears, i.e. Glossary Glossary 157 Add • to add means to combine by itself) ...; functions or commands can be reset to the basic settings ESC • closing a function, going back to original position (e.g. The sewer manually changes the positions on the type of buttonhole). Mega-Hoop • mega means very large, hoop means frame • extra large embroidery...
User Guide
Page 165
Index Index 175 A Accessories 154-156 • artista Embroidery Software 156 • Embroidery Mega-Hoop 155 • Embroidery Sticks 155 • Suitcase System 154 Accessory Box 4 Accessories Embroidery 110-111 Accessories Sewing 4-5...Term Memory • Buttonhole Program Functions • Buttonholes Summary • Buttonholes with Cord • Cutting Buttonholes open • Important Information • In General • Manual 4 or 6 Step Buttonholes • Sewing Hand-look Buttonhole • Sewing Round and Keyhole Buttonholes 102 53 50 10 10 12 80-83 62-75 69...
Index Index 175 A Accessories 154-156 • artista Embroidery Software 156 • Embroidery Mega-Hoop 155 • Embroidery Sticks 155 • Suitcase System 154 Accessory Box 4 Accessories Embroidery 110-111 Accessories Sewing 4-5...Term Memory • Buttonhole Program Functions • Buttonholes Summary • Buttonholes with Cord • Cutting Buttonholes open • Important Information • In General • Manual 4 or 6 Step Buttonholes • Sewing Hand-look Buttonhole • Sewing Round and Keyhole Buttonholes 102 53 50 10 10 12 80-83 62-75 69...
User Guide
Page 166
...; Buttonholes • Decorative Stitches • Embroidery Mode/ Sewing Mode • Personal Program • Practical Stitches • Quilt Stitches • Setup Program • Tutorial for Embroidery Manual Darning 25-27 25 26 25 26, 128 26 25 26 27 27 43 O Optional Accessories 111 P Personal Program 84-86 • Altering Stitches 86...
...; Buttonholes • Decorative Stitches • Embroidery Mode/ Sewing Mode • Personal Program • Practical Stitches • Quilt Stitches • Setup Program • Tutorial for Embroidery Manual Darning 25-27 25 26 25 26, 128 26 25 26 27 27 43 O Optional Accessories 111 P Personal Program 84-86 • Altering Stitches 86...


