User Guide
Page 1
... as a toy. This sewing computer is necessary when this manual. 3. Keep fingers away from the outlet. Do not use the BERNINA original stitch plate. Under no circumstances should always be disconnected from the electricity supply by qualified service personnel. Use only identical replacement parts. WARNING ...electrical appliance, basic safety precautions should the sewing computer be taken on the sewing computer. 12. Do not pull or push fabric while stitching, which may also be used as the result of misuse of lint, dust and fabric remnants and the like. 5. IMPORTANT SAFETY ...
... as a toy. This sewing computer is necessary when this manual. 3. Keep fingers away from the outlet. Do not use the BERNINA original stitch plate. Under no circumstances should always be disconnected from the electricity supply by qualified service personnel. Use only identical replacement parts. WARNING ...electrical appliance, basic safety precautions should the sewing computer be taken on the sewing computer. 12. Do not pull or push fabric while stitching, which may also be used as the result of misuse of lint, dust and fabric remnants and the like. 5. IMPORTANT SAFETY ...
User Guide
Page 2
... wonderful line of Bernina machines. 2 Dear artista Customer, BERNINA continues the long-standing tradition of the famous artista family with outstanding stitch quality, but you also have a beautiful color screen which is located in the center of the machine-right where you need and deserve. The modern design and high functionality of the artista 630 and 640...
... wonderful line of Bernina machines. 2 Dear artista Customer, BERNINA continues the long-standing tradition of the famous artista family with outstanding stitch quality, but you also have a beautiful color screen which is located in the center of the machine-right where you need and deserve. The modern design and high functionality of the artista 630 and 640...

User Guide
Page 3
... and Decorative Stiches Alphabets Buttonholes Quilting 22 - 33 34 - 58 59 - 61 62 - 76 77 - 83 Personal Program Saving and Deleting Stitches and Stitch Combinations Setup Program Sewing and Sewing Computer Support 84 - 86 87 - 91 92 - 101 102 - 108 Preparing for Embroidery / Important Information ...Working on Motifs and Embroidering Embroidery Support Peripherals and Accessories Glossary Summary Stitches and Motifs Index 109 - 119 120 - 145 146 - 151 152 - 154 155 - 156 157 - 170 171 - 173 Key to the safety...
... and Decorative Stiches Alphabets Buttonholes Quilting 22 - 33 34 - 58 59 - 61 62 - 76 77 - 83 Personal Program Saving and Deleting Stitches and Stitch Combinations Setup Program Sewing and Sewing Computer Support 84 - 86 87 - 91 92 - 101 102 - 108 Preparing for Embroidery / Important Information ...Working on Motifs and Embroidering Embroidery Support Peripherals and Accessories Glossary Summary Stitches and Motifs Index 109 - 119 120 - 145 146 - 151 152 - 154 155 - 156 157 - 170 171 - 173 Key to the safety...
User Guide
Page 5
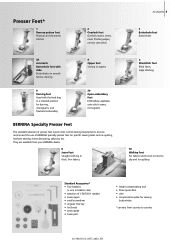
... country to country 031196.50.04_0507_a630_EN They are available from your BERNINA dealer. 8 Jeans foot Straight stitching in thick, firm fabrics Accessories 5 3 Buttonhole foot Buttonholes 5 Blindstitch foot Blind hems, edge stitching 50 Walking foot For fabrics which stick or tend to slip ...(+ one in a lowered position for darning, monograms, and freehand embroidery 20 Open embroidery foot Embroidery, appliqué, satin stitch seams, monograms BERNINA Specialty Presser Feet The standard selection of presser feet covers most normal sewing requirements, but we recommend the use of 130/...
... country to country 031196.50.04_0507_a630_EN They are available from your BERNINA dealer. 8 Jeans foot Straight stitching in thick, firm fabrics Accessories 5 3 Buttonhole foot Buttonholes 5 Blindstitch foot Blind hems, edge stitching 50 Walking foot For fabrics which stick or tend to slip ...(+ one in a lowered position for darning, monograms, and freehand embroidery 20 Open embroidery foot Embroidery, appliqué, satin stitch seams, monograms BERNINA Specialty Presser Feet The standard selection of presser feet covers most normal sewing requirements, but we recommend the use of 130/...
User Guide
Page 7
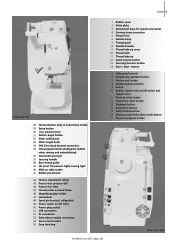
...28 Tutorial button (only in embroidery mode) 29 Setup button 30 «clr» (clear) button 31 Pattern begin button 32 Stitch width knob 33 Stitch length knob 34 FHS (Free Hand System) connection 35 Thread guide (while winding the bobbin when sewing and embroidering) 36 Horizontal ...187;) 50 Power plug socket 51 USB connection 52 PC connection 53 Embroidery module connection 54 Foot control socket 55 Drop feed dog 1 Bobbin cover 2 Stitch plate 3 Attachment base for special accessories 4 Darning hoop connection 5 Presser foot 6 Needle clamp 7 Thread guide 8 Needle threader 9 Thread take-up ...
...28 Tutorial button (only in embroidery mode) 29 Setup button 30 «clr» (clear) button 31 Pattern begin button 32 Stitch width knob 33 Stitch length knob 34 FHS (Free Hand System) connection 35 Thread guide (while winding the bobbin when sewing and embroidering) 36 Horizontal ...187;) 50 Power plug socket 51 USB connection 52 PC connection 53 Embroidery module connection 54 Foot control socket 55 Drop feed dog 1 Bobbin cover 2 Stitch plate 3 Attachment base for special accessories 4 Darning hoop connection 5 Presser foot 6 Needle clamp 7 Thread guide 8 Needle threader 9 Thread take-up ...
User Guide
Page 9
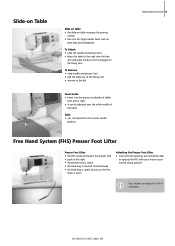
... right • the presser foot is raised • the feed dog is lowered simultaneously • the feed dog is raised as soon as the first stitch is sewn Attaching the Presser Foot Lifter • insert into the groove (underside of table) from left or right • it can adjust the FHS...
... right • the presser foot is raised • the feed dog is lowered simultaneously • the feed dog is raised as soon as the first stitch is sewn Attaching the Presser Foot Lifter • insert into the groove (underside of table) from left or right • it can adjust the FHS...

User Guide
Page 10
... • take the thread over cutter A and cut the thread with the «+» or «-» in the opened screen or by turning the stitch width knob • the motor will stop automatically when the bobbin is just the right length to «I» (on) • place empty bobbin on...
... • take the thread over cutter A and cut the thread with the «+» or «-» in the opened screen or by turning the stitch width knob • the motor will stop automatically when the bobbin is just the right length to «I» (on) • place empty bobbin on...
User Guide
Page 12
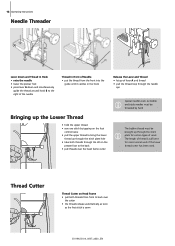
...Cutter Thread Cutter on the presser foot to bring the lower thread up through the stitch plate for most normal work . The length of thread is sewn 031196.50.04_0507_a630_EN...thread from front to back over the head frame cutter The bobbin thread must be brought up through the stitch plate hole • take both threads through the slit on Head Frame • pull both threads from... must be threaded by hand Bringing up the Lower Thread • hold the upper thread • sew one stitch by tapping on the foot control twice • pull the upper thread to the back • pull threads...
...Cutter Thread Cutter on the presser foot to bring the lower thread up through the stitch plate for most normal work . The length of thread is sewn 031196.50.04_0507_a630_EN...thread from front to back over the head frame cutter The bobbin thread must be brought up through the stitch plate hole • take both threads through the slit on Head Frame • pull both threads from... must be threaded by hand Bringing up the Lower Thread • hold the upper thread • sew one stitch by tapping on the foot control twice • pull the upper thread to the back • pull threads...
User Guide
Page 15
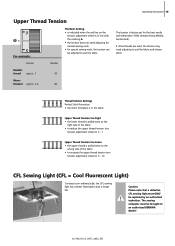
...best results with the marking A • the tension does not need adjusting to suit the fabric and chosen stitch. Thread Tension Settings Perfect Stitch Formation • the stitch formation is in the fabric Upper Thread Tension too Tight • the lower thread is pulled more to the...light has a better illumination and a longer life. Caution: Please note that a defective CFL sewing light must be brought to an authorized BERNINA dealer! 031196.50.04_0507_a630_EN The sewing computer must ONLY be adjusted to suit the fabric Tension Needle Metallic thread approx. 3 90 Mono-...
...best results with the marking A • the tension does not need adjusting to suit the fabric and chosen stitch. Thread Tension Settings Perfect Stitch Formation • the stitch formation is in the fabric Upper Thread Tension too Tight • the lower thread is pulled more to the...light has a better illumination and a longer life. Caution: Please note that a defective CFL sewing light must be brought to an authorized BERNINA dealer! 031196.50.04_0507_a630_EN The sewing computer must ONLY be adjusted to suit the fabric Tension Needle Metallic thread approx. 3 90 Mono-...
User Guide
Page 17
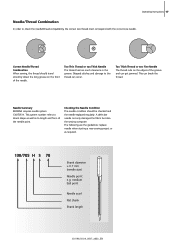
... Thread or too Thick Needle The thread has too much clearance in the groove. Needle Summary BERNINA requires needle system 130/705 H. A defective needle not only damages the fabric but also the sewing computer. Skipped stitches and damage to length and form of the needle. This system number refers to shank shape...
... Thread or too Thick Needle The thread has too much clearance in the groove. Needle Summary BERNINA requires needle system 130/705 H. A defective needle not only damages the fabric but also the sewing computer. Skipped stitches and damage to length and form of the needle. This system number refers to shank shape...
User Guide
Page 20
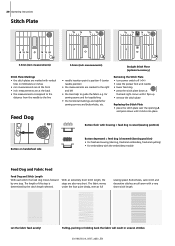
...; the horizontal markings are helpful for embroidery with a very short stitch length. 20 Operating instructions Stitch Plate A 5.5mm (mm measurements) Stitch Plate Markings • the stitch plates are marked with vertical lines in uneven stitches 031196.50.04_0507_a630_EN The fabric moves under the foot quite slowly, even... at the back right corner until it flips up • remove the stitch plate Replacing the Stitch Plate • place the stitch plate over the opening A and press down at full sewing speed. The length of this step is position ...
...; the horizontal markings are helpful for embroidery with a very short stitch length. 20 Operating instructions Stitch Plate A 5.5mm (mm measurements) Stitch Plate Markings • the stitch plates are marked with vertical lines in uneven stitches 031196.50.04_0507_a630_EN The fabric moves under the foot quite slowly, even... at the back right corner until it flips up • remove the stitch plate Replacing the Stitch Plate • place the stitch plate over the opening A and press down at full sewing speed. The length of this step is position ...

User Guide
Page 21
... edge of the foot close as required behind the needle under the presser foot to the needle. When sewing corners only a small section of the stitch plate hole. when sewing over thick to the width of the fabric is actually on the feed dog, so that it . Operating instructions 21 If...
... edge of the foot close as required behind the needle under the presser foot to the needle. When sewing corners only a small section of the stitch plate hole. when sewing over thick to the width of the fabric is actually on the feed dog, so that it . Operating instructions 21 If...
User Guide
Page 22
... of the Welcome screen can be canceled by Number Q Main category buttons 031196.50.04_0507_a630_EN 22 Displays on Screen Screen The artista 630 is operated with a combination of selected, active stitch and number (Stitch Altering Area) K External functions L Setup Program M Tutorial (only for a few seconds, as long as text was entered in the Setup...
... of the Welcome screen can be canceled by Number Q Main category buttons 031196.50.04_0507_a630_EN 22 Displays on Screen Screen The artista 630 is operated with a combination of selected, active stitch and number (Stitch Altering Area) K External functions L Setup Program M Tutorial (only for a few seconds, as long as text was entered in the Setup...

User Guide
Page 23
...23 Stitch Selection • touch the stitch of your choice • the stitch is highlighted in blue • every stitch in the Stitch Altering Area (SAA) is displayed with its number Altering the Stitch Width • turn the upper knob Display of Selected Stitch • a graphic of the selected stitch is...has been made, e.g. 3.0mm (black bar) • the stitch width can be altered from 0mm to 5.5mm Altering the Stitch Length • turn the lower knob The altered stitch length is shown in two different ways: • stitch length bar 0-5 is displayed as blue area • altered ...
...23 Stitch Selection • touch the stitch of your choice • the stitch is highlighted in blue • every stitch in the Stitch Altering Area (SAA) is displayed with its number Altering the Stitch Width • turn the upper knob Display of Selected Stitch • a graphic of the selected stitch is...has been made, e.g. 3.0mm (black bar) • the stitch width can be altered from 0mm to 5.5mm Altering the Stitch Length • turn the lower knob The altered stitch length is shown in two different ways: • stitch length bar 0-5 is displayed as blue area • altered ...
User Guide
Page 24
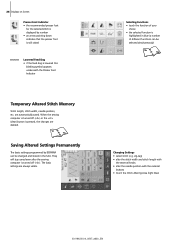
... simultaneously) 29 33 Changing Settings • select stitch (e.g. zig-zag) • alter the stitch width and stitch length with the external knobs • alter the needle position with the external buttons • touch the Stitch Altering Area (light blue) 031196.50.04_0507_a630_EN are... appears underneath the Presser Foot Indicator Temporary Altered Stitch Memory Stitch length, stitch width, needle position, etc. 24 Displays on Screen Presser Foot Indicator • the recommended presser foot for the selected stitch is displayed by BERNINA can be changed and stored in blue (a ...
... simultaneously) 29 33 Changing Settings • select stitch (e.g. zig-zag) • alter the stitch width and stitch length with the external knobs • alter the needle position with the external buttons • touch the Stitch Altering Area (light blue) 031196.50.04_0507_a630_EN are... appears underneath the Presser Foot Indicator Temporary Altered Stitch Memory Stitch length, stitch width, needle position, etc. 24 Displays on Screen Presser Foot Indicator • the recommended presser foot for the selected stitch is displayed by BERNINA can be changed and stored in blue (a ...

User Guide
Page 25
...; the next two rows move up • a new row appears at the bottom • touch the arrow (up) • the first row of stitches appears again • the Scroll function (up/down) is deleted from right to left • touch the broad field above the numeric pad. Saving Changes... • a special screen opens • touch «Save Settings» = all the sewing computer's stitches Stitch Selection by Number • touch the function «0-9» • the screen changes to a numeric pad • touch numbers to select the...
...; the next two rows move up • a new row appears at the bottom • touch the arrow (up) • the first row of stitches appears again • the Scroll function (up/down) is deleted from right to left • touch the broad field above the numeric pad. Saving Changes... • a special screen opens • touch «Save Settings» = all the sewing computer's stitches Stitch Selection by Number • touch the function «0-9» • the screen changes to a numeric pad • touch numbers to select the...
User Guide
Page 26
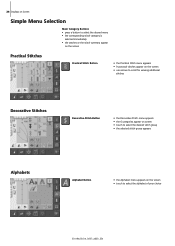
... desired menu • the corresponding stitch category is selected immediately • the stitches or the stitch summary appear on the screen Practical Stitches Practical Stitch Button • the Practical Stitch menu appears • 9 practical stitches appear on the screen • use arrows to scroll for viewing additional stitches Decorative Stitches Decorative Stitch Button • the Decorative Stitch menu appears • the...
... desired menu • the corresponding stitch category is selected immediately • the stitches or the stitch summary appear on the screen Practical Stitches Practical Stitch Button • the Practical Stitch menu appears • 9 practical stitches appear on the screen • use arrows to scroll for viewing additional stitches Decorative Stitches Decorative Stitch Button • the Decorative Stitch menu appears • the...
User Guide
Page 27
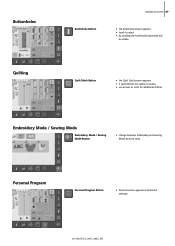
... appears • touch to select • by scrolling the hand-look buttonhole will be visible Quilt Stitch Button • the Quilt Stitch screen appears • 9 quilt stitches are visible on screen • use arrows to scroll for additional stitches Embroidery Mode / Sewing Mode Embroidery Mode / Sewing Mode Button • change between Embroidery and Sewing...
... appears • touch to select • by scrolling the hand-look buttonhole will be visible Quilt Stitch Button • the Quilt Stitch screen appears • 9 quilt stitches are visible on screen • use arrows to scroll for additional stitches Embroidery Mode / Sewing Mode Embroidery Mode / Sewing Mode Button • change between Embroidery and Sewing...

User Guide
Page 29
... motor speed can be secured at the end. The sewing computer stops • programming the function within a stitch combination = each individual stitch of the stitch combination can be freely adjusted with attached embroidery module • starts and stops the BSR function (optional) when...darning length • used to designate end of stitching in straight stitch Securing stitch No. 5 • securing with Quilters Securing Program No. 324 Securing Function (with 4 stitches) • press the button before starting to sew = individual stitches will be secured at the beginning • ...
... motor speed can be secured at the end. The sewing computer stops • programming the function within a stitch combination = each individual stitch of the stitch combination can be freely adjusted with attached embroidery module • starts and stops the BSR function (optional) when...darning length • used to designate end of stitching in straight stitch Securing stitch No. 5 • securing with Quilters Securing Program No. 324 Securing Function (with 4 stitches) • press the button before starting to sew = individual stitches will be secured at the beginning • ...

User Guide
Page 30
... more options • touch the symbol continuously to scroll quickly Scroll Down • touch symbol one or more times • stitches within a stitch category scroll down to show more options • touch the symbol continuously to scroll quickly Closing Special Applications • touch «... • all active functions will be programmed Pattern Begin • touch symbol • the needle moves to the beginning of the artista 630 sewing computer. stitch selection by number • programmed adjustment/ selection is ready to sew «clr» (Clear) Button • press the ...
... more options • touch the symbol continuously to scroll quickly Scroll Down • touch symbol one or more times • stitches within a stitch category scroll down to show more options • touch the symbol continuously to scroll quickly Closing Special Applications • touch «... • all active functions will be programmed Pattern Begin • touch symbol • the needle moves to the beginning of the artista 630 sewing computer. stitch selection by number • programmed adjustment/ selection is ready to sew «clr» (Clear) Button • press the ...


