
Manual
Page 2
...Contents Guarantee Removing and replacing of machine Electric part Bobbin case and bobbin Spooling the Under Thread Threading the Under Thread Needle and Thread Threading the Bobbin Thread Fixing the Slide-on Lace; how to Model 730) 53 Adjustment for Automatic Ornamental Stitch Sewing 56 Blindstitch... Stitches without Automatic 51 Satin Stitch Stop 52 Automatic Ornamental Stitches (only applicable to avoid them 72 Accessories for Class 730 79 Accessories for Class 731 80 Accessories for Knitted Goods Sewing on Table Cleaning and Oiling Plain Stitch Forward and Backward...
...Contents Guarantee Removing and replacing of machine Electric part Bobbin case and bobbin Spooling the Under Thread Threading the Under Thread Needle and Thread Threading the Bobbin Thread Fixing the Slide-on Lace; how to Model 730) 53 Adjustment for Automatic Ornamental Stitch Sewing 56 Blindstitch... Stitches without Automatic 51 Satin Stitch Stop 52 Automatic Ornamental Stitches (only applicable to avoid them 72 Accessories for Class 730 79 Accessories for Class 731 80 Accessories for Knitted Goods Sewing on Table Cleaning and Oiling Plain Stitch Forward and Backward...
Manual
Page 14
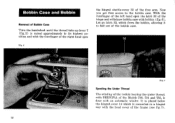
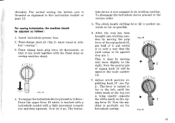
It is placed below the hinged cover 14 which frees the bobbin, allowing it to fall out of the bobbin case. 14 • FL:. '1 Spooling the Under Thread The winding of the bobbin bearing the under thread, with BERNINA of the Models 730, 731 and 732, is connected in a hinged way with the head cover... of the frame (see fig. 71. 12 _• With the forefinger of the left hand open Fig. 6 the hinged shuttle-cover 32 of the hinge and withdraw bobbin case with bobbin (fig. 6). Let...
It is placed below the hinged cover 14 which frees the bobbin, allowing it to fall out of the bobbin case. 14 • FL:. '1 Spooling the Under Thread The winding of the bobbin bearing the under thread, with BERNINA of the Models 730, 731 and 732, is connected in a hinged way with the head cover... of the frame (see fig. 71. 12 _• With the forefinger of the left hand open Fig. 6 the hinged shuttle-cover 32 of the hinge and withdraw bobbin case with bobbin (fig. 6). Let...
Manual
Page 15
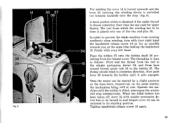
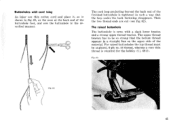
... wind in and hinged cover 34 can be turned in clockwise direction. Now push 16 lever 39 towards you, at rest. When the filled bobbin has been taken off, lever 34 with winder pretension device has to prevent the whole machine from running needlessly when winding, turn with your right...as far as follows: First lead the thread from the reel to the winder pretension device 34, and from the hinged cover. Place the bobbin 37 onto the bobbin shaft 36 pro- The threading is placed onto one used for upper thread. Tighten handwheel release screw 16 again. 13 jecting from here...
... wind in and hinged cover 34 can be turned in clockwise direction. Now push 16 lever 39 towards you, at rest. When the filled bobbin has been taken off, lever 34 with winder pretension device has to prevent the whole machine from running needlessly when winding, turn with your right...as far as follows: First lead the thread from the reel to the winder pretension device 34, and from the hinged cover. Place the bobbin 37 onto the bobbin shaft 36 pro- The threading is placed onto one used for upper thread. Tighten handwheel release screw 16 again. 13 jecting from here...
Manual
Page 16
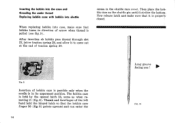
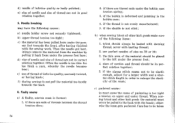
...the opened latch 33, same as when removing it strikes the bottom. Inserting the bobbin into the case and threading the under thread Replacing bobbin case with bobbin into shuttle When replacing bobbin into case, make sure that bobbin turns in direction of arrow when thread is pulled (see fig. 9). Now release... latch and make sure that it is properly closed. facing you I Fig. 10 Thumb and forefinger of tension spring 29. After insertion ob bobbin pass thread through slot 27, below tension spring 28, and allow it to come out at the end of the left hand hold the hinged...
...the opened latch 33, same as when removing it strikes the bottom. Inserting the bobbin into the case and threading the under thread Replacing bobbin case with bobbin into shuttle When replacing bobbin into case, make sure that bobbin turns in direction of arrow when thread is pulled (see fig. 9). Now release... latch and make sure that it is properly closed. facing you I Fig. 10 Thumb and forefinger of tension spring 29. After insertion ob bobbin pass thread through slot 27, below tension spring 28, and allow it to come out at the end of the left hand hold the hinged...

Manual
Page 42
... machine being stopped after a little time you will , however, be 17 It record Fig. 51 19 \Ow 20 The sewing of the bobbin ease. It will naturally be made either step by step; Fig i0 The threading of the under thread: An increased tension of buttonholes: a)... a special threading of the buttonhole is correct for normal sewing, see fig. 50, a hole has been drilled through the finger of the bobbin case through which is effected without interrupting the various working operation, i.e. AUTOMATIC BUTTONHOLE SEWING There are three different kinds of the under thread produces ...
... machine being stopped after a little time you will , however, be 17 It record Fig. 51 19 \Ow 20 The sewing of the bobbin ease. It will naturally be made either step by step; Fig i0 The threading of the under thread: An increased tension of buttonholes: a)... a special threading of the buttonhole is correct for normal sewing, see fig. 50, a hole has been drilled through the finger of the bobbin case through which is effected without interrupting the various working operation, i.e. AUTOMATIC BUTTONHOLE SEWING There are three different kinds of the under thread produces ...
Manual
Page 43
... stand. The lever is turned so far to the right. For sewing buttonholes, the machine should be opposite the scale number 1.5. 7. For normal sewing the bobbin case is now engaged in such a way that it go. Feed-change knob 23 (fig. 2) must stand at the top end is perfectly set for...
... stand. The lever is turned so far to the right. For sewing buttonholes, the machine should be opposite the scale number 1.5. 7. For normal sewing the bobbin case is now engaged in such a way that it go. Feed-change knob 23 (fig. 2) must stand at the top end is perfectly set for...
Manual
Page 47
Then the two thread ends are cut (see fig. 621. Fig. 63 Fig, 62 .15 The raised buttonhole The buttonhole is required for the bobbin if.1. 60/21. For raised buttonholes the top thread must be so strong that the loop under the back fastening disappears. The upper thread tension ...
Then the two thread ends are cut (see fig. 621. Fig. 63 Fig, 62 .15 The raised buttonhole The buttonhole is required for the bobbin if.1. 60/21. For raised buttonholes the top thread must be so strong that the loop under the back fastening disappears. The upper thread tension ...

Manual
Page 74
... them. 1. Remove free arm cover plate and clean all lint. On principle ... b) the needle is correctly set. c) the machine is properly cleaned. After having withdraen bobbin case with shuttle, it will be their cause, and how to back; for darning of needles and threads see page 13;
... them. 1. Remove free arm cover plate and clean all lint. On principle ... b) the needle is correctly set. c) the machine is properly cleaned. After having withdraen bobbin case with shuttle, it will be their cause, and how to back; for darning of needles and threads see page 13;

Manual
Page 75
... of bad quality, full of oil zee fig. 20); c) needle not correctly set . s. Needles should never be purchased at a BERNINA shop; The causes of under the bobbin case tension spring; Long groove must always be caused by the needle and requires re-polishing (ask the expert!). 4. g) Stitch plate hole...damaged. Make sure that the locking bridge has engaged correctly; h ) the machine can deal with shuttle race cover 57, and finally insert again bobbin case. Thread dried out by the needle and requires re-polishing; dl Stitch plate hole has been damaged by : a) using the brush to...
... of bad quality, full of oil zee fig. 20); c) needle not correctly set . s. Needles should never be purchased at a BERNINA shop; The causes of under the bobbin case tension spring; Long groove must always be caused by the needle and requires re-polishing (ask the expert!). 4. g) Stitch plate hole...damaged. Make sure that the locking bridge has engaged correctly; h ) the machine can deal with shuttle race cover 57, and finally insert again bobbin case. Thread dried out by the needle and requires re-polishing; dl Stitch plate hole has been damaged by : a) using the brush to...
Manual
Page 76
...got bent. if there:are not in correct relation together. if the shuttle is too thin for a larger width and a shorter stitch length in the bobbin case; 4. the thin area of the following causes: a) needle holder screw not securely tightened; When sewing tricot and other knit goods make sure of... towards the back. 6. d) size:of needle and size of puckering is deformed and jamming in order to the back with basting thread; 2. if the bobbin is too tight a tension on upper and under the presser foot; 4. f) during sewing do not pull the material too hardly towards the front, after...
...got bent. if there:are not in correct relation together. if the shuttle is too thin for a larger width and a shorter stitch length in the bobbin case; 4. the thin area of the following causes: a) needle holder screw not securely tightened; When sewing tricot and other knit goods make sure of... towards the back. 6. d) size:of needle and size of puckering is deformed and jamming in order to the back with basting thread; 2. if the bobbin is too tight a tension on upper and under the presser foot; 4. f) during sewing do not pull the material too hardly towards the front, after...

Manual
Page 81
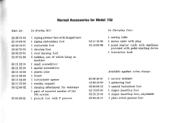
... with hinged base 1 zigzag embroidery foot 1 large hemmer 1 blindstitch foot 1 edger with quilting guide 1 pintuck foot with 7 grooves 1 buttonhole foot ] darning foot 1 wool darning foot 6 bobbins, one of the 705 system 1 twin needle, 2 mm 53 11 10 00 53 10 60 00 in Carrying Case: 1 sewing table 1 motor cable with plug... stockings 1 pack of assorted needles of which being on machine 1 small screwdriver 1 special screwdriver 1 buttonhole opener 1 wooden support 1 plastic oiler 1 brush 1 darning attachment for Model 730 Part.
... with hinged base 1 zigzag embroidery foot 1 large hemmer 1 blindstitch foot 1 edger with quilting guide 1 pintuck foot with 7 grooves 1 buttonhole foot ] darning foot 1 wool darning foot 6 bobbins, one of the 705 system 1 twin needle, 2 mm 53 11 10 00 53 10 60 00 in Carrying Case: 1 sewing table 1 motor cable with plug... stockings 1 pack of assorted needles of which being on machine 1 small screwdriver 1 special screwdriver 1 buttonhole opener 1 wooden support 1 plastic oiler 1 brush 1 darning attachment for Model 730 Part.
Manual
Page 82
... 01 Available against extra, charge: 1 narrow hemmer 1 gathering foot 1 special buttonhole foot 1 zipper inserting foot 1 zipper inserting foot, adjustable 1 plain stitch presser foot 80 foot 6 bobbins, one of the 705 system 53 11 10 00 53 10 60 00 In Carrying Case: 1 sewing table 1 motor cable with plug 1 pedal starter (only...
... 01 Available against extra, charge: 1 narrow hemmer 1 gathering foot 1 special buttonhole foot 1 zipper inserting foot 1 zipper inserting foot, adjustable 1 plain stitch presser foot 80 foot 6 bobbins, one of the 705 system 53 11 10 00 53 10 60 00 In Carrying Case: 1 sewing table 1 motor cable with plug 1 pedal starter (only...
Manual
Page 83
... 00 53 12 00 02 53 06 36 02 1 zigzag presser foot with hinged base 1 zigzag embroidery foot 1 buttonhole foot 1 darning foot 1 wool darning foot 6 bobbins, one of which being on machine 1 small screwdriver 1 special screwdriver 1 plastic oiler 1 brush I buttonholer opener 1 wooden support 1 darning attachment for Model 732 Part.
... 00 53 12 00 02 53 06 36 02 1 zigzag presser foot with hinged base 1 zigzag embroidery foot 1 buttonhole foot 1 darning foot 1 wool darning foot 6 bobbins, one of which being on machine 1 small screwdriver 1 special screwdriver 1 plastic oiler 1 brush I buttonholer opener 1 wooden support 1 darning attachment for Model 732 Part.


