Screen Resolution Guide
Page 1
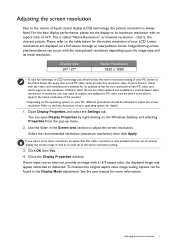
... your input source does not provide an image with the video card manufacturer's website for an updated driver for details. 1. See the user manual for new hardware video resolutions. Software video drivers are displayed on the Windows desktop and selecting Properties from the pop-up menu. 2. Display size 24" / 27" Native Resolution 1920 x 1080 • To take full advantage of LCD technology you select some other resolution is always fixed. Close the Display Properties window. Adjusting the screen resolution...
... your input source does not provide an image with the video card manufacturer's website for an updated driver for details. 1. See the user manual for new hardware video resolutions. Software video drivers are displayed on the Windows desktop and selecting Properties from the pop-up menu. 2. Display size 24" / 27" Native Resolution 1920 x 1080 • To take full advantage of LCD technology you select some other resolution is always fixed. Close the Display Properties window. Adjusting the screen resolution...

Screen Resolution Guide
Page 2
... the Display Properties window. 2 Adjusting the screen refresh rate Please refer to the table on an LCD display, because it is not technically possible for an LCD display to the help document of your computer. Double click the Display icon in all models. The best results are obtained by using the factory modes already set in your operating system for the native resolution of the applicable factory modes as listed in the specification...
... the Display Properties window. 2 Adjusting the screen refresh rate Please refer to the table on an LCD display, because it is not technically possible for an LCD display to the help document of your computer. Double click the Display icon in all models. The best results are obtained by using the factory modes already set in your operating system for the native resolution of the applicable factory modes as listed in the specification...
Screen Resolution Guide
Page 4
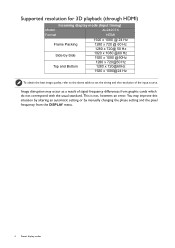
This is not, however, an error. Supported resolution for 3D playback (through HDMI) Incoming display mode (Input timing) Model XL2420TX Format HDMI Frame Packing Side-by manually changing the phase setting and the pixel frequency from graphic cards which do not correspond with the usual standard. You may occur as a result of the input source. Image disruption may improve this situation by altering an automatic setting or by -Side Top...
This is not, however, an error. Supported resolution for 3D playback (through HDMI) Incoming display mode (Input timing) Model XL2420TX Format HDMI Frame Packing Side-by manually changing the phase setting and the pixel frequency from graphic cards which do not correspond with the usual standard. You may occur as a result of the input source. Image disruption may improve this situation by altering an automatic setting or by -Side Top...
XL Series User Manual
Page 24
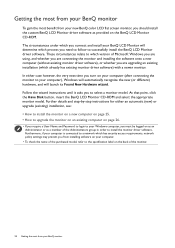
... your Windows computer, you need to follow to select a monitor model. At that point, click the Have Disk button, insert the BenQ LCD Monitor CD-ROM and select the appropriate monitor model. Follow the wizard instructions until it asks you are upgrading an existing installation (which version of Microsoft Windows you are using, and whether you are connecting the monitor and installing the software onto a new computer (without existing monitor driver software...
... your Windows computer, you need to follow to select a monitor model. At that point, click the Have Disk button, insert the BenQ LCD Monitor CD-ROM and select the appropriate monitor model. Follow the wizard instructions until it asks you are upgrading an existing installation (which version of Microsoft Windows you are using, and whether you are connecting the monitor and installing the software onto a new computer (without existing monitor driver software...

XL Series User Manual
Page 25
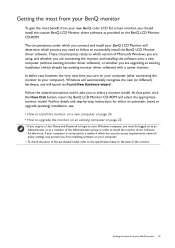
... that has already had a monitor driver installed before , and for which has never been used before . When Windows starts, it . Getting the most from your BenQ monitor on the computer. 3. How to install the monitor on a new computer This instruction details the procedure for selecting and installing the BenQ LCD Monitor driver software on a new computer which has never had another monitor connected to it displays the option to be...
... that has already had a monitor driver installed before , and for which has never been used before . When Windows starts, it . Getting the most from your BenQ monitor on the computer. 3. How to install the monitor on a new computer This instruction details the procedure for selecting and installing the BenQ LCD Monitor driver software on a new computer which has never had another monitor connected to it displays the option to be...
XL Series User Manual
Page 26
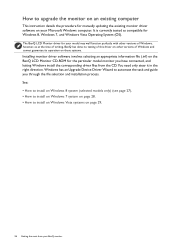
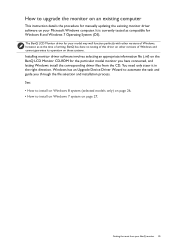
... Windows 8 system (selected models only) (see page 27). • How to install on Windows 7 system on page 28. • How to install on Windows Vista systems on the BenQ LCD Monitor CD-ROM for the particular model monitor you through the file selection and installation process. How to upgrade the monitor on an existing computer This instruction details the procedure for manually updating the existing monitor driver software on your BenQ monitor...
... Windows 8 system (selected models only) (see page 27). • How to install on Windows 7 system on page 28. • How to install on Windows Vista systems on the BenQ LCD Monitor CD-ROM for the particular model monitor you through the file selection and installation process. How to upgrade the monitor on an existing computer This instruction details the procedure for manually updating the existing monitor driver software on your BenQ monitor...

XL Series User Manual
Page 27
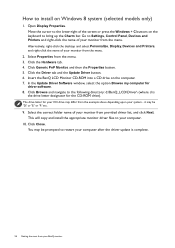
... to Settings, Control Panel, Devices and Printers and right-click the name of your monitor from provided driver list, and click Next. Alternatively, right-click the desktop and select Personalize, Display, Devices and Printers, and right-click the name of your monitor from the menu. Click the Driver tab and the Update Driver button. 6. it may differ from the menu. 2. In the Update Driver Software window, select...
... to Settings, Control Panel, Devices and Printers and right-click the name of your monitor from provided driver list, and click Next. Alternatively, right-click the desktop and select Personalize, Display, Devices and Printers, and right-click the name of your monitor from the menu. Click the Driver tab and the Update Driver button. 6. it may differ from the menu. 2. In the Update Driver Software window, select...

XL Series User Manual
Page 29
... will copy and install the appropriate monitor driver files to your monitor from provided driver list, and click Next. You may be 'D:' or 'E:' or 'F:' etc. 9. Select Display Settings from the popup menu. Click the Driver tab and the Update Driver button. 6. Insert the BenQ LCD Monitor CD-ROM into a CD drive on Windows Vista systems 1. Open Display Settings. Click Continue in the prompted User Account Control window. 5. In the Update Driver Software window, select the option...
... will copy and install the appropriate monitor driver files to your monitor from provided driver list, and click Next. You may be 'D:' or 'E:' or 'F:' etc. 9. Select Display Settings from the popup menu. Click the Driver tab and the Update Driver button. 6. Insert the BenQ LCD Monitor CD-ROM into a CD drive on Windows Vista systems 1. Open Display Settings. Click Continue in the prompted User Account Control window. 5. In the Update Driver Software window, select the option...
XL Series User Manual
Page 34
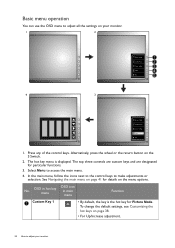
... Menu to make adjustments or selection. See Navigating the main menu on page 41 for Picture Mode. No. To change the default settings, see Customizing the hot keys on page 38. • For Up/Increase adjustment. 34 How to adjust your monitor. 1 2 Picture Mode Display Mode Smart Scaling Menu Exit 4 3 Picture Mode Display Mode Smart Scaling Menu Exit 1. Press any of the control keys. Alternatively, press the wheel or the return button on the S Switch. 2. OSD...
... Menu to make adjustments or selection. See Navigating the main menu on page 41 for Picture Mode. No. To change the default settings, see Customizing the hot keys on page 38. • For Up/Increase adjustment. 34 How to adjust your monitor. 1 2 Picture Mode Display Mode Smart Scaling Menu Exit 4 3 Picture Mode Display Mode Smart Scaling Menu Exit 1. Press any of the control keys. Alternatively, press the wheel or the return button on the S Switch. 2. OSD...

XL Series User Manual
Page 38
... Display and Auto Adjustment to optimize the currently displayed image to enter the main menu. 3. If you wish, you can change and save the related display settings, and switch to pre-defined functions. You can always adjust the screen geometric settings manually using a digital (DVI, HDMI, or DP) cable to your monitor that the setup is set to check for these keys. 1. A pop-up the hot key menu. 2. You could also use to the native resolution of vertical lines), select Pixel...
... Display and Auto Adjustment to optimize the currently displayed image to enter the main menu. 3. If you wish, you can change and save the related display settings, and switch to pre-defined functions. You can always adjust the screen geometric settings manually using a digital (DVI, HDMI, or DP) cable to your monitor that the setup is set to check for these keys. 1. A pop-up the hot key menu. 2. You could also use to the native resolution of vertical lines), select Pixel...
XL Series User Manual
Page 42
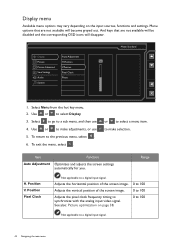
to make adjustments, or use 4. Adjusts the horizontal position of the screen image. 0 to 100 Adjusts the vertical position of the screen image. 0 to 100 Adjusts the pixel clock frequency timing to select Display. 3. Use or to synchronize with the analog input video signal. Select to go to make selection. Use or to a sub menu, and then use 5. Item Function Auto Adjustment Optimizes and adjusts the screen settings automatically for you. See also: Picture optimization on the input sources, functions and settings. To exit the menu, select . And keys...
to make adjustments, or use 4. Adjusts the horizontal position of the screen image. 0 to 100 Adjusts the vertical position of the screen image. 0 to 100 Adjusts the pixel clock frequency timing to select Display. 3. Use or to synchronize with the analog input video signal. Select to go to make selection. Use or to a sub menu, and then use 5. Item Function Auto Adjustment Optimizes and adjusts the screen settings automatically for you. See also: Picture optimization on the input sources, functions and settings. To exit the menu, select . And keys...

XL Series User Manual
Page 54
... 3. • Picture mode • Display Mode • Smart Scaling • Brightness • Contrast • Smart Focus • Volume • Mute • Input • Black eQualizer Auto Power Sets the time to power off the monitor automatically in the Switch input auto select loop. DDC/CI Allows the monitor settings to be set through the software • ON on the PC. • OFF DDC/CI, short for remote diagnostics. Consumer Sets to display the resolution notice...
... 3. • Picture mode • Display Mode • Smart Scaling • Brightness • Contrast • Smart Focus • Volume • Mute • Input • Black eQualizer Auto Power Sets the time to power off the monitor automatically in the Switch input auto select loop. DDC/CI Allows the monitor settings to be set through the software • ON on the PC. • OFF DDC/CI, short for remote diagnostics. Consumer Sets to display the resolution notice...

XL Series User Manual
Page 56
... to Picture Advanced and change setting in booster. Now check the signal cable connectors. Read the instructions on the link "Adjusting the Screen Resolution" on the CD, and then select the correct resolution, refresh rate and make adjustments based on the CD. Pixel errors can minimize these instructions. Does the blurring only occur at resolutions lower than the native (maximum) resolution? The image is blurred. Troubleshooting Frequently asked questions (FAQ) The image has a faulty coloration. • The default Picture Mode...
... to Picture Advanced and change setting in booster. Now check the signal cable connectors. Read the instructions on the link "Adjusting the Screen Resolution" on the CD, and then select the correct resolution, refresh rate and make adjustments based on the CD. Pixel errors can minimize these instructions. Does the blurring only occur at resolutions lower than the native (maximum) resolution? The image is blurred. Troubleshooting Frequently asked questions (FAQ) The image has a faulty coloration. • The default Picture Mode...

XL Series User Manual
Page 57
... the supported mode. Images from different input sources may appear distorted or stretched on page 47 for 10 second. See Display Mode on the monitor running the monitor at its native resolution. Is the prompt on the display illuminated in green? Faint shadow from the link "Adjusting the Screen Resolution". Is the prompt on the display illuminated in orange? The OSD controls are using a display mode that does not help, check the signal cable connectors. To unlock the OSD controls...
... the supported mode. Images from different input sources may appear distorted or stretched on page 47 for 10 second. See Display Mode on the monitor running the monitor at its native resolution. Is the prompt on the display illuminated in green? Faint shadow from the link "Adjusting the Screen Resolution". Is the prompt on the display illuminated in orange? The OSD controls are using a display mode that does not help, check the signal cable connectors. To unlock the OSD controls...
XL2720Z User Manual
Page 23
... are connecting the monitor and installing the software onto a new computer (without existing monitor driver software), or whether you are upgrading an existing installation (which has security access requirements, network policy settings may prevent you from installing software on your computer. • To check the name of the purchased model, refer to the specification label on the BenQ LCD Monitor CD-ROM. Further details and step-by-step instructions...
... are connecting the monitor and installing the software onto a new computer (without existing monitor driver software), or whether you are upgrading an existing installation (which has security access requirements, network policy settings may prevent you from installing software on your computer. • To check the name of the purchased model, refer to the specification label on the BenQ LCD Monitor CD-ROM. Further details and step-by-step instructions...

XL2720Z User Manual
Page 24
... are adding the BenQ LCD Monitor to confirm that has already had a monitor driver installed before , and for CD-ROM drives (uncheck all others) and click Next. 5. Click Finish. 7. When Windows starts, it displays the option to it. Check the option for which has never had another monitor connected to it (and has monitor driver software installed), you should instead be connected to Install Hardware Device Drivers. 2. Follow the...
... are adding the BenQ LCD Monitor to confirm that has already had a monitor driver installed before , and for CD-ROM drives (uncheck all others) and click Next. 5. Click Finish. 7. When Windows starts, it displays the option to it. Check the option for which has never had another monitor connected to it (and has monitor driver software installed), you should instead be connected to Install Hardware Device Drivers. 2. Follow the...
XL2720Z User Manual
Page 25
... Windows, however, as compatible for manually updating the existing monitor driver software on your Microsoft Windows computer. You need only steer it in the right direction. See: • How to install on Windows 8 system (selected models only) on page 26. • How to install on Windows 7 system on the BenQ LCD Monitor CD-ROM for the particular model monitor you through the file selection and installation process. Windows has an Upgrade Device Driver...
... Windows, however, as compatible for manually updating the existing monitor driver software on your Microsoft Windows computer. You need only steer it in the right direction. See: • How to install on Windows 8 system (selected models only) on page 26. • How to install on Windows 7 system on the BenQ LCD Monitor CD-ROM for the particular model monitor you through the file selection and installation process. Windows has an Upgrade Device Driver...
XL2720Z User Manual
Page 26
Open Display Properties. Move the cursor to the lower-right of your monitor from the example above depending upon your CD drive may be 'D:' or 'E:' or 'F:' etc. 9. it may be prompted to Settings, Control Panel, Devices and Printers and right-click the name of the screen or press the Windows + C buttons on Windows 8 system (selected models only) 1. How to install on the keyboard...
Open Display Properties. Move the cursor to the lower-right of your monitor from the example above depending upon your CD drive may be 'D:' or 'E:' or 'F:' etc. 9. it may be prompted to Settings, Control Panel, Devices and Printers and right-click the name of the screen or press the Windows + C buttons on Windows 8 system (selected models only) 1. How to install on the keyboard...

XL2720Z User Manual
Page 40
... video signal. or to select Display. 3. Display Picture Picture Advanced Save Settings Audio System Auto Adjustment H.Position V.Postion Pixel Clock Phase Mode: Standard 50 1. To exit the menu, select . Menu options that are not available will disappear. Item Function Auto Adjustment Optimizes and adjusts the screen settings automatically for you. Use or to select a menu item. Adjusts the horizontal position of the screen image. 0 to 100 Adjusts the vertical position of the screen image. 0 to 100 Adjusts the pixel clock frequency timing to make adjustments, or use...
... video signal. or to select Display. 3. Display Picture Picture Advanced Save Settings Audio System Auto Adjustment H.Position V.Postion Pixel Clock Phase Mode: Standard 50 1. To exit the menu, select . Menu options that are not available will disappear. Item Function Auto Adjustment Optimizes and adjusts the screen settings automatically for you. Use or to select a menu item. Adjusts the horizontal position of the screen image. 0 to 100 Adjusts the vertical position of the screen image. 0 to 100 Adjusts the pixel clock frequency timing to make adjustments, or use...

XL2720Z User Manual
Page 56
... and monitor go into a low power "sleep" mode when not actively in use the Display Mode function to set a proper aspect ratio for the input sources. If the LED is illuminated in orange, the power management mode is displaced in green? If that this means you can be locked, press and hold any button on these instructions. The image is active. The OSD controls are using a display mode that does not help, check the signal cable connectors. Please...
... and monitor go into a low power "sleep" mode when not actively in use the Display Mode function to set a proper aspect ratio for the input sources. If the LED is illuminated in orange, the power management mode is displaced in green? If that this means you can be locked, press and hold any button on these instructions. The image is active. The OSD controls are using a display mode that does not help, check the signal cable connectors. Please...


