XL Series User Manual
Page 2
... follow these safety instructions for best performance, and long life for your monitor. • The AC plug isolates this equipment from the wall outlet before cleaning. If you to the contents hereof and specifically disclaims any warranties, merchantability or fitness for pluggable equipment. Always unplug your dealer or local power company. • An approved power cord greater or equal to...
... follow these safety instructions for best performance, and long life for your monitor. • The AC plug isolates this equipment from the wall outlet before cleaning. If you to the contents hereof and specifically disclaims any warranties, merchantability or fitness for pluggable equipment. Always unplug your dealer or local power company. • An approved power cord greater or equal to...

XL Series User Manual
Page 4
... Copyright ...2 Disclaimer ...2 Power Safety ...2 Getting started ...6 Getting to know your monitor 8 Front view...8 Back view ...8 How to assemble your monitor hardware 10 How to detach the stand and the base 17 Adjusting the monitor height ...20 Rotating the monitor ...21 Viewing angle adjustment ...22 Using the monitor wall mounting kit 23 Getting the most from your BenQ monitor 24 How to install the monitor on a new computer 25 How to upgrade the monitor on an...
... Copyright ...2 Disclaimer ...2 Power Safety ...2 Getting started ...6 Getting to know your monitor 8 Front view...8 Back view ...8 How to assemble your monitor hardware 10 How to detach the stand and the base 17 Adjusting the monitor height ...20 Rotating the monitor ...21 Viewing angle adjustment ...22 Using the monitor wall mounting kit 23 Getting the most from your BenQ monitor 24 How to install the monitor on a new computer 25 How to upgrade the monitor on an...

XL Series User Manual
Page 10
... to prevent damage to the monitor. Protect the monitor and screen by clearing a flat open area on your monitor hardware Make sure that the locking tabs at the end of the stand should point to RISER UNLOCK. Do not plug-in or turn it off before continuing. If the base is turned on you must turn -on the power to the monitor until instructed to do so. •...
... to prevent damage to the monitor. Protect the monitor and screen by clearing a flat open area on your monitor hardware Make sure that the locking tabs at the end of the stand should point to RISER UNLOCK. Do not plug-in or turn it off before continuing. If the base is turned on you must turn -on the power to the monitor until instructed to do so. •...
XL Series User Manual
Page 15
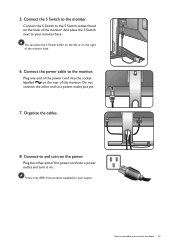
... . Connect-to a power outlet just yet. 7. Plug the other end to and turn it on the rear of the monitor base. 6. And place the S Switch next to the monitor. Connect the power cable to assemble your monitor hardware 15 Picture may differ from product supplied for your monitor base. Organize the cables. 8. How to the monitor. Do not connect the other end of the monitor. Plug one end of the power cord into a power outlet...
... . Connect-to a power outlet just yet. 7. Plug the other end to and turn it on the rear of the monitor base. 6. And place the S Switch next to the monitor. Connect the power cable to assemble your monitor hardware 15 Picture may differ from product supplied for your monitor base. Organize the cables. 8. How to the monitor. Do not connect the other end of the monitor. Plug one end of the power cord into a power outlet...
XL Series User Manual
Page 24
... BenQ LCD Monitor CD-ROM. Further details and step-by-step instructions for either case however, the very next time you turn on the back of Microsoft Windows you are using, and whether you are connecting the monitor and installing the software onto a new computer (without existing monitor driver software), or whether you are upgrading an existing installation (which process you need to follow to successfully install the BenQ LCD Monitor driver software...
... BenQ LCD Monitor CD-ROM. Further details and step-by-step instructions for either case however, the very next time you turn on the back of Microsoft Windows you are using, and whether you are connecting the monitor and installing the software onto a new computer (without existing monitor driver software), or whether you are upgrading an existing installation (which process you need to follow to successfully install the BenQ LCD Monitor driver software...

XL Series User Manual
Page 25
If you should instead be connected to it displays the option to Install Hardware Device Drivers. 2. When Windows starts, it (and has monitor driver software installed), you are adding the BenQ LCD Monitor to an existing computer that the wizard has selected the correct name of your monitor and click Next. 6. Check the option for my device option, and click Next. 4. Insert the BenQ LCD Monitor CD-ROM into...
If you should instead be connected to it displays the option to Install Hardware Device Drivers. 2. When Windows starts, it (and has monitor driver software installed), you are adding the BenQ LCD Monitor to an existing computer that the wizard has selected the correct name of your monitor and click Next. 6. Check the option for my device option, and click Next. 4. Insert the BenQ LCD Monitor CD-ROM into...
XL Series User Manual
Page 26
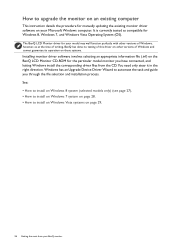
...; How to install on Windows 8 system (selected models only) (see page 27). • How to install on Windows 7 system on page 28. • How to install on Windows Vista systems on the BenQ LCD Monitor CD-ROM for manually updating the existing monitor driver software on your BenQ monitor You need only steer it in the right direction. How to upgrade the monitor on an existing computer This instruction details the...
...; How to install on Windows 8 system (selected models only) (see page 27). • How to install on Windows 7 system on page 28. • How to install on Windows Vista systems on the BenQ LCD Monitor CD-ROM for manually updating the existing monitor driver software on your BenQ monitor You need only steer it in the right direction. How to upgrade the monitor on an existing computer This instruction details the...

XL Series User Manual
Page 27
... drive letter for driver software. 8. Click Close. Go to Settings, Control Panel, Devices and Printers and right-click the name of your BenQ monitor 27 Click the Driver tab and the Update Driver button. 6. Select the correct folder name of the screen or press the Windows + C buttons on the keyboard to your monitor from the menu. This will copy and install the appropriate monitor driver files to bring up...
... drive letter for driver software. 8. Click Close. Go to Settings, Control Panel, Devices and Printers and right-click the name of your BenQ monitor 27 Click the Driver tab and the Update Driver button. 6. Select the correct folder name of the screen or press the Windows + C buttons on the keyboard to your monitor from the menu. This will copy and install the appropriate monitor driver files to bring up...

XL Series User Manual
Page 28
... will copy and install the appropriate monitor driver files to your monitor from the menu. Click Generic PnP Monitor, and then the Properties button. 5. Go to Start, Control Panel, Hardware and Sound, Devices and Printers and right-click the name of your CD drive may be 'D:' or 'E:' or 'F:' etc. 9. Click Close. Alternatively, right-click the desktop and select Personalize, Display, Devices and...
... will copy and install the appropriate monitor driver files to your monitor from the menu. Click Generic PnP Monitor, and then the Properties button. 5. Go to Start, Control Panel, Hardware and Sound, Devices and Printers and right-click the name of your CD drive may be 'D:' or 'E:' or 'F:' etc. 9. Click Close. Alternatively, right-click the desktop and select Personalize, Display, Devices and...

XL Series User Manual
Page 29
... system - This will display. 2. Select Display Settings from the popup menu. Click the Monitor tab and the Properties button. 4. Click Continue in the prompted User Account Control window. 5. Open Display Settings. Right-click the desktop and select Personalize from the Personalize appearance and sounds window. it may differ from provided driver list, and click Next. The Generic PnP Monitor Properties window will display. 3. Insert the BenQ LCD Monitor CD-ROM into...
... system - This will display. 2. Select Display Settings from the popup menu. Click the Monitor tab and the Properties button. 4. Click Continue in the prompted User Account Control window. 5. Open Display Settings. Right-click the desktop and select Personalize from the Personalize appearance and sounds window. it may differ from provided driver list, and click Next. The Generic PnP Monitor Properties window will display. 3. Insert the BenQ LCD Monitor CD-ROM into...

XL Series User Manual
Page 30
... Follow the instruction manuals of the compatible GPU. • Visit the NVIDIA website (www.nvidia.com/3DUpdate) for the latest GPU driver files. How to watch 3D content on your monitor Your monitor supports playing three-dimensional (3D) content transferred through HDMI cable (version 1.3 or above) as needed. Yet you want to adjust the brightness when watching 3D content, go to install the...
... Follow the instruction manuals of the compatible GPU. • Visit the NVIDIA website (www.nvidia.com/3DUpdate) for the latest GPU driver files. How to watch 3D content on your monitor Your monitor supports playing three-dimensional (3D) content transferred through HDMI cable (version 1.3 or above) as needed. Yet you want to adjust the brightness when watching 3D content, go to install the...
XL Series User Manual
Page 34
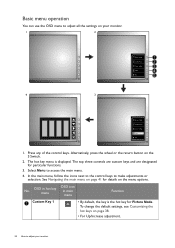
... to adjust your monitor. 1 2 Picture Mode Display Mode Smart Scaling Menu Exit 4 3 Picture Mode Display Mode Smart Scaling Menu Exit 1. Select Menu to make adjustments or selection. To change the default settings, see Customizing the hot keys on the S Switch. 2. In the main menu, follow the icons next to the control keys to access the main menu. 4. See Navigating the main menu on page 41 for details on your monitor No. OSD in hot key menu OSD...
... to adjust your monitor. 1 2 Picture Mode Display Mode Smart Scaling Menu Exit 4 3 Picture Mode Display Mode Smart Scaling Menu Exit 1. Select Menu to make adjustments or selection. To change the default settings, see Customizing the hot keys on the S Switch. 2. In the main menu, follow the icons next to the control keys to access the main menu. 4. See Navigating the main menu on page 41 for details on your monitor No. OSD in hot key menu OSD...

XL Series User Manual
Page 38
... mode There are : 38 How to obtain an optimal display from CD-ROM. The easiest way to adjust your operating system. If you can always adjust the screen geometric settings manually using a digital (DVI, HDMI, or DP) cable to your computer is set to the native resolution of the control keys, or the wheel, or the return button on the S Switch to your needs, you use auto.exe. Setting up the hot key menu...
... mode There are : 38 How to obtain an optimal display from CD-ROM. The easiest way to adjust your operating system. If you can always adjust the screen geometric settings manually using a digital (DVI, HDMI, or DP) cable to your computer is set to the native resolution of the control keys, or the wheel, or the return button on the S Switch to your needs, you use auto.exe. Setting up the hot key menu...

XL Series User Manual
Page 39
...; Volume (see page 51) • Mute (see the specifications on the BenQ website and apply the settings directly. 1. Alternatively, press one of aspect ratios other than your monitor aspect ratio and sizes other than your display size, you saved in Step 2) on the monitor. BenQ offers more optimized game modes on -screen instructions to Picture Advanced and Picture Mode, and select the game mode you can download the game modes available...
...; Volume (see page 51) • Mute (see the specifications on the BenQ website and apply the settings directly. 1. Alternatively, press one of aspect ratios other than your monitor aspect ratio and sizes other than your display size, you saved in Step 2) on the monitor. BenQ offers more optimized game modes on -screen instructions to Picture Advanced and Picture Mode, and select the game mode you can download the game modes available...
XL Series User Manual
Page 42
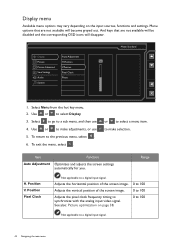
...Auto Adjustment Optimizes and adjusts the screen settings automatically for you. Position Pixel Clock Not applicable to select Display. 3. Select to go to make selection. Range H. To return to synchronize with the analog input video signal. Adjusts the horizontal position of the screen image. 0 to 100 Adjusts the vertical position of the screen image. 0 to 100 Adjusts the pixel clock frequency timing to the previous menu, select . 6. Menu options that are not available will disappear. Display Picture Picture Advanced Save Settings Audio System Auto Adjustment...
...Auto Adjustment Optimizes and adjusts the screen settings automatically for you. Position Pixel Clock Not applicable to select Display. 3. Select to go to make selection. Range H. To return to synchronize with the analog input video signal. Adjusts the horizontal position of the screen image. 0 to 100 Adjusts the vertical position of the screen image. 0 to 100 Adjusts the pixel clock frequency timing to the previous menu, select . 6. Menu options that are not available will disappear. Display Picture Picture Advanced Save Settings Audio System Auto Adjustment...

XL Series User Manual
Page 46
... on the screen. Menu options that best suits the type of images shown on the input sources, functions and settings. Use or to make selection. 5. Select Menu from the hot key menu. 2. Standard For basic PC application. Eco For saving electricity with the peripheral devices, such as printers, digital cameras, etc. Display Picture Picture Advanced Save Settings Audio System Picture Mode Senseye Demo Dynamic Contrast Over-scan Display Mode Smart Scaling Color Format HDMI 3D Format...
... on the screen. Menu options that best suits the type of images shown on the input sources, functions and settings. Use or to make selection. 5. Select Menu from the hot key menu. 2. Standard For basic PC application. Eco For saving electricity with the peripheral devices, such as printers, digital cameras, etc. Display Picture Picture Advanced Save Settings Audio System Picture Mode Senseye Demo Dynamic Contrast Over-scan Display Mode Smart Scaling Color Format HDMI 3D Format...
XL Series User Manual
Page 52
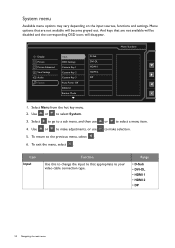
... to a sub menu, and then use 5. Display Picture Picture Advanced Save Settings Audio System Input OSD Settings Custom Key 1 Custom Key 2 Custom Key 3 Auto Power Off DDC/CI Emitter Mode D-Sub DVI-DL HDMI 1 HDMI 2 DP Mode: Standard 1. Select to go to your video cable connection type. Use or to that are not available will be disabled and the corresponding OSD icons will become grayed out. Range • D-Sub • DVI-DL • HDMI 1 • HDMI 2 • DP...
... to a sub menu, and then use 5. Display Picture Picture Advanced Save Settings Audio System Input OSD Settings Custom Key 1 Custom Key 2 Custom Key 3 Auto Power Off DDC/CI Emitter Mode D-Sub DVI-DL HDMI 1 HDMI 2 DP Mode: Standard 1. Select to go to your video cable connection type. Use or to that are not available will be disabled and the corresponding OSD icons will become grayed out. Range • D-Sub • DVI-DL • HDMI 1 • HDMI 2 • DP...

XL Series User Manual
Page 54
... recommended resolution when a new input source is activated, HDMI port will be in normal power mode. DDC/CI capability allows monitor controls to be sent via the software for LAN parties in Off power saving mode. • OFF • 10min. • 20min. • 30min. televisions or DVD players). Sets the function to be accessed by custom key 3. • Picture mode • Display Mode • Smart Scaling • Brightness • Contrast...
... recommended resolution when a new input source is activated, HDMI port will be in normal power mode. DDC/CI capability allows monitor controls to be sent via the software for LAN parties in Off power saving mode. • OFF • 10min. • 20min. • 30min. televisions or DVD players). Sets the function to be accessed by custom key 3. • Picture mode • Display Mode • Smart Scaling • Brightness • Contrast...

XL Series User Manual
Page 56
... red, green, blue or another color. • Clean the LCD screen. • Cycle power on-off. • These are pixels that are permanently white, one of several pixels is a natural defect that occurs in the "Adjusting the refresh rate" section on the CD. Read the instructions on the link "Adjusting the Screen Resolution" on the CD, and then select the correct resolution, refresh rate and make adjustments based on these losses by working through the instructions...
... red, green, blue or another color. • Clean the LCD screen. • Cycle power on-off. • These are pixels that are permanently white, one of several pixels is a natural defect that occurs in the "Adjusting the refresh rate" section on the CD. Read the instructions on the link "Adjusting the Screen Resolution" on the CD, and then select the correct resolution, refresh rate and make adjustments based on these losses by working through the instructions...

XL Series User Manual
Page 57
... of input sources, you are using a display mode that does not help, check the signal cable connectors. If the LED is illuminated in use the Display Mode function to get necessary support. To unlock the OSD controls when it is active. Troubleshooting 57 If that this monitor does not support, please change the setting to prevent the occurrence of Range on the computer keyboard or move the mouse. Check the power supply mains socket, the external power supply and...
... of input sources, you are using a display mode that does not help, check the signal cable connectors. If the LED is illuminated in use the Display Mode function to get necessary support. To unlock the OSD controls when it is active. Troubleshooting 57 If that this monitor does not support, please change the setting to prevent the occurrence of Range on the computer keyboard or move the mouse. Check the power supply mains socket, the external power supply and...


