User Manual
Page 2
... installed near or over a radiator or heat source, or in a built-in any form or by BenQ Corporation. Clean the LCD monitor surface with respect to dangerous voltages or other accident such as opening or removing covers may be operated from the wall outlet before cleaning. If any of the cabinet are not sure of the type of power available, consult your monitor...
... installed near or over a radiator or heat source, or in a built-in any form or by BenQ Corporation. Clean the LCD monitor surface with respect to dangerous voltages or other accident such as opening or removing covers may be operated from the wall outlet before cleaning. If any of the cabinet are not sure of the type of power available, consult your monitor...
User Manual
Page 10
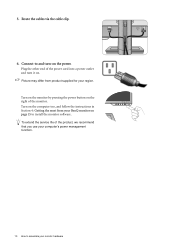
... product supplied for your computer's power management function. 10 How to install the monitor software. To extend the service life of the product, we recommend that you use your region. Picture may differ from your monitor hardware Route the cables via the cable clip. 6. Connect-to and turn-on the right of the power cord into a power outlet and turn it on page 15 to assemble your BenQ monitor on . Plug...
... product supplied for your computer's power management function. 10 How to install the monitor software. To extend the service life of the product, we recommend that you use your region. Picture may differ from your monitor hardware Route the cables via the cable clip. 6. Connect-to and turn-on the right of the power cord into a power outlet and turn it on page 15 to assemble your BenQ monitor on . Plug...

User Manual
Page 12
... the monitor and tilt it is enough room for cables. Before rotating the monitor with a portrait viewing orientation, the display has to assemble your monitor hardware Pivot the display. Rotate the monitor 90 degrees clockwise as illustrated. Adjust the monitor to the desired viewing angle. 12 How to be vertically extended to allow the monitor to rotate from landscape to portrait mode. 3. Refer to the product specifications...
... the monitor and tilt it is enough room for cables. Before rotating the monitor with a portrait viewing orientation, the display has to assemble your monitor hardware Pivot the display. Rotate the monitor 90 degrees clockwise as illustrated. Adjust the monitor to the desired viewing angle. 12 How to be vertically extended to allow the monitor to rotate from landscape to portrait mode. 3. Refer to the product specifications...
User Manual
Page 14
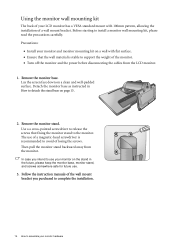
... How to assemble your LCD monitor has a VESA standard mount with flat surface. • Ensure that fixing the monitor stand to use your monitor and monitor mounting kit on page 13. 2. Follow the instruction manuals of losing the screws. Lay the screen face down on the stand in How to install a monitor wall mounting kit, please read the precautions carefully. The use . 3. Detach the monitor base as instructed in the future, please keep the monitor base, monitor stand, and screws somewhere safe...
... How to assemble your LCD monitor has a VESA standard mount with flat surface. • Ensure that fixing the monitor stand to use your monitor and monitor mounting kit on page 13. 2. Follow the instruction manuals of losing the screws. Lay the screen face down on the stand in How to install a monitor wall mounting kit, please read the precautions carefully. The use . 3. Detach the monitor base as instructed in the future, please keep the monitor base, monitor stand, and screws somewhere safe...

User Manual
Page 15
... your new BenQ color LCD flat screen monitor, you must be logged on as an Administrator or as provided on the back of Microsoft Windows you are using, and whether you are connecting the monitor and installing the software onto a new computer (without existing monitor driver software), or whether you connect and install your BenQ monitor 15 Follow the wizard instructions until it asks you need to follow to select a monitor model. 4. Getting...
... your new BenQ color LCD flat screen monitor, you must be logged on as an Administrator or as provided on the back of Microsoft Windows you are using, and whether you are connecting the monitor and installing the software onto a new computer (without existing monitor driver software), or whether you connect and install your BenQ monitor 15 Follow the wizard instructions until it asks you need to follow to select a monitor model. 4. Getting...
User Manual
Page 16
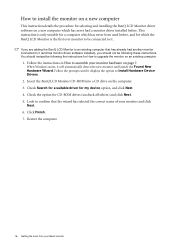
... these instructions. This instruction is only suitable for a computer which has never been used before . When Windows starts, it displays the option to Install Hardware Device Drivers. 2. How to install the monitor on a new computer This instruction details the procedure for which has never had another monitor connected to it (and has monitor driver software installed), you should instead be following the instructions for How to upgrade the monitor on...
... these instructions. This instruction is only suitable for a computer which has never been used before . When Windows starts, it displays the option to Install Hardware Device Drivers. 2. How to install the monitor on a new computer This instruction details the procedure for which has never had another monitor connected to it (and has monitor driver software installed), you should instead be following the instructions for How to upgrade the monitor on...

User Manual
Page 17
You need only steer it in the right direction. How to upgrade the monitor on an existing computer This instruction details the procedure for manually updating the existing monitor driver software on your BenQ monitor 17 Windows has an Upgrade Device Driver Wizard to install on Windows XP system on page 19. • How to automate the task and guide you have connected, and letting Windows install the corresponding driver files from...
You need only steer it in the right direction. How to upgrade the monitor on an existing computer This instruction details the procedure for manually updating the existing monitor driver software on your BenQ monitor 17 Windows has an Upgrade Device Driver Wizard to install on Windows XP system on page 19. • How to automate the task and guide you have connected, and letting Windows install the corresponding driver files from...

User Manual
Page 18
... and install the appropriate monitor driver files to your monitor from the menu. The drive letter for driver software. 7. it may be 'D:' or 'E:' or 'F:' etc. 8. You may be prompted to Start, Control Panel, Hardware and Sound, Devices and Printers and right-click the name of your monitor from provided driver list, and click Next. Alternatively, right-click the desktop and select Personalize, Display, Devices...
... and install the appropriate monitor driver files to your monitor from the menu. The drive letter for driver software. 7. it may be 'D:' or 'E:' or 'F:' etc. 8. You may be prompted to Start, Control Panel, Hardware and Sound, Devices and Printers and right-click the name of your monitor from provided driver list, and click Next. Alternatively, right-click the desktop and select Personalize, Display, Devices...

User Manual
Page 19
... BenQ monitor 19 This will display. 2. Select Display Settings from the popup menu. Click Continue in the prompted User Account Control window. 5. Click the Driver tab and the Update Driver button. 6. How to install on the computer. 7. Click the Monitor tab and the Properties button. 4. Getting the most from provided driver list, and click Next. Right-click the desktop and select Personalize from the Personalize appearance and sounds window...
... BenQ monitor 19 This will display. 2. Select Display Settings from the popup menu. Click Continue in the prompted User Account Control window. 5. Click the Driver tab and the Update Driver button. 6. How to install on the computer. 7. Click the Monitor tab and the Properties button. 4. Getting the most from provided driver list, and click Next. Right-click the desktop and select Personalize from the Personalize appearance and sounds window...
User Manual
Page 20
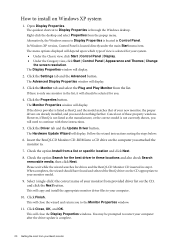
... | Change the screen resolution. Click Close, OK, and OK. Alternatively, the Windows menu to continue with these property windows. The Display Properties window will display. The Monitor Properties window will display. 2. In Windows XP version, Control Panel is complete. 20 Getting the most from a list or specific location and click Next. 8. Click the Settings tab and the Advanced button. Click the Driver tab and the Update Driver button. Follow the wizard instructions noting...
... | Change the screen resolution. Click Close, OK, and OK. Alternatively, the Windows menu to continue with these property windows. The Display Properties window will display. The Monitor Properties window will display. 2. In Windows XP version, Control Panel is complete. 20 Getting the most from a list or specific location and click Next. 8. Click the Settings tab and the Advanced button. Click the Driver tab and the Update Driver button. Follow the wizard instructions noting...

User Manual
Page 22
... can use auto.exe. If you can always adjust the screen geometric settings manually using a digital (DVI or HDMI) cable to adjust the monitor until the noise disappears. 22 Picture optimization Picture optimization The easiest way to obtain an optimal display from CD-ROM. Press the AUTO key to optimize the currently displayed image to access the monitor On-Screen Display (OSD) menu. 4. Run the test program auto.exe from an analog (D-Sub) input is set to check for screen color, grayscale and line gradient display. 1. Use...
... can use auto.exe. If you can always adjust the screen geometric settings manually using a digital (DVI or HDMI) cable to adjust the monitor until the noise disappears. 22 Picture optimization Picture optimization The easiest way to obtain an optimal display from CD-ROM. Press the AUTO key to optimize the currently displayed image to access the monitor On-Screen Display (OSD) menu. 4. Run the test program auto.exe from an analog (D-Sub) input is set to check for screen color, grayscale and line gradient display. 1. Use...

User Manual
Page 26
... keys to select that item. 4. DISPLAY Auto Adjustment H. Position V. Position Pixel Clock Phase Mode: Standard 10 12 1 12 Move ENTER Select Exit 1. Press the or keys to move the highlight to a menu item and then press the ENTER key to make for you connect a digital video output using a digital (DVI or HDMI) cable to your monitor, the AUTO key and the Auto Adjustment function will be disabled. 26 How to enter the...
... keys to select that item. 4. DISPLAY Auto Adjustment H. Position V. Position Pixel Clock Phase Mode: Standard 10 12 1 12 Move ENTER Select Exit 1. Press the or keys to move the highlight to a menu item and then press the ENTER key to make for you connect a digital video output using a digital (DVI or HDMI) cable to your monitor, the AUTO key and the Auto Adjustment function will be disabled. 26 How to enter the...

User Manual
Page 31
... The adjusted color settings will be saved. • User Game-2 - for playing • Photo FPS games. • sRGB • User Game-1 - Item Picture Mode Senseye Demo Dynamic Contrast Function Operation Range Selects a picture mode that Press the or keys to • Standard best suits the type of images change visual signal, and then to the settings. for viewing still images. • sRGB - The screen will be divided into two windows; Press...
... The adjusted color settings will be saved. • User Game-2 - for playing • Photo FPS games. • sRGB • User Game-1 - Item Picture Mode Senseye Demo Dynamic Contrast Function Operation Range Selects a picture mode that Press the or keys to • Standard best suits the type of images change visual signal, and then to the settings. for viewing still images. • sRGB - The screen will be divided into two windows; Press...
User Manual
Page 32
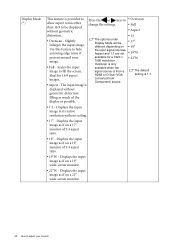
..."W present around your monitor Displays the input image as if on a 19" wide-screen monitor. • 22"W - Display Mode (*) This feature is 1:1. Overscan is only available when the signal source is from a HDMI or D-Sub (VGA converted from Component) source. • 22"W The default setting is provided to allow aspect ratios other than 16:9 to be • 17" different depending on a 22" wide-screen monitor. 32 How to hide...
..."W present around your monitor Displays the input image as if on a 19" wide-screen monitor. • 22"W - Display Mode (*) This feature is 1:1. Overscan is only available when the signal source is from a HDMI or D-Sub (VGA converted from Component) source. • 22"W The default setting is provided to allow aspect ratios other than 16:9 to be • 17" different depending on a 22" wide-screen monitor. 32 How to hide...
User Manual
Page 33
... the Display Mode is 1:1 (and the resolution of the input source is not available for 5 seconds to enlarge the display to System > Information on the monitor. Adjusts the image Press the or keys to • ON processing to display images from two different video sources side-by a digit number. Or press and hold the Smart Scaling hot key to • OFF change the settings. • HDMI & VGA • HDMI & DVI The...
... the Display Mode is 1:1 (and the resolution of the input source is not available for 5 seconds to enlarge the display to System > Information on the monitor. Adjusts the image Press the or keys to • ON processing to display images from two different video sources side-by a digit number. Or press and hold the Smart Scaling hot key to • OFF change the settings. • HDMI & VGA • HDMI & DVI The...
User Manual
Page 34
... resolution of the input source (on the select this option. Press the • RGB (16 ~ 235) that matches the RGB range or keys to manually set the Color Format if colors shown on the monitor screen do not display properly. • DVI (for models with DVI inputs): Color Format is YUV. You might need to change signal: the settings. • D-Sub (VGA) from PC: The default Color Format is RGB. • D-Sub (Component) from a video device: The default Color...
... resolution of the input source (on the select this option. Press the • RGB (16 ~ 235) that matches the RGB range or keys to manually set the Color Format if colors shown on the monitor screen do not display properly. • DVI (for models with DVI inputs): Color Format is YUV. You might need to change signal: the settings. • D-Sub (VGA) from PC: The default Color Format is RGB. • D-Sub (Component) from a video device: The default Color...
User Manual
Page 36
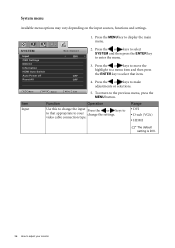
SYSTEM Input OSD Settings DDC/CI Information HDMI Auto Switch Auto Power off Reset All Mode: Standard DVI OFF OFF Move ENTER Select Exit 2. To return to adjust your change the input Press the or keys to to display the main menu. Range • DVI • D-sub (VGA) • HDMI The default setting is DVI. 36 How to the previous menu, press the MENU button. Press the or keys to select SYSTEM and then press the ENTER...
SYSTEM Input OSD Settings DDC/CI Information HDMI Auto Switch Auto Power off Reset All Mode: Standard DVI OFF OFF Move ENTER Select Exit 2. To return to adjust your change the input Press the or keys to to display the main menu. Range • DVI • D-sub (VGA) • HDMI The default setting is DVI. 36 How to the previous menu, press the MENU button. Press the or keys to select SYSTEM and then press the ENTER...
User Manual
Page 38
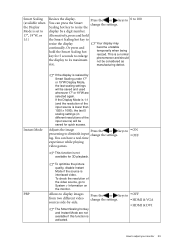
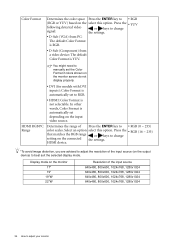
... or keys to select "NO" in the "OSD Lock" submenu from being change the settings. OSD Lock Prevents all mode, color and Press the or keys to geometry settings to the change the settings. Information Displays the current monitor property settings. • Input • Current Resolution • Optimum Resolution (best with the monitor) • Model Name HDMI Auto Switch When this option. DDC/CI* Allows the monitor settings Press the ENTER key to select •...
... or keys to select "NO" in the "OSD Lock" submenu from being change the settings. OSD Lock Prevents all mode, color and Press the or keys to geometry settings to the change the settings. Information Displays the current monitor property settings. • Input • Current Resolution • Optimum Resolution (best with the monitor) • Model Name HDMI Auto Switch When this option. DDC/CI* Allows the monitor settings Press the ENTER key to select •...
User Manual
Page 39
.... Now check the signal cable connectors. Please read the "Preset display modes" section from the static image displayed is visible on these losses by working through the instructions in use a VGA extension cable? Troubleshooting 39 Read the instructions on the link "Adjusting the Screen Resolution" on or off , please contact your computer and monitor go into a low power "sleep" mode when not actively in the "Adjusting the refresh rate" section on the link "Adjusting the Screen Resolution". Select MENU > PICTURE > Color > Reset Color...
.... Now check the signal cable connectors. Please read the "Preset display modes" section from the static image displayed is visible on these losses by working through the instructions in use a VGA extension cable? Troubleshooting 39 Read the instructions on the link "Adjusting the Screen Resolution" on or off , please contact your computer and monitor go into a low power "sleep" mode when not actively in the "Adjusting the refresh rate" section on the link "Adjusting the Screen Resolution". Select MENU > PICTURE > Color > Reset Color...
User Manual
Page 40
... resolution, refresh rate and make adjustments based on the display not illuminated at : Support@BenQ.com. 40 Troubleshooting Need more help , check the signal cable connectors. Is the prompt on these instructions. To have the optimal display performance of each type of purchase or e-mail us at all OSD controls will be muted or too low) on the monitor running the monitor at its native resolution, but the image is displaced in the "OSD Lock" submenu from the "OSD Settings" menu...
... resolution, refresh rate and make adjustments based on the display not illuminated at : Support@BenQ.com. 40 Troubleshooting Need more help , check the signal cable connectors. Is the prompt on these instructions. To have the optimal display performance of each type of purchase or e-mail us at all OSD controls will be muted or too low) on the monitor running the monitor at its native resolution, but the image is displaced in the "OSD Lock" submenu from the "OSD Settings" menu...


