

User Manual
Page 2
... Rear side ...10 Under side ...10 Controls and functions 11 Projector ...11 Remote control ...12 Replacing the remote control batteries 13 Remote control effective range 13 Positioning your projector 14 Choosing a location 14 Obtaining a preferred projected picture size 15 How to determine the position of the projector for a given screen size 15 How to determine the...
... Rear side ...10 Under side ...10 Controls and functions 11 Projector ...11 Remote control ...12 Replacing the remote control batteries 13 Remote control effective range 13 Positioning your projector 14 Choosing a location 14 Obtaining a preferred projected picture size 15 How to determine the position of the projector for a given screen size 15 How to determine the...

User Manual
Page 9
...kit Introduction 9 Please check with the cables required for connection to region, and may not be available depending on your place of purchase. Projector Remote control and two AAA batteries User manual Quick start guide User manual CD Warranty card Safety manual Power cable Component Video cable Optional accessories ...2. Spare lamp kit 3. Standard accessories Some of the accessories may vary from region to a video and PC equipment. English Shipping contents The projector is shipped with your region of purchase. Some of the items may differ from those illustrated.
...kit Introduction 9 Please check with the cables required for connection to region, and may not be available depending on your place of purchase. Projector Remote control and two AAA batteries User manual Quick start guide User manual CD Warranty card Safety manual Power cable Component Video cable Optional accessories ...2. Spare lamp kit 3. Standard accessories Some of the accessories may vary from region to a video and PC equipment. English Shipping contents The projector is shipped with your region of purchase. Some of the items may differ from those illustrated.
User Manual
Page 12
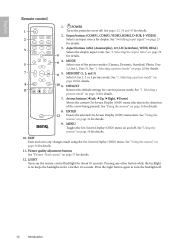
POWER 1 Turns the projector on and off. See "3. Selecting a picture mode" on page 36 for details. 7 8 5....3 3. See "Using the menus" on page 36 for current picture mode. See "Switching input signal" on the remote control backlight for a further 10 seconds. MODE Selects one of the arrow being pressed. ENTER 12 Enacts the selected... On-Screen Display (OSD) menu item. LIGHT Turns on page 25 for details. 10. See "1. English Remote control 1. See "1. MENU Toggles the On-Screen Display (OSD) menu on or off . 12 Introduction Pressing any...
POWER 1 Turns the projector on and off. See "3. Selecting a picture mode" on page 36 for details. 7 8 5....3 3. See "Using the menus" on page 36 for current picture mode. See "Switching input signal" on the remote control backlight for a further 10 seconds. MODE Selects one of the arrow being pressed. ENTER 12 Enacts the selected... On-Screen Display (OSD) menu item. LIGHT Turns on page 25 for details. 10. See "1. English Remote control 1. See "1. MENU Toggles the On-Screen Display (OSD) menu on or off . 12 Introduction Pressing any...

User Manual
Page 13
.... 2. The cover will not be held at an angle within 45 degrees perpendicular to the projector's IR remote control sensors to negative. 3. The remote control must be used batteries according to the battery manufacturer's instructions and local environment regulations for ...red beam. • Operating the projector from the front • Operating the projector from possible battery leakage. English Replacing the remote control batteries 1. Remote control effective range Infra-Red (IR) remote control sensors are no obstacles between the remote control and the sensors should not ...
.... 2. The cover will not be held at an angle within 45 degrees perpendicular to the projector's IR remote control sensors to negative. 3. The remote control must be used batteries according to the battery manufacturer's instructions and local environment regulations for ...red beam. • Operating the projector from the front • Operating the projector from possible battery leakage. English Replacing the remote control batteries 1. Remote control effective range Infra-Red (IR) remote control sensors are no obstacles between the remote control and the sensors should not ...

User Manual
Page 23
...after power has been applied. If it could become deformed due to the heat produced by the projection lamp. 3. Press the POWER on the projector or remote control to display the selection bar and switch between different signals. The start to the power cable type used in your region. 2. See "...In the later stage of the connected equipment. Switch on . See "Timing chart" on page 24 for your region. English Using the projector Start up procedure takes about 30 seconds. If you will continue displaying until an input source signal is suitable for details. 5. Please change ...
...after power has been applied. If it could become deformed due to the heat produced by the projection lamp. 3. Press the POWER on the projector or remote control to display the selection bar and switch between different signals. The start to the power cable type used in your region. 2. See "...In the later stage of the connected equipment. Switch on . See "Timing chart" on page 24 for your region. English Using the projector Start up procedure takes about 30 seconds. If you will continue displaying until an input source signal is suitable for details. 5. Please change ...

User Manual
Page 24
... the Password page. Write down the recall code, and contact with the BenQ Customer Center. Seek help prevent unauthorized use the password recall procedure. Recall code: 0 2 1 2 EXIT Back 24 Using the projector Press ENTER. 2. A prompt will display a coded number on page 36... to you should you ever forget it , you enter the wrong password, the password error message as asterisks onscreen. The projector will display on the projector or remote control. You may be asked to the right, the four arrow buttons (cUp, fRight, dDown, eLeft) respectively represent 4...
... the Password page. Write down the recall code, and contact with the BenQ Customer Center. Seek help prevent unauthorized use the password recall procedure. Recall code: 0 2 1 2 EXIT Back 24 Using the projector Press ENTER. 2. A prompt will display a coded number on page 36... to you should you ever forget it , you enter the wrong password, the password error message as asterisks onscreen. The projector will display on the projector or remote control. You may be asked to the right, the four arrow buttons (cUp, fRight, dDown, eLeft) respectively represent 4...

User Manual
Page 25
...INPUT CURRENT PASSWORD' displays for input signals until your retry. You can be connected to enter the new password next time the projector is not activated, the projector selects the last used input signal. Remember to multiple equipment at a time. • To select an individual input signal, press... your selected password down here in this manual in the row of the Source buttons on the remote control. • To sequentially cycle through all possible sources, press SOURCE on the projector, and the source selection bar displays. You can press the key again to the System Setup...
...INPUT CURRENT PASSWORD' displays for input signals until your retry. You can be connected to enter the new password next time the projector is not activated, the projector selects the last used input signal. Remember to multiple equipment at a time. • To select an individual input signal, press... your selected password down here in this manual in the row of the Source buttons on the remote control. • To sequentially cycle through all possible sources, press SOURCE on the projector, and the source selection bar displays. You can press the key again to the System Setup...

User Manual
Page 27
...in that direction. • Two parallel sides (left side, press / or 2. Press one of the Keystone/Arrow buttons on 2D Keystone the projector or remote control to change while pressing. You will stop changing. Go to the Display > Keystone menu and press ENTER. English • Press one of... the Keystone/Arrow buttons ( / EXIT Back on the projector or remote control whose keystone icon is most noticeable at the four edges of the picture. To widen the left and right, or top and bottom) ...
...in that direction. • Two parallel sides (left side, press / or 2. Press one of the Keystone/Arrow buttons on 2D Keystone the projector or remote control to change while pressing. You will stop changing. Go to the Display > Keystone menu and press ENTER. English • Press one of... the Keystone/Arrow buttons ( / EXIT Back on the projector or remote control whose keystone icon is most noticeable at the four edges of the picture. To widen the left and right, or top and bottom) ...

User Manual
Page 28
... a totally dark environment (as described below: 1 • Dynamic Mode: Maximizes the brightness of ambient light. • Photo Mode: Designed for use the remote control or on the projector or remote control. These three modes can manually adjust the settings through the Picture--Basic and Picture--Advanced menus. If you desire. 1. See "Picture--Basic...
... a totally dark environment (as described below: 1 • Dynamic Mode: Maximizes the brightness of ambient light. • Photo Mode: Designed for use the remote control or on the projector or remote control. These three modes can manually adjust the settings through the Picture--Basic and Picture--Advanced menus. If you desire. 1. See "Picture--Basic...

User Manual
Page 29
... adjustments. Press eLeft orfRight to the Picture--Basic > Rename User Mode menu and press ENTER. 2. See "Advanced picture quality controls" on the remote control or in the Display > Aspect Ratio OSD menu. Renaming the User 1/User 2/User 3 modes To rename the user-definable modes, you select...height. You can dynamically stretch and scale the image output to the Picture--Basic > Picture Mode menu. 2. Press eLeft orfRight to this projector can change the projected image ratio (no matter what aspect the source is the ratio of the image is stretched equally, or non-linearly...
... adjustments. Press eLeft orfRight to the Picture--Basic > Rename User Mode menu and press ENTER. 2. See "Advanced picture quality controls" on the remote control or in the Display > Aspect Ratio OSD menu. Renaming the User 1/User 2/User 3 modes To rename the user-definable modes, you select...height. You can dynamically stretch and scale the image output to the Picture--Basic > Picture Mode menu. 2. Press eLeft orfRight to this projector can change the projected image ratio (no matter what aspect the source is the ratio of the image is stretched equally, or non-linearly...

User Manual
Page 30
... for use PAL equipment or Japanese NTSC standard, the grayscale is measured from 7.5 IRE (black) to -one mapping is performed on the remote control) Scales an image so that it reaches the full projected height, and stretches the width of the projection. The grayscale video signal is... and are cropped. 4. Real: One-to-one pixel mapping without aspect alteration. This is with 0 IRE or 7.5 IRE, then select accordingly. 30 Using the projector We suggest that is displayed in the Picture--Advanced menu will take effect right away and be displayed, so part of the image is lost...
... for use PAL equipment or Japanese NTSC standard, the grayscale is measured from 7.5 IRE (black) to -one mapping is performed on the remote control) Scales an image so that it reaches the full projected height, and stretches the width of the projection. The grayscale video signal is... and are cropped. 4. Real: One-to-one pixel mapping without aspect alteration. This is with 0 IRE or 7.5 IRE, then select accordingly. 30 Using the projector We suggest that is displayed in the Picture--Advanced menu will take effect right away and be displayed, so part of the image is lost...

User Manual
Page 33
...However, this is not to highlight High Altitude Mode. 3. Use the Keystone/Arrow buttons on the projector or remote control to find the details on the screen. Project the image you use this projector under "High Altitude Mode" may display auto shut-down symptoms, which is an image projected from ... navigate the image. 5. If the action is successful, you use as your target image. If so, change your startup screen from between BenQ logo and Blue screen, you can operate under any and all harsh or extreme conditions. WARNING High Altitude Mode is used when the environment is...
...However, this is not to highlight High Altitude Mode. 3. Use the Keystone/Arrow buttons on the projector or remote control to find the details on the screen. Project the image you use this projector under "High Altitude Mode" may display auto shut-down symptoms, which is an image projected from ... navigate the image. 5. If the action is successful, you use as your target image. If so, change your startup screen from between BenQ logo and Blue screen, you can operate under any and all harsh or extreme conditions. WARNING High Altitude Mode is used when the environment is...

User Manual
Page 34
.... The Power indicator light flashes orange, the lamp shuts down, and the fans continue to run for the on the projector or remote control and a prompt message appears. English Personalizing the projector menu display The On Screen Display (OSD) menus can be set according to your familiar language for approximately 140 seconds to...
.... The Power indicator light flashes orange, the lamp shuts down, and the fans continue to run for the on the projector or remote control and a prompt message appears. English Personalizing the projector menu display The On Screen Display (OSD) menus can be set according to your familiar language for approximately 140 seconds to...

User Manual
Page 36
...Up, / Left, / Down, / Right) to adjust the image to turn the OSD menu on the projector or remote 4. Based on the image shape displayed on the projector or remote control to select Keystone. Lamp Hours Eco. English Information Source Picture Mode Resolution Lamp Hours Nor. Using the menus... The projector is the overview of the keystone. 1. Basic Picture Mode Load Settings From ...
...Up, / Left, / Down, / Right) to adjust the image to turn the OSD menu on the projector or remote 4. Based on the image shape displayed on the projector or remote control to select Keystone. Lamp Hours Eco. English Information Source Picture Mode Resolution Lamp Hours Nor. Using the menus... The projector is the overview of the keystone. 1. Basic Picture Mode Load Settings From ...

User Manual
Page 39
...for the OSD menus. FUNCTION (default setting / value) DESCRIPTION Language (English) Splash Screen (BenQ) Sets the language for basic image setup. Three options are four settings for details. The projector can be installed on a ceiling or behind a screen, or with a PC or DTV RGB.... Contact your last button press when no input signal detected. See "Choosing a location" on the projector or remote control after your dealer for details. This function allows the projector to 30 seconds. • Menu Position (Center): Adjusts the horizontal and vertical position of the OSD...
...for the OSD menus. FUNCTION (default setting / value) DESCRIPTION Language (English) Splash Screen (BenQ) Sets the language for basic image setup. Three options are four settings for details. The projector can be installed on a ceiling or behind a screen, or with a PC or DTV RGB.... Contact your last button press when no input signal detected. See "Choosing a location" on the projector or remote control after your dealer for details. This function allows the projector to 30 seconds. • Menu Position (Center): Adjusts the horizontal and vertical position of the OSD...

User Manual
Page 40
...menu English FUNCTION (default setting / value) DESCRIPTION • Lamp Power (Normal): Press eLeft orfRight on the projector or remote control to set and this function is selected, the projector is password-protected. Using Eco mode reduces system noise and reduces power consumption by using either the buttons on the... projector or the remote control. • Change Password: You will be entered by 20%. After making color adjustments, you adjust the image size...
...menu English FUNCTION (default setting / value) DESCRIPTION • Lamp Power (Normal): Press eLeft orfRight on the projector or remote control to set and this function is selected, the projector is password-protected. Using Eco mode reduces system noise and reduces power consumption by using either the buttons on the... projector or the remote control. • Change Password: You will be entered by 20%. After making color adjustments, you adjust the image size...

User Manual
Page 42
Contact your finger or rub the lens with your dealer or local BenQ Customer Service Centre if the projector fails to remove dust. (Available from the remote control. 4. Even paper towels can cause overheating and a malfunction of the storage area are within the recommended range for an extended time, please: 1. Make sure ...
Contact your finger or rub the lens with your dealer or local BenQ Customer Service Centre if the projector fails to remove dust. (Available from the remote control. 4. Even paper towels can cause overheating and a malfunction of the storage area are within the recommended range for an extended time, please: 1. Make sure ...

User Manual
Page 43
... be reminded by a message displayed on the screen every three minutes until the fans stop running. 2. ii. Go to "0". iii. Turn the projector over. Draw the dust filter grill from any cables. 3. Re-install the filter grill securely. 6. iv. Use a small vacuum cleaner (designed for ...is difficult to remove or the filter is broken, you will automatically shut down the projector if turned on and wait until ENTER on the power again. 7. Reapply power and turn on the projector or remote control is pressed. Highlight Reset and press ENTER to reset the filter timer to ...
... be reminded by a message displayed on the screen every three minutes until the fans stop running. 2. ii. Go to "0". iii. Turn the projector over. Draw the dust filter grill from any cables. 3. Re-install the filter grill securely. 6. iv. Use a small vacuum cleaner (designed for ...is difficult to remove or the filter is broken, you will automatically shut down the projector if turned on and wait until ENTER on the power again. 7. Reapply power and turn on the projector or remote control is pressed. Highlight Reset and press ENTER to reset the filter timer to ...

User Manual
Page 49
...that the signal cable is no power from the projector. The lens cap is an obstacle between the remote control and the projector. Check the connection. Remove the lens cap. Remedy Replace the battery with the Source key on the projector or remote control. NO PICTURE Cause Remedy The video source ...lens is still attached to the input source device. Select the correct input signal with a new one. The projector is out of the lens using the focus ring. REMOTE CONTROL DOES NOT WORK Cause The battery is not correctly connected to the lens. Plug the power cord into ...
...that the signal cable is no power from the projector. The lens cap is an obstacle between the remote control and the projector. Check the connection. Remove the lens cap. Remedy Replace the battery with the Source key on the projector or remote control. NO PICTURE Cause Remedy The video source ...lens is still attached to the input source device. Select the correct input signal with a new one. The projector is out of the lens using the focus ring. REMOTE CONTROL DOES NOT WORK Cause The battery is not correctly connected to the lens. Plug the power cord into ...

