

User Manual
Page 1
W11000 Digital Projector User Manual
W11000 Digital Projector User Manual

User Manual
Page 2
... 0°C and 35°C, altitude lower than 4920 feet, and avoiding to operate the projector in material and workmanship, under normal usage and storage. Disclaimer BenQ Corporation makes no representations or warranties, either expressed or implied, with any warranty claim. Patents... to the contents hereof and specifically disclaims any warranties, merchantability or fitness for the details on BenQ projector patent coverage. 2 Warranty and Copyright information Further, BenQ Corporation reserves the right to revise this product is found to country. In the event this ...
... 0°C and 35°C, altitude lower than 4920 feet, and avoiding to operate the projector in material and workmanship, under normal usage and storage. Disclaimer BenQ Corporation makes no representations or warranties, either expressed or implied, with any warranty claim. Patents... to the contents hereof and specifically disclaims any warranties, merchantability or fitness for the details on BenQ projector patent coverage. 2 Warranty and Copyright information Further, BenQ Corporation reserves the right to revise this product is found to country. In the event this ...

User Manual
Page 3
... ...11 Obtaining a preferred projected image size 12 Mounting the projector...13 Adjusting the projector position...14 Adjusting the projected image...15 Connection ...16 Operation ...18 Starting up the projector ...18 Using the menus ...20 Securing the projector ...21 Switching input signal ...22 Shutting down the projector ...23 Direct power off ...23 Menu operation ...24 PICTURE...
... ...11 Obtaining a preferred projected image size 12 Mounting the projector...13 Adjusting the projector position...14 Adjusting the projected image...15 Connection ...16 Operation ...18 Starting up the projector ...18 Using the menus ...20 Securing the projector ...21 Switching input signal ...22 Shutting down the projector ...23 Direct power off ...23 Menu operation ...24 PICTURE...
User Manual
Page 4
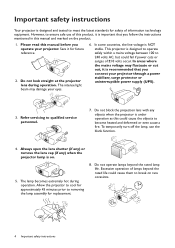
... approximately 45 minutes prior to qualified service personnel. 7. Please read this manual and marked on rare occasions. 4 Important safety instructions This projector is designed to operate safely within a mains voltage between 100 to 240 volts AC, but could fail if power cuts or surges of... eyes. 6. In some countries, the line voltage is under operation as this product, it for future reference. 2. Important safety instructions Your projector is designed and tested to meet the latest standards for safety of ±10 volts occur. Excessive operation of this could cause them to ...
... approximately 45 minutes prior to qualified service personnel. 7. Please read this manual and marked on rare occasions. 4 Important safety instructions This projector is designed to operate safely within a mains voltage between 100 to 240 volts AC, but could fail if power cuts or surges of... eyes. 6. In some countries, the line voltage is under operation as this product, it for future reference. 2. Important safety instructions Your projector is designed and tested to meet the latest standards for safety of ±10 volts occur. Excessive operation of this could cause them to ...
User Manual
Page 5
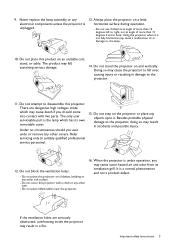
... attempt to suitably qualified professional service personnel. 15. Do not block the ventilation holes. - When the projector is the lamp which may result in damage to the projector, doing so may cause death if you should you may fall over, causing injury or resulting in accidents... and possible injury. 12. Always place the projector on end vertically. Do not place this projector on an unstable cart, stand, or table. It is unplugged. 13. Important safety instructions 5 The product may ...
... attempt to suitably qualified professional service personnel. 15. Do not block the ventilation holes. - When the projector is the lamp which may result in damage to the projector, doing so may cause death if you should you may fall over, causing injury or resulting in accidents... and possible injury. 12. Always place the projector on end vertically. Do not place this projector on an unstable cart, stand, or table. It is unplugged. 13. Important safety instructions 5 The product may ...
User Manual
Page 6
...the power supply's power outlet and call BenQ to fail. Locations where temperatures may cause it from walls and free flow of the following environments. - Liquids spilled into the projector may become wet, disconnect it to have the projector serviced. 20. This apparatus must be earthed... above 40°C / 104°F - Locations where excessive humidity, dust, or cigarette smoke may contaminate optical components, shorten the projector's life span and darken the image. 18. This product is poorly ventilated or confined. See www.lamprecycle.org. 6 Important safety ...
...the power supply's power outlet and call BenQ to fail. Locations where temperatures may cause it from walls and free flow of the following environments. - Liquids spilled into the projector may become wet, disconnect it to have the projector serviced. 20. This apparatus must be earthed... above 40°C / 104°F - Locations where excessive humidity, dust, or cigarette smoke may contaminate optical components, shorten the projector's life span and darken the image. 18. This product is poorly ventilated or confined. See www.lamprecycle.org. 6 Important safety ...

User Manual
Page 7
... environment like the kitchen, bathroom, sauna, sunroom or in some specific regions. Remove the old batteries (if applicable) and install two AAA batteries. Standard accessories Projector QDuigiictkalSPtraortjeGctuoidr e Remote control with the same or equivalent type recommended by the battery manufacturer. • Dispose of the used batteries according to the remote control...
... environment like the kitchen, bathroom, sauna, sunroom or in some specific regions. Remove the old batteries (if applicable) and install two AAA batteries. Standard accessories Projector QDuigiictkalSPtraortjeGctuoidr e Remote control with the same or equivalent type recommended by the battery manufacturer. • Dispose of the used batteries according to the remote control...

User Manual
Page 8
Projector exterior view 6 8 1 2 3 4 9 5 6 10 23 23 7 24 25 25 12 15 17 11 13 14 16 18 19 20 LAN IR I N 12V TRIGGHER 1 PC HDMI 1 HDMI 2 ...
Projector exterior view 6 8 1 2 3 4 9 5 6 10 23 23 7 24 25 25 12 15 17 11 13 14 16 18 19 20 LAN IR I N 12V TRIGGHER 1 PC HDMI 1 HDMI 2 ...
User Manual
Page 9
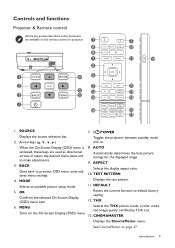
...MODE Displays the test pattern. DEFAULT 5. See CinemaMaster on the On-Screen Display (OSD) menu. 13. Controls and functions Projector & Remote control All the key presses described in this document are used as directional arrows to select the desired menu items... and to make adjustments. 3. ASPECT Selects the display aspect ratio. 10. I/ POWER Toggles the projector between standby mode and on the remote control or projector. 7 LAN IR I N 12V TRIGGHER 1 PC HDMI 1 HDMI 2 USB MINI-B 2 RS-232 HDCP 2.2 8 9 1 2 1 4 5 2 3 5 12...
...MODE Displays the test pattern. DEFAULT 5. See CinemaMaster on the On-Screen Display (OSD) menu. 13. Controls and functions Projector & Remote control All the key presses described in this document are used as directional arrows to select the desired menu items... and to make adjustments. 3. ASPECT Selects the display aspect ratio. 10. I/ POWER Toggles the projector between standby mode and on the remote control or projector. 7 LAN IR I N 12V TRIGGHER 1 PC HDMI 1 HDMI 2 USB MINI-B 2 RS-232 HDCP 2.2 8 9 1 2 1 4 5 2 3 5 12...
User Manual
Page 10
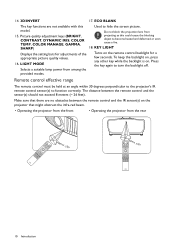
.... +30º Approx. +30º 10 Introduction To keep the backlight on, press any other key while the backlight is on the projector that there are not available with this could cause the blocking object to hide the screen picture. The distance between the remote control and the... key again to function correctly. Remote control effective range The remote control must be held at an angle within 30 degrees perpendicular to the projector's IR remote control sensor(s) to turn the backlight off. ECO BLANK The key functions are no obstacles between the remote control and the sensor...
.... +30º Approx. +30º 10 Introduction To keep the backlight on, press any other key while the backlight is on the projector that there are not available with this could cause the blocking object to hide the screen picture. The distance between the remote control and the... key again to function correctly. Remote control effective range The remote control must be held at an angle within 30 degrees perpendicular to the projector's IR remote control sensor(s) to turn the backlight off. ECO BLANK The key functions are no obstacles between the remote control and the sensor...
User Manual
Page 11
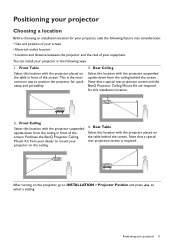
... quick setup and portability. 3. After turning on the table behind the screen. This is required. Purchase the BenQ Projector Ceiling Mount Kit from the ceiling behind the screen. Positioning your projector Choosing a location Before choosing an installation location for this installation location. 2. Note that a special rear projection screen is the most common way...
... quick setup and portability. 3. After turning on the table behind the screen. This is required. Purchase the BenQ Projector Ceiling Mount Kit from the ceiling behind the screen. Positioning your projector Choosing a location Before choosing an installation location for this installation location. 2. Note that a special rear projection screen is the most common way...

User Manual
Page 12
... so as to the screen, the zoom setting, and the video format each factors in the "Distance from the projector lens to make allowance for this projector's optical characteristics. zoom) 80 2032 996 1771 90 2286 1121 1992 100 2540 1245 2214 110 2794 1370 2435 ... installation location. 12 Positioning your measured projection distance is 520 cm, the closest match in the projected image size. BenQ recommends that if you intend to permanently install the projector, you determine the exact mounting position so that a 140'' (about 3.6 m) screen is required. This will help...
... so as to the screen, the zoom setting, and the video format each factors in the "Distance from the projector lens to make allowance for this projector's optical characteristics. zoom) 80 2032 996 1771 90 2286 1121 1992 100 2540 1245 2214 110 2794 1370 2435 ... installation location. 12 Positioning your measured projection distance is 520 cm, the closest match in the projected image size. BenQ recommends that if you intend to permanently install the projector, you determine the exact mounting position so that a 140'' (about 3.6 m) screen is required. This will help...

User Manual
Page 13
... due to an improper attachment through the use of the wrong gauge or length screws. Tightening with a non-BenQ brand projector mounting kit. • Consider the surrounding temperature where the projector is securely and safely installed. Min L = 20 mm) 372.8 290 547.8 530.8 553.39 275.... a separate Kensington lock compatible security cable and attach it is ceiling mounted. Mounting the projector If you intend to mount your projector, we strongly recommend that you use a proper fitting BenQ projector mounting kit and that you ensure it securely to both the Kensington lock slot on your...
... due to an improper attachment through the use of the wrong gauge or length screws. Tightening with a non-BenQ brand projector mounting kit. • Consider the surrounding temperature where the projector is securely and safely installed. Min L = 20 mm) 372.8 290 547.8 530.8 553.39 275.... a separate Kensington lock compatible security cable and attach it is ceiling mounted. Mounting the projector If you intend to mount your projector, we strongly recommend that you use a proper fitting BenQ projector mounting kit and that you ensure it securely to both the Kensington lock slot on your...

User Manual
Page 14
You can turn the knobs on your projector. Adjusting the projector position Shifting the projection lens The lens shift control provides flexibility for installing your desired image position. The horizontal position The vertical position 27% 1 screen ...-B 2 RS-232 HDCP 2.2 1 screen height 65% The projection range Lens shift adjustment will not result in any direction within the allowable range depending on the projector to be positioned off the center of the projected image height or width. It allows the...
You can turn the knobs on your projector. Adjusting the projector position Shifting the projection lens The lens shift control provides flexibility for installing your desired image position. The horizontal position The vertical position 27% 1 screen ...-B 2 RS-232 HDCP 2.2 1 screen height 65% The projection range Lens shift adjustment will not result in any direction within the allowable range depending on the projector to be positioned off the center of the projected image height or width. It allows the...

User Manual
Page 15
... displayed in a reverse direction. Sharpen the image by rotating the focus ring. need to your projector 15 Adjusting the projected image Adjusting the projection angle If the projector is on a flat surface or the screen and the projector are not perpendicular to each other, the projected image becomes trapezoidal. The strong light from...
... displayed in a reverse direction. Sharpen the image by rotating the focus ring. need to your projector 15 Adjusting the projected image Adjusting the projection angle If the projector is on a flat surface or the screen and the projector are not perpendicular to each other, the projected image becomes trapezoidal. The strong light from...

User Manual
Page 16
...to your notebook's documentation to find your notebook's key combination. • If the selected video image is not displayed after the projector is turned on and the correct video source has been selected, check that the signal cables have been connected correctly. Terminal Picture... 2 (Version 1.4a) Better PC Good 16 Connection Ensure the cables are for each source. 3. Connection When connecting a signal source to the projector, be included with a monitor symbol turns the external display on/off before making any connections. 2. Turn all equipment off . They are commercially ...
...to your notebook's documentation to find your notebook's key combination. • If the selected video image is not displayed after the projector is turned on and the correct video source has been selected, check that the signal cables have been connected correctly. Terminal Picture... 2 (Version 1.4a) Better PC Good 16 Connection Ensure the cables are for each source. 3. Connection When connecting a signal source to the projector, be included with a monitor symbol turns the external display on/off before making any connections. 2. Turn all equipment off . They are commercially ...

User Manual
Page 17
... The cable tie set : 1. Insert the end of the cable plug. 2 5 The cable tie installation is inserted. 3 1 4 2. Slightly open the ratchet to the cable tie projector. It contains the following parts. Move the cable tie ratchet along with the cable tie to the end of the cable tie to surround the...
... The cable tie set : 1. Insert the end of the cable plug. 2 5 The cable tie installation is inserted. 3 1 4 2. Slightly open the ratchet to the cable tie projector. It contains the following parts. Move the cable tie ratchet along with the cable tie to the end of the cable tie to surround the...

User Manual
Page 18
... later stage of start up , a startup logo is on the power outlet switch (where fitted). Turn on . The start up procedure takes about projector position, see Choosing a location. If you turn on the remote control to adjust the image clearness. 3. Step 3: Specify Auto Source. Now you ... the first time you have already done this, skip this is turned on the projector or remote control to move on to confirm the selected menu item. Press on the projector or on the projector, the setup wizard appears to guide you 've completed the initial setup. 18 Operation Step...
... later stage of start up , a startup logo is on the power outlet switch (where fitted). Turn on . The start up procedure takes about projector position, see Choosing a location. If you turn on the remote control to adjust the image clearness. 3. Step 3: Specify Auto Source. Now you ... the first time you have already done this, skip this is turned on the projector or remote control to move on to confirm the selected menu item. Press on the projector or on the projector, the setup wizard appears to guide you 've completed the initial setup. 18 Operation Step...

User Manual
Page 19
...the background screen. See Timing chart on . 6. If you will continue displaying until an input signal is detected for input signals. The projector will search for 3 minutes, the projector automatically enters saving mode. You can also press SOURCE to enter a 6-digit password. Operation 19 power cord) to a lower setting. ... signal on page 21. 5. The current input signal being scanned appears. Please change to an input signal which is compatible with the projector's resolution or set the input signal to avoid possible dangers such as electric shock and fire. • If the...
...the background screen. See Timing chart on . 6. If you will continue displaying until an input signal is detected for input signals. The projector will search for 3 minutes, the projector automatically enters saving mode. You can also press SOURCE to enter a 6-digit password. Operation 19 power cord) to a lower setting. ... signal on page 21. 5. The current input signal being scanned appears. Please change to an input signal which is compatible with the projector's resolution or set the input signal to avoid possible dangers such as electric shock and fire. • If the...

User Manual
Page 20
Using the menus The projector is the overview of the OSD menu. 1 2 PICTURE Picture Mode User Mode Management Brightness Contrast 3 Color Tint Sharpness Advanced Reset Current Picture Mode PC 4 Main ... with On-Screen Display (OSD) menus for reference only, and may differ from the actual design. To access the OSD menu, press MENU on the projector or remote control. • Use the arrow keys ( / / / ) on the projector or remote control to move through the menu items. • Use OK on the...
Using the menus The projector is the overview of the OSD menu. 1 2 PICTURE Picture Mode User Mode Management Brightness Contrast 3 Color Tint Sharpness Advanced Reset Current Picture Mode PC 4 Main ... with On-Screen Display (OSD) menus for reference only, and may differ from the actual design. To access the OSD menu, press MENU on the projector or remote control. • Use the arrow keys ( / / / ) on the projector or remote control to move through the menu items. • Use OK on the...


