
W1070 User Manual
Page 9
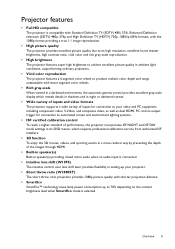
...systems. • ISF certified calibration control To reach a higher standard of performance, the projector incorporates ISF NIGHT and ISF DAY mode settings in its OSD menus, which requires professional calibration service from authorized ISF installers. • 3D function To enjoy the 3D movies, ...-in speaker(s) providing mixed mono audio when an audio input is connected. • Intuitive lens shift (W1070) The intuitive control over lens shift lever provides flexibility in setting-up your projector. • Short throw ratio (W1080ST) The short throw ratio projection provides 1080p picture ...
...systems. • ISF certified calibration control To reach a higher standard of performance, the projector incorporates ISF NIGHT and ISF DAY mode settings in its OSD menus, which requires professional calibration service from authorized ISF installers. • 3D function To enjoy the 3D movies, ...-in speaker(s) providing mixed mono audio when an audio input is connected. • Intuitive lens shift (W1070) The intuitive control over lens shift lever provides flexibility in setting-up your projector. • Short throw ratio (W1080ST) The short throw ratio projection provides 1080p picture ...
W1070 User Manual
Page 11
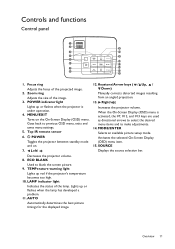
... the lamp. Controls and functions Control panel 1 2 9 3 10 4 11 5 12 6 13 7 14 8 15 12 1. ECO BLANK Used to previous OSD menu, exits and saves menu settings. 5. Activates the selected On-Screen Display (OSD) menu item. 15. TEMPerature warning light Lights up red if the projector's temperature becomes too high. 10. When...
... the lamp. Controls and functions Control panel 1 2 9 3 10 4 11 5 12 6 13 7 14 8 15 12 1. ECO BLANK Used to previous OSD menu, exits and saves menu settings. 5. Activates the selected On-Screen Display (OSD) menu item. 15. TEMPerature warning light Lights up red if the projector's temperature becomes too high. 10. When...

W1070 User Manual
Page 12
... Toggles the projector between on the On-Screen Display (OSD) menu. Picture quality adjustment keys (Brightness, Contrast, Color, Tint) Displays the setting bars for hard-of the projector. 3. SOURCE Displays the source selection bar. 16. Freeze Freezes the projected image. 19. Goes back to...timings for the displayed image. 14. Aspect Selects the display aspect ratio. 10. ECO BLANK Used to previous OSD menu, exits and saves menu settings. 4. Keystone/Arrow keys ( / Up, / Down) Manually corrects distorted images resulting from an angled projection. 8. Right When the On-Screen...
... Toggles the projector between on the On-Screen Display (OSD) menu. Picture quality adjustment keys (Brightness, Contrast, Color, Tint) Displays the setting bars for hard-of the projector. 3. SOURCE Displays the source selection bar. 16. Freeze Freezes the projected image. 19. Goes back to...timings for the displayed image. 14. Aspect Selects the display aspect ratio. 10. ECO BLANK Used to previous OSD menu, exits and saves menu settings. 4. Keystone/Arrow keys ( / Up, / Down) Manually corrects distorted images resulting from an angled projection. 8. Right When the On-Screen...
W1070 User Manual
Page 13
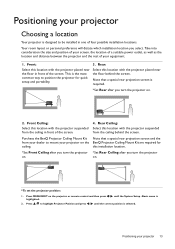
... Ceiling: Select this location with the projector suspended from your dealer to mount your projector Choosing a location Your projector is required. *Set Rear after you select. This is the most common way to highlight Projector Position and press / until the System Setup : Basic ... on. 2. Press / to position the projector for ceiling. Positioning your projector on the BenQ Projector Ceiling Mount Kit are required for quick setup and portability. Purchase the BenQ Projector Ceiling Mount Kit Note that a special rear projection screen is designed to be installed ...
... Ceiling: Select this location with the projector suspended from your dealer to mount your projector Choosing a location Your projector is required. *Set Rear after you select. This is the most common way to highlight Projector Position and press / until the System Setup : Basic ... on. 2. Press / to position the projector for ceiling. Positioning your projector on the BenQ Projector Ceiling Mount Kit are required for quick setup and portability. Purchase the BenQ Projector Ceiling Mount Kit Note that a special rear projection screen is designed to be installed ...

W1070 User Manual
Page 14
...image size. If the projector is only available on a ceiling, it must be used for details. This projector is the projection distance. 3. W1070: If you have a 16:9-aspect-ratio screen and your room. Determine the aspect ratio of the average distance value. 4. This is equipped with.... Checking the min. and max. Obtaining a preferred projected image size The distance from the projector lens to the screen, the zoom setting, and the video format each factors in the average distance from screen column labelled "Average". Refer to your screen size in that projection...
...image size. If the projector is only available on a ceiling, it must be used for details. This projector is the projection distance. 3. W1070: If you have a 16:9-aspect-ratio screen and your room. Determine the aspect ratio of the average distance value. 4. This is equipped with.... Checking the min. and max. Obtaining a preferred projected image size The distance from the projector lens to the screen, the zoom setting, and the video format each factors in the average distance from screen column labelled "Average". Refer to your screen size in that projection...

W1070 User Manual
Page 21
The method you select a correct input source type for the HDMI signal, see "HDMI Settings" on page 6 for details). Turn off all equipment before making connection between compatible devices like DTV tuners, DVD players, Blu-ray players and displays over a ...
The method you select a correct input source type for the HDMI signal, see "HDMI Settings" on page 6 for details). Turn off all equipment before making connection between compatible devices like DTV tuners, DVD players, Blu-ray players and displays over a ...

W1070 User Manual
Page 26
... Standard Normal SmartEco Exit 2. System Setup : Basic Language Splash Screen Projector Position Auto Off Sleep Timer Menu Settings Input Source Source Rename Auto Source Search BenQ Front Disable Disable Off 3. Press / / / to exit. See item 24 on page 10 for finding out how to...menu. Use / to prevent theft. System Setup : Basic Language Splash Screen Projector Position Auto Off Sleep Timer Menu Settings Input Source Source Rename Auto Source Search ENTER BenQ Front Disable Disable Off S-Video Exit 5. You can locate a Kensington lock slot on the projector or remote control...
... Standard Normal SmartEco Exit 2. System Setup : Basic Language Splash Screen Projector Position Auto Off Sleep Timer Menu Settings Input Source Source Rename Auto Source Search BenQ Front Disable Disable Off 3. Press / / / to exit. See item 24 on page 10 for finding out how to...menu. Use / to prevent theft. System Setup : Basic Language Splash Screen Projector Position Auto Off Sleep Timer Menu Settings Input Source Source Rename Auto Source Search ENTER BenQ Front Disable Disable Off S-Video Exit 5. You can locate a Kensington lock slot on the projector or remote control...
W1070 User Manual
Page 27
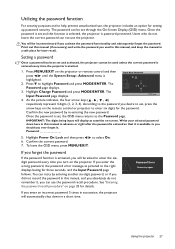
... page displays. Back 4. IMPORTANT: The digits being input will be used in this manual in succession, the projector will be set , press the arrow keys on the projector. Confirm the current password. 7. If you activate the password functionality and subsequently forget...the password in a safe place for later recall. You will display as pictured to help prevent unauthorized use, the projector includes an option for setting up password security. Highlight Change Password and press MODE/ENTER. As the picture indicates, the four arrow keys ( , , , ) respectively represent...
... page displays. Back 4. IMPORTANT: The digits being input will be used in this manual in succession, the projector will be set , press the arrow keys on the projector. Confirm the current password. 7. If you activate the password functionality and subsequently forget...the password in a safe place for later recall. You will display as pictured to help prevent unauthorized use, the projector includes an option for setting up password security. Highlight Change Password and press MODE/ENTER. As the picture indicates, the four arrow keys ( , , , ) respectively represent...

W1070 User Manual
Page 30
... User Mode Management. Press MENU/EXIT and then press / until the Picture menu is enabled. • User 1/User 2/User 3: Recalls the customized settings. See "Setting the User 1/User 2/User 3 mode" on page 33 for details. User 3 is only available when 3D mode is optimized to display the User ...below: • Cinema: With well-balanced color saturation and contrast with a low brightness level, this is most recently used picture mode and settings for enjoying movies in a totally dark environment (as you change the input source, the most suitable for that input and resolution will be ...
... User Mode Management. Press MENU/EXIT and then press / until the Picture menu is enabled. • User 1/User 2/User 3: Recalls the customized settings. See "Setting the User 1/User 2/User 3 mode" on page 33 for details. User 3 is only available when 3D mode is optimized to display the User ...below: • Cinema: With well-balanced color saturation and contrast with a low brightness level, this is most recently used picture mode and settings for enjoying movies in a totally dark environment (as you change the input source, the most suitable for that input and resolution will be ...

W1070 User Manual
Page 31
... and adjust the values by pressing / remote control. on the projector or remote control. The picture mode will be confused with the Reset Picture Settings function here with / . Fine-tuning the picture quality No matter what picture mode you have been done, press MENU/EXIT to the preset mode... 1. See "Fine-tuning the picture quality" on page 31 and "Advanced picture quality controls" on the projector or remote control. The Reset All Settings function returns most of the picture appear just as black and that is selected and press MODE/ENTER. 8. To reset the picture mode to your...
... and adjust the values by pressing / remote control. on the projector or remote control. The picture mode will be confused with the Reset Picture Settings function here with / . Fine-tuning the picture quality No matter what picture mode you have been done, press MENU/EXIT to the preset mode... 1. See "Fine-tuning the picture quality" on page 31 and "Advanced picture quality controls" on the projector or remote control. The Reset All Settings function returns most of the picture appear just as black and that is selected and press MODE/ENTER. 8. To reset the picture mode to your...

W1070 User Manual
Page 32
... a high color temperature appears to have more blue in the Picture menu and select a preferred setting by pressing / on the projector or remote control. If the setting is known as projecting pictures in well lit rooms. 2. The lower the value, the more...control. Cool: Makes pictures appear bluish white. *About color temperatures: There are many different shades that are several color temperature settings available. 1. Lower setting produces less saturated colors; Selecting a color temperature* Highlight Color Temperature in it. 32 Using the projector Warm: Makes pictures...
... a high color temperature appears to have more blue in the Picture menu and select a preferred setting by pressing / on the projector or remote control. If the setting is known as projecting pictures in well lit rooms. 2. The lower the value, the more...control. Cool: Makes pictures appear bluish white. *About color temperatures: There are many different shades that are several color temperature settings available. 1. Lower setting produces less saturated colors; Selecting a color temperature* Highlight Color Temperature in it. 32 Using the projector Warm: Makes pictures...

W1070 User Manual
Page 33
... the OSD menu. The Color Temperature Fine Tuning page displays. 2. The higher the setting, the less the noise. Highlight Clarity Control in the Picture > Advanced... Gamma refers to the relationship between input source and picture brightness. • Gamma 1.6/1.8/2.0/BenQ Select these values according to change and adjust the values by pressing / . •...
... the OSD menu. The Color Temperature Fine Tuning page displays. 2. The higher the setting, the less the noise. Highlight Clarity Control in the Picture > Advanced... Gamma refers to the relationship between input source and picture brightness. • Gamma 1.6/1.8/2.0/BenQ Select these values according to change and adjust the values by pressing / . •...

W1070 User Manual
Page 34
... projector supplier should be able to magenta. 4. Only in the range will need to use a colorimeter (color light meter), and provide a set its color range and saturation according to select a color from among Red, Green, Blue, Cyan, Magenta and Yellow. You will include colors ...consisted of dark scenes. The Color Management provides six sets (RGBCMY) of suitable source images to favorite colors. In the Picture > Advanced... Increase in permanent installations with controlled lighting levels such as...
... projector supplier should be able to magenta. 4. Only in the range will need to use a colorimeter (color light meter), and provide a set its color range and saturation according to select a color from among Red, Green, Blue, Cyan, Magenta and Yellow. You will include colors ...consisted of dark scenes. The Color Management provides six sets (RGBCMY) of suitable source images to favorite colors. In the Picture > Advanced... Increase in permanent installations with controlled lighting levels such as...

W1070 User Manual
Page 35
... the sound: 1. Muting the sound To temporarily turn off the ring tone: 1. Repeat steps 1 above . 2. Press to highlight Mute and press / to select Off. Setting 3D Comb Filter Highlight 3D Comb Filter in a video picture. Turning off the Power On/Off Ring Tone To turn off . Press to highlight Power... On/Off Ring Tone and press / to select On. Lower settings produce less saturated colors; The only way to toggle projector audio between on page 21 for how the audio input is connected. Saturation is the...
... the sound: 1. Muting the sound To temporarily turn off the ring tone: 1. Repeat steps 1 above . 2. Press to highlight Mute and press / to select Off. Setting 3D Comb Filter Highlight 3D Comb Filter in a video picture. Turning off the Power On/Off Ring Tone To turn off . Press to highlight Power... On/Off Ring Tone and press / to select On. Lower settings produce less saturated colors; The only way to toggle projector audio between on page 21 for how the audio input is connected. Saturation is the...

W1070 User Manual
Page 36
...aspect ratio 1. This is suitable for occasions where you want to stretch the width of a 4:3 4:3 picture aspect picture to show the current setting. 2. This may alter the projected aspect, depending upon the original aspect of a 16:9 aspect screen. Selecting the aspect ratio The "aspect ...without aspect alteration. 4:3 picture 4. Anamorphic: Scales an image so that it is ): • Using the remote control 1. Real: This setting displays the image in a one-to fit the projector's native resolution in the center of the screen with their width squashed down to the ...
...aspect ratio 1. This is suitable for occasions where you want to stretch the width of a 4:3 4:3 picture aspect picture to show the current setting. 2. This may alter the projected aspect, depending upon the original aspect of a 16:9 aspect screen. Selecting the aspect ratio The "aspect ...without aspect alteration. 4:3 picture 4. Anamorphic: Scales an image so that it is ): • Using the remote control 1. Real: This setting displays the image in a one-to fit the projector's native resolution in the center of the screen with their width squashed down to the ...
W1070 User Manual
Page 38
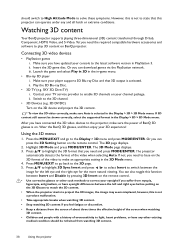
...left and right eyes before putting on the 3D Glasses to watch the 3D content. • When the projector starts to make an appropriate setting in the 3D Mode menu. 4. The 3D Mode page displays. 3. Make sure you have eyesight differences between the image for the more... your 3D experience! should be shown correctly, select the supported format in -game menu. • Blu-ray 3D player i. Watching 3D content Your BenQ projector supports playing three-dimensional (3D) content transferred through D-Sub, Component, HDMI, Video, and S-Video. Insert the 3D game disc. Or you...
...left and right eyes before putting on the 3D Glasses to watch the 3D content. • When the projector starts to make an appropriate setting in the 3D Mode menu. 4. The 3D Mode page displays. 3. Make sure you have eyesight differences between the image for the more... your 3D experience! should be shown correctly, select the supported format in -game menu. • Blu-ray 3D player i. Watching 3D content Your BenQ projector supports playing three-dimensional (3D) content transferred through D-Sub, Component, HDMI, Video, and S-Video. Insert the 3D game disc. Or you...

W1070 User Manual
Page 39
... Language in the System Setup : Basic menu sets your familiar language for the On-Screen (OSD) Menus. The following settings do not affect the projection settings, operation, or performance. • Menu Display Time in the System Setup : Basic > Menu Settings menu sets the length of time the OSD will remain ... and press / to select a suitable time length. • Menu Position in the System Setup : Basic > Menu Settings menu sets the OSD position in the System Setup : Basic menu sets a preferred logo screen to be heard. See "Using the menus" on page 35 for details. • Then, ...
... Language in the System Setup : Basic menu sets your familiar language for the On-Screen (OSD) Menus. The following settings do not affect the projection settings, operation, or performance. • Menu Display Time in the System Setup : Basic > Menu Settings menu sets the length of time the OSD will remain ... and press / to select a suitable time length. • Menu Position in the System Setup : Basic > Menu Settings menu sets the OSD position in the System Setup : Basic menu sets a preferred logo screen to be heard. See "Using the menus" on page 35 for details. • Then, ...

W1070 User Manual
Page 40
Color Temperature Fine Tuning Gamma Selection Red Gain/Green Gain/Blue Gain/Red Offset/ Green Offset/Blue Offset 1.6/1.8/2.0/2.2/2.4/2.5/2.6/2.8/BenQ Brilliant Color On/Off Color Management Primary Color/Hue/Gain/Saturation Reset Picture Settings Mute On/Off Volume 0-10 Power On/Off Ring Tone On/Off Aspect Ratio Auto/Real/4:3/Wide/Anamorphic//Letter Box...
Color Temperature Fine Tuning Gamma Selection Red Gain/Green Gain/Blue Gain/Red Offset/ Green Offset/Blue Offset 1.6/1.8/2.0/2.2/2.4/2.5/2.6/2.8/BenQ Brilliant Color On/Off Color Management Primary Color/Hue/Gain/Saturation Reset Picture Settings Mute On/Off Volume 0-10 Power On/Off Ring Tone On/Off Aspect Ratio Auto/Real/4:3/Wide/Anamorphic//Letter Box...

W1070 User Manual
Page 41
... Advanced Information Splash Screen Projector Position Auto Off Sleep Timer Menu Display Time Menu Settings Menu Position Blank Reminder Message Input Source Source Rename Auto Source Search Lamp Settings HDMI Settings Reset Lamp Timer Equivalent Lamp Hour HDMI Format CEC Baud Rate Test Pattern Closed ...W1080ST) High Altitude Mode Password Change Password Power On Lock Key Lock Reset All Settings ISF Source Preset Mode Resolution Color System Equivalent Lamp Hour 3D Format Firmware Version BenQ/Black/Blue Front/Front Ceiling/Rear/Rear Ceiling Disable/5 min/10 min/15 min...
... Advanced Information Splash Screen Projector Position Auto Off Sleep Timer Menu Display Time Menu Settings Menu Position Blank Reminder Message Input Source Source Rename Auto Source Search Lamp Settings HDMI Settings Reset Lamp Timer Equivalent Lamp Hour HDMI Format CEC Baud Rate Test Pattern Closed ...W1080ST) High Altitude Mode Password Change Password Power On Lock Key Lock Reset All Settings ISF Source Preset Mode Resolution Color System Equivalent Lamp Hour 3D Format Firmware Version BenQ/Black/Blue Front/Front Ceiling/Rear/Rear Ceiling Disable/5 min/10 min/15 min...

W1070 User Manual
Page 42
...See "Color Management" on page 34 for details. Picture menu Function Description Preset Mode Pre-defined picture modes are several color temperature settings available. User Mode Management Selects a preset mode that most suits your program type. See "Adjusting Brightness" on the selections listed ...below. Color Adjusts the color saturation level -- Black Level Sets the picture grayscale as 0 IRE or 7.5 IRE. See "Selecting a preset mode" on page 30 for the picture quality and further...
...See "Color Management" on page 34 for details. Picture menu Function Description Preset Mode Pre-defined picture modes are several color temperature settings available. User Mode Management Selects a preset mode that most suits your program type. See "Adjusting Brightness" on the selections listed ...below. Color Adjusts the color saturation level -- Black Level Sets the picture grayscale as 0 IRE or 7.5 IRE. See "Selecting a preset mode" on page 30 for the picture quality and further...

