
W1060 user manual
Page 7
... color adjustments to your liking • Selectable quick cooling function makes the projector cool in a shorter time • One-key auto-adjustment to display the best picture quality • Digital keystone correction to correct distorted images • Adjustable color balance control for data/video display • High brightness projection lamp •... keystone function to deliver high reliability and ease of the projected image will vary depending on the ambient lighting conditions, selected input signal contrast/brightness settings, and is normal and expected behavior.
... color adjustments to your liking • Selectable quick cooling function makes the projector cool in a shorter time • One-key auto-adjustment to display the best picture quality • Digital keystone correction to correct distorted images • Adjustable color balance control for data/video display • High brightness projection lamp •... keystone function to deliver high reliability and ease of the projected image will vary depending on the ambient lighting conditions, selected input signal contrast/brightness settings, and is normal and expected behavior.

W1060 user manual
Page 10
... if the projector's temperature becomes too high. Used to previous OSD menu, When the On-Screen Display (OSD) exits and saves menu settings. POWER indicator light "Auto-adjusting the image" on page 42 for are used as directional arrows to select the details. See "Adjusting the...31 for the displayed image. LAMP indicator light Indicates the status of the lamp. See "Fine-tuning the image size Automatically determines the best picture and clarity" on page 58 for details. timings for details. Goes back to adjust the projected image 10. Decreases volume. Enacts...
... if the projector's temperature becomes too high. Used to previous OSD menu, When the On-Screen Display (OSD) exits and saves menu settings. POWER indicator light "Auto-adjusting the image" on page 42 for are used as directional arrows to select the details. See "Adjusting the...31 for the displayed image. LAMP indicator light Indicates the status of the lamp. See "Fine-tuning the image size Automatically determines the best picture and clarity" on page 58 for details. timings for details. Goes back to adjust the projected image 10. Decreases volume. Enacts...

W1060 user manual
Page 12
... See Displays the HDMI 2 source selection. BLANK details. 21. Turns off the remote control backlight for details. Automatically determines the best picture See "Switching input signal" on page 36 for about 10 seconds. CONTRAST 20. See "Adjusting Contrast" on page 29 for... timings for a further 10 seconds. 24. HDMI 2 Displays the CONTRAST setting bar. TINT : Navigates and changes settings in the OSD. Displays the TINT setting bar. AUTO Displays the S-VIDEO source selection. FREEZE 17. English 16. See Displays the PC ...
... See Displays the HDMI 2 source selection. BLANK details. 21. Turns off the remote control backlight for details. Automatically determines the best picture See "Switching input signal" on page 36 for about 10 seconds. CONTRAST 20. See "Adjusting Contrast" on page 29 for... timings for a further 10 seconds. 24. HDMI 2 Displays the CONTRAST setting bar. TINT : Navigates and changes settings in the OSD. Displays the TINT setting bar. AUTO Displays the S-VIDEO source selection. FREEZE 17. English 16. See Displays the PC ...

W1060 user manual
Page 29
...:9 aspect ratio. Operation 29 You can be scaled by the projector depending upon the 'aspect ratio' setting, which outputs at this : 1. Once detected, the selected source information will be connected to select the setting. For best display picture results, you switch between different input signals. See "Selecting the aspect ratio" on the screen...
...:9 aspect ratio. Operation 29 You can be scaled by the projector depending upon the 'aspect ratio' setting, which outputs at this : 1. Once detected, the selected source information will be connected to select the setting. For best display picture results, you switch between different input signals. See "Selecting the aspect ratio" on the screen...
W1060 user manual
Page 35
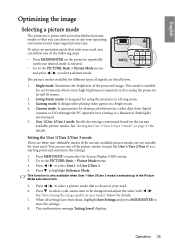
...User 3 mode" on page 35 for playing video games in well lit rooms. 2. Setting the User 1/User 2/User 3 mode There are three user-definable modes if the current available picture modes are listed below for best viewing in user modes" below . 1. Operation 35 This mode is suitable for your ...need . 6. You can follow one of signals are not suitable for environments where extra-high brightness is required, such as a starting point and customize the settings. 1. Cinema mode...
...User 3 mode" on page 35 for playing video games in well lit rooms. 2. Setting the User 1/User 2/User 3 mode There are three user-definable modes if the current available picture modes are listed below for best viewing in user modes" below . 1. Operation 35 This mode is suitable for your ...need . 6. You can follow one of signals are not suitable for environments where extra-high brightness is required, such as a starting point and customize the settings. 1. Cinema mode...

W1060 user manual
Page 40
...frame, it also analyzes each frame in the SYSTEM SETUP: Basic > Operation Settings > Sleep Timer from projecting as this could cause the blocking object to restore the image. Set the sleep timer in advance, ensuring the best possible picture. Hiding the image In order to draw the audience's full ...attention to the presenter, you can set the Sleep Timer interval so the projector powers off after a...
...frame, it also analyzes each frame in the SYSTEM SETUP: Basic > Operation Settings > Sleep Timer from projecting as this could cause the blocking object to restore the image. Set the sleep timer in advance, ensuring the best possible picture. Hiding the image In order to draw the audience's full ...attention to the presenter, you can set the Sleep Timer interval so the projector powers off after a...

W1060 user manual
Page 41
...' will still hear the audio even though the image is frozen on screen. Operating in a high altitude environment We recommend you use this projector can set the remote receiver in the upper left corner of increased fan speed necessary to improve overall system cooling and performance. To activate the High Altitude... and press / to select On. If the connected devices have active audio output, you will display in the SYSTEM SETUP: Basic > Remote Receiver menu. For best results, be over -heating.
...' will still hear the audio even though the image is frozen on screen. Operating in a high altitude environment We recommend you use this projector can set the remote receiver in the upper left corner of increased fan speed necessary to improve overall system cooling and performance. To activate the High Altitude... and press / to select On. If the connected devices have active audio output, you will display in the SYSTEM SETUP: Basic > Remote Receiver menu. For best results, be over -heating.

