

W1060 user manual
Page 6
... displaying inverted images for mounting the projector and ensure it is securely and safely installed. This will perform the secondary role of the ceiling mount bracket. Ceiling mounting the projector We want you intend to mount your projector on the projector and the base of restraining the projector should its attachment to your BenQ projector. English Safety Instructions (Continued) 16. If you also purchase a separate Kensington lock compatible security cable...
... displaying inverted images for mounting the projector and ensure it is securely and safely installed. This will perform the secondary role of the ceiling mount bracket. Ceiling mounting the projector We want you intend to mount your projector on the projector and the base of restraining the projector should its attachment to your BenQ projector. English Safety Instructions (Continued) 16. If you also purchase a separate Kensington lock compatible security cable...
W1060 user manual
Page 7
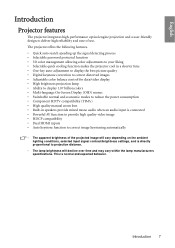
... the signal detecting process • Selectable password protected function • 3D color management allowing color adjustments to your liking • Selectable quick cooling function makes the projector cool in a shorter time • One-key auto-adjustment to display the best picture quality • Digital keystone correction to correct distorted images • Adjustable color balance control for data/video display • High brightness projection lamp • Ability to display 1.07 billion colors • Multi-language On-Screen Display...
... the signal detecting process • Selectable password protected function • 3D color management allowing color adjustments to your liking • Selectable quick cooling function makes the projector cool in a shorter time • One-key auto-adjustment to display the best picture quality • Digital keystone correction to correct distorted images • Adjustable color balance control for data/video display • High brightness projection lamp • Ability to display 1.07 billion colors • Multi-language On-Screen Display...

W1060 user manual
Page 10
... the displayed image. timings for details. See "Adjusting the Turns on the On-Screen Display (OSD) sound level" on page 31 for details. 13. See "Indicators" on page 40 for 1. See Used to previous OSD menu, When the On-Screen Display (OSD) exits and saves menu settings. FOCUS/ZOOM Ring details. See "Hiding "Switching input signal" on page 29 for the image" on page 58 for details. TEMPerature indicator light 1 Lights up 6 8 or flashes when the lamp...
... the displayed image. timings for details. See "Adjusting the Turns on the On-Screen Display (OSD) sound level" on page 31 for details. 13. See "Indicators" on page 40 for 1. See Used to previous OSD menu, When the On-Screen Display (OSD) exits and saves menu settings. FOCUS/ZOOM Ring details. See "Hiding "Switching input signal" on page 29 for the image" on page 58 for details. TEMPerature indicator light 1 Lights up 6 8 or flashes when the lamp...

W1060 user manual
Page 11
... page 29 for details. EXIT: Goes back to projector. 2. INFO Starts the INFORMATION function. mode and on the On-Screen Display (OSD) menu. "Switching input signal" on page 31 for details. 5. See "Using the menus" on page 25 for details. 6. HDMI 1 Displays the HDMI 1 source selection. MODE/ ENTER MODE: Choose a suitable preset mode for details. Up cursor/Keystone ( / ) : Navigates and changes settings in the OSD. MUTE Mutes the built-in...
... page 29 for details. EXIT: Goes back to projector. 2. INFO Starts the INFORMATION function. mode and on the On-Screen Display (OSD) menu. "Switching input signal" on page 31 for details. 5. See "Using the menus" on page 25 for details. 6. HDMI 1 Displays the HDMI 1 source selection. MODE/ ENTER MODE: Choose a suitable preset mode for details. Up cursor/Keystone ( / ) : Navigates and changes settings in the OSD. MUTE Mutes the built-in...
W1060 user manual
Page 15
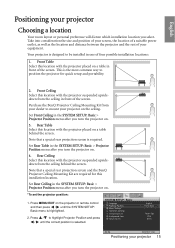
... projection screen is the most common way to position the projector for this installation location. SYSTEM SETUP: Basic Language Projector Position Menu Settings Operation Settings Remote Receiver Background Color Splash Screen English Front Table Front+Top Blue BenQ PC Menu/Back Exit Positioning your equipment. Set Front Ceiling in the SYSTEM SETUP: Basic > Projector Position menu after you turn the projector on . 3. Set Rear Table in one of your projector 15 This is required. Purchase the BenQ Projector Ceiling Mounting...
... projection screen is the most common way to position the projector for this installation location. SYSTEM SETUP: Basic Language Projector Position Menu Settings Operation Settings Remote Receiver Background Color Splash Screen English Front Table Front+Top Blue BenQ PC Menu/Back Exit Positioning your equipment. Set Front Ceiling in the SYSTEM SETUP: Basic > Projector Position menu after you turn the projector on . 3. Set Rear Table in one of your projector 15 This is required. Purchase the BenQ Projector Ceiling Mounting...

W1060 user manual
Page 19
...; With a VGA cable: • With a HDMI cable: Your computer must be controlled by the projector On-Screen Display (OSD) menus. Take a VGA cable and connect one end of the cable to the HDMI jack of the projector (mixed mono) speakers in the following diagram: Notebook or desktop computer 3 2 1 1. Audio cable COMPONENT S-VIDEO VIDEO COMPUTER PC HDMI-1 HDMI-2 RS-232 USB AUDIO L AUDIO R OUT IN Many notebooks do not turn on the notebook. Locate a function key...
...; With a VGA cable: • With a HDMI cable: Your computer must be controlled by the projector On-Screen Display (OSD) menus. Take a VGA cable and connect one end of the cable to the HDMI jack of the projector (mixed mono) speakers in the following diagram: Notebook or desktop computer 3 2 1 1. Audio cable COMPONENT S-VIDEO VIDEO COMPUTER PC HDMI-1 HDMI-2 RS-232 USB AUDIO L AUDIO R OUT IN Many notebooks do not turn on the notebook. Locate a function key...

W1060 user manual
Page 24
... diagram: AV device Video Cable COMPONENT S-VIDEO VIDEO COMPUTER PC HDMI-1 HDMI-2 RS-232 USB AUDIO L AUDIO R OUT IN Audio Cable • If the selected video image is not displayed after the projector is turned on page 42 for details. 24 Connections To connect the projector to a composite Video source device: 1. Once connected, the audio can use . See "Adjusting the sound" on and operating correctly. To connect the projector to an Audio source device: 1. Take a suitable audio cable and connect one end to the...
... diagram: AV device Video Cable COMPONENT S-VIDEO VIDEO COMPUTER PC HDMI-1 HDMI-2 RS-232 USB AUDIO L AUDIO R OUT IN Audio Cable • If the selected video image is not displayed after the projector is turned on page 42 for details. 24 Connections To connect the projector to a composite Video source device: 1. Once connected, the audio can use . See "Adjusting the sound" on and operating correctly. To connect the projector to an Audio source device: 1. Take a suitable audio cable and connect one end to the...

W1060 user manual
Page 25
... desired input signal. See "Switching input signal" on page 42 for details. English Operation Starting up tone sounds. If the frequency/resolution of the screen. Check that the POWER indicator light on a blank screen. If the projector doesn't detect a valid signal, the message 'No Signal' will run the cooling fan for details. 5. To turn the projector on the projector or remote control to start the projector and a start to enter a five digit password. Please change to an input signal which is found. power cable) only...
... desired input signal. See "Switching input signal" on page 42 for details. English Operation Starting up tone sounds. If the frequency/resolution of the screen. Check that the POWER indicator light on a blank screen. If the projector doesn't detect a valid signal, the message 'No Signal' will run the cooling fan for details. 5. To turn the projector on the projector or remote control to start the projector and a start to enter a five digit password. Please change to an input signal which is found. power cable) only...

W1060 user manual
Page 26
... Reference Mode Brightness 50 Contrast 0 Color 0 Tint 0 Sharpness 0 Flesh Tone 0 Save Settings Reset Picture Settings User 1 Living Room SYSTEM SETUP: Basic Language Projector Position Menu Settings Operation Settings Remote Receiver Background Color Splash Screen English Front Table Front+Top Blue BenQ PC Menu/Back Exit PC Menu/Back Exit 2. Otherwise, purchase a lock, such as a Kensington lock, to prevent theft. A Kensington security cable lock is equipped with On-Screen Display (OSD) menus for making various adjustments and settings. Operating Settings Remote...
... Reference Mode Brightness 50 Contrast 0 Color 0 Tint 0 Sharpness 0 Flesh Tone 0 Save Settings Reset Picture Settings User 1 Living Room SYSTEM SETUP: Basic Language Projector Position Menu Settings Operation Settings Remote Receiver Background Color Splash Screen English Front Table Front+Top Blue BenQ PC Menu/Back Exit PC Menu/Back Exit 2. Otherwise, purchase a lock, such as a Kensington lock, to prevent theft. A Kensington security cable lock is equipped with On-Screen Display (OSD) menus for making various adjustments and settings. Operating Settings Remote...
W1060 user manual
Page 27
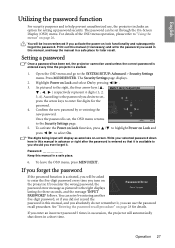
.... The digits being input will be asked to enter the five-digit password every time you activate the power-on page 28 for three seconds, and the message 'INPUT PASSWORD' follows. You can be used in this manual in succession, the projector will be inconvenienced if you turn on Lock and select On by re-entering the new password. As pictured to the SYSTEM SETUP: Advanced > Security Settings menu. Write...
.... The digits being input will be asked to enter the five-digit password every time you activate the power-on page 28 for three seconds, and the message 'INPUT PASSWORD' follows. You can be used in this manual in succession, the projector will be inconvenienced if you turn on Lock and select On by re-entering the new password. As pictured to the SYSTEM SETUP: Advanced > Security Settings menu. Write...
W1060 user manual
Page 28
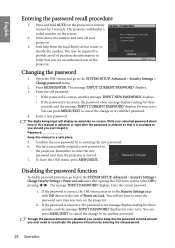
... by entering the old password. 28 Operation Press and hold AUTO on -screen. Seek help from the local BenQ service center to the SYSTEM SETUP: Advanced > Security Settings > Change Security Settings > Power on Lock. Select Off by re-entering the new password. 6. If the password is incorrect, the password error message displays lasting for three seconds, and the message 'INPUT CURRENT PASSWORD' displays for your projector. If the password is disabled, you turn off your retry. English...
... by entering the old password. 28 Operation Press and hold AUTO on -screen. Seek help from the local BenQ service center to the SYSTEM SETUP: Advanced > Security Settings > Change Security Settings > Power on Lock. Select Off by re-entering the new password. 6. If the password is incorrect, the password error message displays lasting for three seconds, and the message 'INPUT CURRENT PASSWORD' displays for your projector. If the password is disabled, you turn off your retry. English...

W1060 user manual
Page 29
... level of picture clarity. Press / until the DISPLAY menu is in use an input signal which may cause some image distortion or loss of the projected image will change the color space. Once detected, the selected source information will be connected to select the setting. For best display picture results, you switch between different input signals. See "Selecting the aspect ratio" on the projector or remote control. Press to highlight Color Space Conversion...
... level of picture clarity. Press / until the DISPLAY menu is in use an input signal which may cause some image distortion or loss of the projected image will change the color space. Once detected, the selected source information will be connected to select the setting. For best display picture results, you switch between different input signals. See "Selecting the aspect ratio" on the projector or remote control. Press to highlight Color Space Conversion...

W1060 user manual
Page 38
... the PICTURE: Advanced menu and adjust the values by pressing / on the projector or remote control. Adjusting Brilliant Color Highlight Brilliant Color in the PICTURE: Advanced > Color Temperature Fine Tuning > White Balance menu and adjust the values by pressing / on the projector or remote control. This adjustable item utilizes a new color-processing algorithm and system level enhancements to measure color reproduction. Proper color management can project any image from among 1.6/1.8/2.0/2.2/2.4/2.6/2.8. These tools are common in video...
... the PICTURE: Advanced menu and adjust the values by pressing / on the projector or remote control. Adjusting Brilliant Color Highlight Brilliant Color in the PICTURE: Advanced > Color Temperature Fine Tuning > White Balance menu and adjust the values by pressing / on the projector or remote control. This adjustable item utilizes a new color-processing algorithm and system level enhancements to measure color reproduction. Proper color management can project any image from among 1.6/1.8/2.0/2.2/2.4/2.6/2.8. These tools are common in video...

W1060 user manual
Page 43
... in the SYSTEM SETUP: Basic menu sets your language. • Splash Screen in the SYSTEM SETUP: Basic menu sets a preferred logo screen to select a suitable time frame. • Menu position in the SYSTEM SETUP: Basic > Menu Settings menu sets the OSD position in five locations. Operation 43 Use / to be displayed during the cooling process. • If the projector is a steady orange and fans stop and the POWER indicator light turns orange. • Lamp life results will run for...
... in the SYSTEM SETUP: Basic menu sets your language. • Splash Screen in the SYSTEM SETUP: Basic menu sets a preferred logo screen to select a suitable time frame. • Menu position in the SYSTEM SETUP: Basic > Menu Settings menu sets the OSD position in five locations. Operation 43 Use / to be displayed during the cooling process. • If the projector is a steady orange and fans stop and the POWER indicator light turns orange. • Lamp life results will run for...

W1060 user manual
Page 49
... 12 hours. Menu display time Sets the length of time. See "Using the menus" on page 43 for details. See "Setting the Sleep Timer" on a ceiling or behind a screen, or with one or more mirrors. Four options are available: BenQ logo, Blue screen, or Black screen. Selects background appearance when there is from the remote control. The range is no input signal is activated, once elapsed the image will display during projector start...
... 12 hours. Menu display time Sets the length of time. See "Using the menus" on page 43 for details. See "Setting the Sleep Timer" on a ceiling or behind a screen, or with one or more mirrors. Four options are available: BenQ logo, Blue screen, or Black screen. Selects background appearance when there is from the remote control. The range is no input signal is activated, once elapsed the image will display during projector start...
W1060 user manual
Page 50
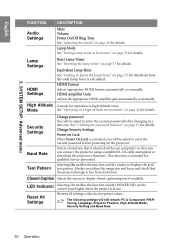
... 5. HDMI Amplifier Gain Adjusts the appropriate HDMI amplifier gain automatically or manually. Change Security Settings Power on page 53 for details. Lamp Mode See "Setting Lamp mode as Economic" on Lock When Power On Lock is in use. See "Utilizing the password function" on the control panel lights when the project is activated, you can connect the projector using a suitable RS-232 cable and update or download the projector's firmware. Closed Caption Selects the screen to the factory preset values. LED Indicator Selecting...
... 5. HDMI Amplifier Gain Adjusts the appropriate HDMI amplifier gain automatically or manually. Change Security Settings Power on page 53 for details. Lamp Mode See "Setting Lamp mode as Economic" on Lock When Power On Lock is in use. See "Utilizing the password function" on the control panel lights when the project is activated, you can connect the projector using a suitable RS-232 cable and update or download the projector's firmware. Closed Caption Selects the screen to the factory preset values. LED Indicator Selecting...

W1060 user manual
Page 53
... menu, press Menu/Exit. Setting Auto Power Off This function allows the projector to turn off automatically if no input source is a consumable item . The Lamp Settings page displays. 3. Extending lamp life The projection lamp is detected after a set period of time to prevent unnecessary waste of lamp life. The projector will not automatically shut down in Economic mode also extends the lamp operation life. To obtain the lamp hour information: 1. To keep the lamp life as long as Economic Using Economic mode...
... menu, press Menu/Exit. Setting Auto Power Off This function allows the projector to turn off automatically if no input source is a consumable item . The Lamp Settings page displays. 3. Extending lamp life The projection lamp is detected after a set period of time to prevent unnecessary waste of lamp life. The projector will not automatically shut down in Economic mode also extends the lamp operation life. To obtain the lamp hour information: 1. To keep the lamp life as long as Economic Using Economic mode...
W1060 user manual
Page 54
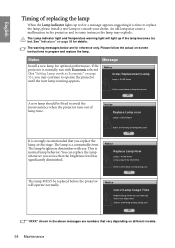
... replace the lamp whenever you notice that vary depending on -screen instructions to avoid the inconvenience when the projector runs out of lamp time. Please follow the actual on different models. 54 Maintenance The lamp is normally run with use. English Timing of replacing the lamp When the Lamp indicator lights up if the lamp becomes too hot. The Lamp indicator light and Temperature warning light will operate normally. Notice Order Replacement Lamp Lamp > XXXX Hours Order a new lamp at lamp.benq...
... replace the lamp whenever you notice that vary depending on -screen instructions to avoid the inconvenience when the projector runs out of lamp time. Please follow the actual on different models. 54 Maintenance The lamp is normally run with use. English Timing of replacing the lamp When the Lamp indicator lights up if the lamp becomes too hot. The Lamp indicator light and Temperature warning light will operate normally. Notice Order Replacement Lamp Lamp > XXXX Hours Order a new lamp at lamp.benq...

W1060 user manual
Page 55
..., always turn the power on with the lamp cover removed. • Do not insert your local hazardous waste regulations to the human eyes caused by fractured lamp. 1. Maintenance 55 Turn the power off and disconnect the power cord before changing the lamp. • To reduce the risk of severe burns, allow the projector to cool for at least 45 minutes before replacing the lamp. •...
..., always turn the power on with the lamp cover removed. • Do not insert your local hazardous waste regulations to the human eyes caused by fractured lamp. 1. Maintenance 55 Turn the power off and disconnect the power cord before changing the lamp. • To reduce the risk of severe burns, allow the projector to cool for at least 45 minutes before replacing the lamp. •...

W1060 user manual
Page 59
... SOURCE key on the projector or remote control. Troubleshooting 59 The projector and the screen are too far away from the power cable. Remedy Please see "Entering the password recall procedure" on the projector, and plug the power cord into the power outlet. Remedy Plug the power cord into the AC inlet on page 28 for details. Remove the obstacle. Remedy Turn the video source on and check that it is connected...
... SOURCE key on the projector or remote control. Troubleshooting 59 The projector and the screen are too far away from the power cable. Remedy Please see "Entering the password recall procedure" on the projector, and plug the power cord into the power outlet. Remedy Plug the power cord into the AC inlet on page 28 for details. Remove the obstacle. Remedy Turn the video source on and check that it is connected...


