

User Manual
Page 2
...18 Connecting a computer 19 Connecting Video source devices ...... 20 Operation 22 Starting up the projector 22 Adjusting the projected image 23 Using the menus 25 Securing the projector 28 Switching input signal 30 Selecting the aspect ratio 31 Optimizing the image 33 Advanced picture...39 Adjusting the sound 40 Locking control keys 40 Personalizing the projector menu display 41 Select the lamp saver mode 41 Shutting down the projector 42 Menu operation 43 Maintenance 58 Care of the projector 58 Lamp information 59 Troubleshooting......... 66 Specifications 67 Dimensions 68 ...
...18 Connecting a computer 19 Connecting Video source devices ...... 20 Operation 22 Starting up the projector 22 Adjusting the projected image 23 Using the menus 25 Securing the projector 28 Switching input signal 30 Selecting the aspect ratio 31 Optimizing the image 33 Advanced picture...39 Adjusting the sound 40 Locking control keys 40 Personalizing the projector menu display 41 Select the lamp saver mode 41 Shutting down the projector 42 Menu operation 43 Maintenance 58 Care of the projector 58 Lamp information 59 Troubleshooting......... 66 Specifications 67 Dimensions 68 ...
User Manual
Page 3
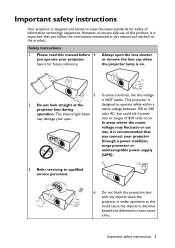
...of ±10 volts occur. Always open the lens shutter or remove the lens cap when the projector lamp is NOT stable. Do not look straight at the projector lens during operation. designed to operate safely within a mains voltage between 100 to qualified service personnel.... In some countries, the line voltage is on the product. you connect your eyes. In areas where the mains voltage may damage your projector through a power stabilizer, surge protector or uninterruptible power supply (UPS). 3. However, to ensure safe use of information technology equipment. Safety ...
...of ±10 volts occur. Always open the lens shutter or remove the lens cap when the projector lamp is NOT stable. Do not look straight at the projector lens during operation. designed to operate safely within a mains voltage between 100 to qualified service personnel.... In some countries, the line voltage is on the product. you connect your eyes. In areas where the mains voltage may damage your projector through a power stabilizer, surge protector or uninterruptible power supply (UPS). 3. However, to ensure safe use of information technology equipment. Safety ...

User Manual
Page 4
... 8. Under no circumstances should come into contact with live parts. Never replace the lamp assembly or any other covers. It is unplugged. 12. Allow the projector to cool for approximately 45 minutes prior to break on an unstable cart, stand, or table. The product may sense some heated air and odor... on rare occasions. There are dangerous high voltages inside which may cause death if you should you may fall, sustaining serious damage. 11. When the projector is under operation, you ever undo or remove any electronic components unless the...
... 8. Under no circumstances should come into contact with live parts. Never replace the lamp assembly or any other covers. It is unplugged. 12. Allow the projector to cool for approximately 45 minutes prior to break on an unstable cart, stand, or table. The product may sense some heated air and odor... on rare occasions. There are dangerous high voltages inside which may cause death if you should you may fall, sustaining serious damage. 11. When the projector is under operation, you ever undo or remove any electronic components unless the...

User Manual
Page 5
... 50 cm clearance from walls and free flow of , or damage to back. Locations where temperatures may cause a malfunction of air around the projector. - Locations where excessive humidity, dust, or cigarette smoke may result in any of a car with an ambient temperature above 40°C /... 104°F - Using the projector when it is poorly ventilated or confined. Safety Instructions (Continued) 13. Locations with all windows rolled up. - the following environments. - Do ...
... 50 cm clearance from walls and free flow of , or damage to back. Locations where temperatures may cause a malfunction of air around the projector. - Locations where excessive humidity, dust, or cigarette smoke may result in any of a car with an ambient temperature above 40°C /... 104°F - Using the projector when it is poorly ventilated or confined. Safety Instructions (Continued) 13. Locations with all windows rolled up. - the following environments. - Do ...

User Manual
Page 6
... place any objects upon it from the power supply's wall socket and call BenQ to the projector does become wet, projector. Besides probable physical damage to the projector, doing so may result in damage to have the projector serviced. 17. Safety Instructions (Continued) 16. If the or resulting in accidents and possible injury. 19. Use...
... place any objects upon it from the power supply's wall socket and call BenQ to the projector does become wet, projector. Besides probable physical damage to the projector, doing so may result in damage to have the projector serviced. 17. Safety Instructions (Continued) 16. If the or resulting in accidents and possible injury. 19. Use...
User Manual
Page 7
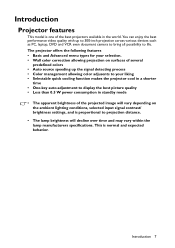
...to display the best picture quality • Less than 0.5 W power consumption in the world. Introduction 7 Introduction Projector features This model is one of the best projectors available in standby mode • The apparent brightness of several predefined colors • Auto source speeding up to 300... on the ambient lighting conditions, selected input signal contrast/ brightness settings, and is normal and expected behavior. The projector offers the following features • Basic and Advanced menu types for your liking • Selectable quick cooling function makes the...
...to display the best picture quality • Less than 0.5 W power consumption in the world. Introduction 7 Introduction Projector features This model is one of the best projectors available in standby mode • The apparent brightness of several predefined colors • Auto source speeding up to 300... on the ambient lighting conditions, selected input signal contrast/ brightness settings, and is normal and expected behavior. The projector offers the following features • Basic and Advanced menu types for your liking • Selectable quick cooling function makes the...
User Manual
Page 8
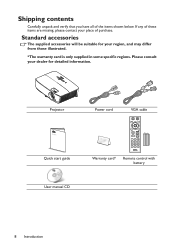
Shipping contents Carefully unpack and verify that you have all of purchase. Standard accessories The supplied accessories will be suitable for detailed information. Projector Power cord VGA cable QDiugiictkal SPtraortjeGctuoirde Quick start guide User manual CD Warranty card* Remote control with battery 8 Introduction If any of these items are missing, please contact your region, and may differ from those illustrated. *The warranty card is only supplied in some specific regions. Please consult your dealer for your place of the items shown below.
Shipping contents Carefully unpack and verify that you have all of purchase. Standard accessories The supplied accessories will be suitable for detailed information. Projector Power cord VGA cable QDiugiictkal SPtraortjeGctuoirde Quick start guide User manual CD Warranty card* Remote control with battery 8 Introduction If any of these items are missing, please contact your region, and may differ from those illustrated. *The warranty card is only supplied in some specific regions. Please consult your dealer for your place of the items shown below.

User Manual
Page 10
... 13. Ceiling mount holes 21. Audio output jack 15. Rear adjuster foot 19. AC power cord inlet 18 22 21 20 19 18 10 Introduction Projector exterior view Front/upper side 1 2 8 7 3 6 4 5 Rear/lower side 9 10 11 12 13 141516 17 1. Front IR remote sensor 7. Audio input jack 14. External control panel...
... 13. Ceiling mount holes 21. Audio output jack 15. Rear adjuster foot 19. AC power cord inlet 18 22 21 20 19 18 10 Introduction Projector exterior view Front/upper side 1 2 8 7 3 6 4 5 Rear/lower side 9 10 11 12 13 141516 17 1. Front IR remote sensor 7. Audio input jack 14. External control panel...
User Manual
Page 11
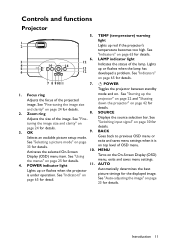
...Using Turns on the On-Screen Display (OSD) the menus" on picture timings for details. Controls and functions Projector 5. Introduction 11 Lights 13 up red if the projector's temperature becomes too high. SOURCE Adjusts the size of OSD menu. details. 3. on page exits and saves ...menu settings when it is under operation. page 65 for details. 6. See "Fine-tuning the image size down the projector" on page 42 for and clarity" on page 65 for details. Zoom ring 8. See "Indicators" on page 24 for details. 7 8 91011...
...Using Turns on the On-Screen Display (OSD) the menus" on picture timings for details. Controls and functions Projector 5. Introduction 11 Lights 13 up red if the projector's temperature becomes too high. SOURCE Adjusts the size of OSD menu. details. 3. on page exits and saves ...menu settings when it is under operation. page 65 for details. 6. See "Fine-tuning the image size down the projector" on page 42 for and clarity" on page 65 for details. Zoom ring 8. See "Indicators" on page 24 for details. 7 8 91011...

User Manual
Page 12
...for page 25 for details. 13. Keystone/Arrow keys ( / Up, 14. See adjustments. You can purchase a BenQ projector ceiling mount kit from the place you use a non-BenQ brand projector ceiling mount kit, there is activated, the #12 and #14 keys are used as directional arrows to select the... desired menu items and to make Used to an improper attachment through the use a proper fitting BenQ projector ceiling mount kit and that you ensure it securely to mount your BenQ projector. See "Correcting keystone" on the ceiling, we need to bring this safety matter to your ...
...for page 25 for details. 13. Keystone/Arrow keys ( / Up, 14. See adjustments. You can purchase a BenQ projector ceiling mount kit from the place you use a non-BenQ brand projector ceiling mount kit, there is activated, the #12 and #14 keys are used as directional arrows to select the... desired menu items and to make Used to an improper attachment through the use a proper fitting BenQ projector ceiling mount kit and that you ensure it securely to mount your BenQ projector. See "Correcting keystone" on the ceiling, we need to bring this safety matter to your ...

User Manual
Page 13
... 3 Displays Bright mode menu. 5 9. OK 2. Selects an available picture setup mode. Up/ Down/ Left/ Right Turns on page 29 for details. 14. Toggles projector audio between on page 25 for details. BRIGHT BOOST BRIGHT BOOST is activated, the keys are used as settings. OFF 10 21 22 Turns off... the projector. See "Correcting keystone" on the On-Screen Display (OSD) menu, exits and saves menu When the On-Screen Display (OSD) menu is not ...
... 3 Displays Bright mode menu. 5 9. OK 2. Selects an available picture setup mode. Up/ Down/ Left/ Right Turns on page 29 for details. 14. Toggles projector audio between on page 25 for details. BRIGHT BOOST BRIGHT BOOST is activated, the keys are used as settings. OFF 10 21 22 Turns off... the projector. See "Correcting keystone" on the On-Screen Display (OSD) menu, exits and saves menu When the On-Screen Display (OSD) menu is not ...

User Manual
Page 14
...Displays the color management setting 19. Displays the sharpness setting bar. Make sure that might obstruct the infra-red beam. • Operating the projector from the front Approx. 30° 14 Introduction Infra-Red (IR) remote control sensor is located on the front of time with on ...page 23 for details. 23. CONTRAST 21. ECO BLANK picture timings for a period of the projector. See "Hiding the Displays the lamp power mode selection bar (Normal/Economic/ image" on the projector that there are no obstacles between the remote control and the sensor should not exceed 8 meters (~...
...Displays the color management setting 19. Displays the sharpness setting bar. Make sure that might obstruct the infra-red beam. • Operating the projector from the front Approx. 30° 14 Introduction Infra-Red (IR) remote control sensor is located on the front of time with on ...page 23 for details. 23. CONTRAST 21. ECO BLANK picture timings for a period of the projector. See "Hiding the Displays the lamp power mode selection bar (Normal/Economic/ image" on the projector that there are no obstacles between the remote control and the sensor should not exceed 8 meters (~...
User Manual
Page 16
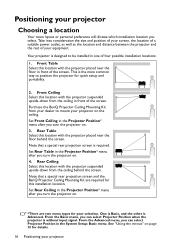
... are two menu types for quick setup and portability. 2. This is required. Front Ceiling Select this location with the projector suspended upside-down from the ceiling behind the screen. Purchase the BenQ Projector Ceiling Mounting Kit from the ceiling in front of four possible installation locations: 1. Rear Table Select this installation location. Set...
... are two menu types for quick setup and portability. 2. This is required. Front Ceiling Select this location with the projector suspended upside-down from the ceiling behind the screen. Purchase the BenQ Projector Ceiling Mounting Kit from the ceiling in front of four possible installation locations: 1. Rear Table Select this installation location. Set...

User Manual
Page 17
...16:9 and the projected picture is 4069 mm and with a vertical offset of 105 mm. Projection dimensions Refer to permanently install the projector, you should physically test the projection size and distance using a 120-inch screen, the average projection distance is 16:9 Screen size ... distance Inch mm (max. (min. Diagonal Diagonal Screen H Center of this row shows that a 150'' (about 4.0 m) screen is 5100 mm. BenQ recommends that it , so as to the screen, the zoom setting (if available), and the video format each factors in situ before calculating the appropriate...
...16:9 and the projected picture is 4069 mm and with a vertical offset of 105 mm. Projection dimensions Refer to permanently install the projector, you should physically test the projection size and distance using a 120-inch screen, the average projection distance is 16:9 Screen size ... distance Inch mm (max. (min. Diagonal Diagonal Screen H Center of this row shows that a 150'' (about 4.0 m) screen is 5100 mm. BenQ recommends that it , so as to the screen, the zoom setting (if available), and the video format each factors in situ before calculating the appropriate...

User Manual
Page 18
VGA cable 3. USB Cable 5. VGA to : 1. Use the correct signal cables for each source. 3. Ensure the cables are firmly inserted. 1 2 3 1 45 4 5 6 5 1. Video cable 18 Connection Audio cable (PC/RCA jack) 2. Connection When connecting a signal source to the projector, be sure to DVI-A cable 4. Turn all equipment off before making any connections. 2. HDMI cable 6.
VGA cable 3. USB Cable 5. VGA to : 1. Use the correct signal cables for each source. 3. Ensure the cables are firmly inserted. 1 2 3 1 45 4 5 6 5 1. Video cable 18 Connection Audio cable (PC/RCA jack) 2. Connection When connecting a signal source to the projector, be sure to DVI-A cable 4. Turn all equipment off before making any connections. 2. HDMI cable 6.

User Manual
Page 19
... be included with a monitor symbol on the notebook. Refer to your notebook's documentation to find your external speakers (not supplied). To connect the projector to the D-Sub output socket of the computer. 2. A Mac adapter is needed if you can connect to your notebook's key combination. If ... audio cable and connect one end of the cable to the audio output jack of the computer, and the other end of the projector. Press FN and the labeled function key simultaneously. If you connect audio output signal from electronics stores. • For detailed connection methods...
... be included with a monitor symbol on the notebook. Refer to your notebook's documentation to find your external speakers (not supplied). To connect the projector to the D-Sub output socket of the computer. 2. A Mac adapter is needed if you can connect to your notebook's key combination. If ... audio cable and connect one end of the cable to the audio output jack of the computer, and the other end of the projector. Press FN and the labeled function key simultaneously. If you connect audio output signal from electronics stores. • For detailed connection methods...

User Manual
Page 20
...audio can use to connect to the device. Connecting Video source devices You need to reassess which method you can be controlled by the projector On-Screen Display (OSD) menus. See "Audio" on and operating correctly. Take a HDMI cable and connect one of the above connecting... methods, however each provides a different level of video quality. Connect the other end of matching terminals on both the projector and the Video source device as described below: Terminal name HDMI 1/HDMI 2 Video Terminal appearance HDM1 1/HDMI 2 Reference "Connecting a HDMI source...
...audio can use to connect to the device. Connecting Video source devices You need to reassess which method you can be controlled by the projector On-Screen Display (OSD) menus. See "Audio" on and operating correctly. Take a HDMI cable and connect one of the above connecting... methods, however each provides a different level of video quality. Connect the other end of matching terminals on both the projector and the Video source device as described below: Terminal name HDMI 1/HDMI 2 Video Terminal appearance HDM1 1/HDMI 2 Reference "Connecting a HDMI source...

User Manual
Page 21
... with this procedure. • If not, you will need to reassess which method you can use to connect to a Video source device: 1. To connect the projector to the device. If you wish, you wish to make use another suitable audio cable and connect one end of the cable to the AUDIO... correct video source has been selected, check that the signal cables have been connected correctly. If the selected video image is not displayed after the projector is turned on page 44 for details. Also check that the Video source device is turned on the...
... with this procedure. • If not, you will need to reassess which method you can use to connect to a Video source device: 1. To connect the projector to the device. If you wish, you wish to make use another suitable audio cable and connect one end of the cable to the AUDIO... correct video source has been selected, check that the signal cables have been connected correctly. If the selected video image is not displayed after the projector is turned on page 44 for details. Also check that the Video source device is turned on the...

User Manual
Page 22
... the other is found. See "Using the menus" on automatically after power has been applied. • Please use the original accessories (e.g. The projector will turn on page 25 for details. 22 Operation Turn on . See "Direct Power On" on the remote control to start up, a ...power cable) only with the device to adjust the image clearness. The POWER flashes and stays orange when the projector is activated, the projector will start up the projector 1. If the projector is still hot from previous activity, it will continue displaying until an input signal is Advanced. In the later...
... the other is found. See "Using the menus" on automatically after power has been applied. • Please use the original accessories (e.g. The projector will turn on page 25 for details. 22 Operation Turn on . See "Direct Power On" on the remote control to start up, a ...power cable) only with the device to adjust the image clearness. The POWER flashes and stays orange when the projector is activated, the projector will start up the projector 1. If the projector is still hot from previous activity, it will continue displaying until an input signal is Advanced. In the later...

User Manual
Page 23
... and lift the front of Frequency and Clock to lock the foot in Intelligent Auto Adjustment function will re-adjust the values of the projector. Screw the rear adjuster feet to change the image height and projection angle. Auto-adjusting the image In some cases, you press the...with 1 front adjuster foot and 2 rear adjuster feet. Within 3 seconds, the built-in position. Adjusting the projected image Adjusting the projection angle The projector is close to optimize the picture quality. You may need to the exhaust vent where hot air comes from the lamp may cause damage to...
... and lift the front of Frequency and Clock to lock the foot in Intelligent Auto Adjustment function will re-adjust the values of the projector. Screw the rear adjuster feet to change the image height and projection angle. Auto-adjusting the image In some cases, you press the...with 1 front adjuster foot and 2 rear adjuster feet. Within 3 seconds, the built-in position. Adjusting the projected image Adjusting the projection angle The projector is close to optimize the picture quality. You may need to the exhaust vent where hot air comes from the lamp may cause damage to...


